How to Implement Interactive Notification in your iOS Application?
Receiving and managing notifications on iOS is a nightmare until the introduction of Notification Centre in iOS 5. Android long held an advantage over iOS in terms of how easily users could interact. However, Apple has evolved how its premiere OS presents notification from third-party apps, but has limited developers to title and string of text.
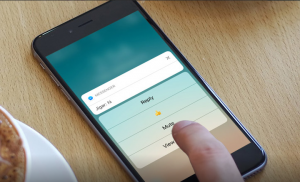
Interactive Notification in iOS 8 represented the first true enhancement to the functionality of notifications on the OS, allowing third–party developers to surface a handful of options for user action following a swipe on a new alert. For example – Received a new chat message? Swipe to initiate a reply; Got an alert for a new comment on Facebook. Tap the “Like” button without leaving the lock screen. This simple functionality coupled with smarter Notification Centre help users to interact with their application in a better way.
Using interactive notifications, customers will have multiple options to respond using simple button taps, such as:
- Share
- Shop Now
- Download
- Check In
- Accept
Or, if the customer is not interested, the following options can be given:
- Dismiss
- No Thanks
- Decline
How to Implement Interactive Notification in your Application
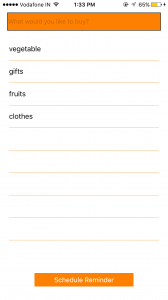
Let’s assume, we have a shopping application and a user who wants to shop certain products and have created a list of things he/she wants to shop at a particular time of the day. The user can schedule a reminder within the application with the list
First thing in the application is that we are using local notifications instead of receiving push notifications. So in this case, we need to register our local push notifications.
So let’s get started.
STEP 1 – Place below code in your AppDelegate.swift.
func application(_ application: UIApplication, didReceive notification: UILocalNotification) {
// Do something serious in a real app.
print(“Received Local Notification:”)
print(notification.alertBody)
}
func application(_ application: UIApplication, handleActionWithIdentifier identifier: String?, for notification: UILocalNotification, completionHandler: @escaping () -> Void) {
if identifier == “editList” {
NotificationCenter.default.post(name: Notification.Name(rawValue: “modifyListNotification”), object: nil)
}
else if identifier == “trashAction” {
NotificationCenter.default.post(name: Notification.Name(rawValue: “deleteListNotification”), object: nil)
}
completionHandler()
}
STEP 2 – Add observers for these two identifiers for “edit list” and “trash Action”.
Add the code given below in the viewDidLoad of view controller:
NotificationCenter.default.addObserver(self, selector: #selector(ViewController.handleModifyListNotification), name: NSNotification.Name(rawValue: “modifyListNotification”), object: nil)
NotificationCenter.default.addObserver(self, selector: #selector(ViewController.handleDeleteListNotification), name: NSNotification.Name(rawValue: “deleteListNotification”), object: nil)
Setup your code for local notification. Now the key thing would be Interactive Notification. Now, create a method named setupNotificationSettings like below:
func setupNotificationSettings() {
let notificationSettings: UIUserNotificationSettings! = UIApplication.shared.currentUserNotificationSettings
if (notificationSettings.types == UIUserNotificationType()){
// Specify the notification types.
var notificationTypes: UIUserNotificationType = [.alert, .sound]
// Specify the notification actions.
var justInformAction = UIMutableUserNotificationAction()
justInformAction.identifier = “justInform”
justInformAction.title = “OK, got it”
justInformAction.activationMode = UIUserNotificationActivationMode.background
justInformAction.isDestructive = false
justInformAction.isAuthenticationRequired = false
var modifyListAction = UIMutableUserNotificationAction()
modifyListAction.identifier = “editList”
modifyListAction.title = “Edit list”
modifyListAction.activationMode = UIUserNotificationActivationMode.foreground
modifyListAction.isDestructive = false
modifyListAction.isAuthenticationRequired = true
var trashAction = UIMutableUserNotificationAction()
trashAction.identifier = “trashAction”
trashAction.title = “Delete list”
trashAction.activationMode = UIUserNotificationActivationMode.background
trashAction.isDestructive = true
trashAction.isAuthenticationRequired = true
let actionsArray = NSArray(objects: justInformAction, modifyListAction, trashAction)
let actionsArrayMinimal = NSArray(objects: trashAction, modifyListAction)
// Specify the category related to the above actions.
var shoppingListReminderCategory = UIMutableUserNotificationCategory()
shoppingListReminderCategory.identifier = “shoppingListReminderCategory”
shoppingListReminderCategory.setActions(actionsArray as! [UIUserNotificationAction], for: UIUserNotificationActionContext.default)
shoppingListReminderCategory.setActions(actionsArrayMinimal as! [UIUserNotificationAction], for: UIUserNotificationActionContext.minimal)
let categoriesForSettings = NSSet(objects: shoppingListReminderCategory)
// Register the notification settings.
//let newNotificationSettings = UIUserNotificationSettings(forTypes: notificationTypes, categories: categoriesForSettings)
let newNotificationSettings = UIUserNotificationSettings(types: [.alert, .badge, .sound], categories: categoriesForSettings as! Set<UIUserNotificationCategory>)
UIApplication.shared.registerUserNotificationSettings(newNotificationSettings)
}
}
Also add the below code snippet:
func scheduleLocalNotification() {
let localNotification = UILocalNotification()
localNotification.fireDate = fixNotificationDate(datePicker.date)
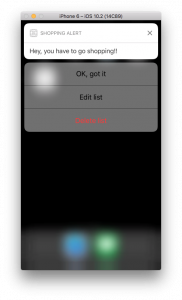
localNotification.alertBody = “Hey, you have to go shopping!!”
localNotification.alertAction = “View List”
localNotification.category = “shoppingListReminderCategory”
UIApplication.shared.scheduleLocalNotification(localNotification)
}
This is the text which will be shown on top when reminder notification is received. In this, we add the localNotification category so that it can be identified as the interactive notification.
In the setupNotificationSettings method, we will be adding different actions that can be performed by a user when swiping on the notification banner.
Now call setupNotificationSettings method in your viewdidload of view controller.
Now when you build your application:
Adding Items to List
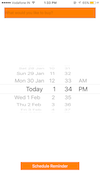
Schedule Reminder
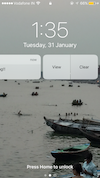
Now let’s go to the Home Page when the notification arrives:
On a swipe, we will be shown different options to choose from.
You can now easily use the above steps to integrate the Interactive Notifications on iOS application.