LESS is More
Ok Now, CSS is fine and all but it is a tedious process to cover all the different states and selectors.
And if your Stylesheets are un-organized like mine(confession?) then you would know it is painful, any change breaks so many things and when it doesn’t you know you have missed a couple of selectors that need to be updated.
So in order to be a bit more organized with some peace of mind we can use some of the CSS pre-processors which can help a great deal, making sense of what you’ve written is better than your plain old CSS.
Now there are many pre-processors of CSS but LESS is something i believe is more balanced between ease and power, which is a good thing.
What is LESS
To put it simply it is a Super-set of CSS, Allowing us to use variables, operations and mixins which makes our life easier.
Wouldn’t it be great if I defined a color once and use that everywhere,
only having to change it at a single place?
Wait did i just say variables? Quite a few times while writing CSS you would have thought well i am using a this particular color throughout and if i have to change it, i would have to replace it everywhere, followed by some occasional swearing (I’m not judging), wouldn’t it be great if i defined a color once and use that everywhere and while updating only have to change at a single place, LESS provides us the same.
How do i use it
Using less is very simple and straightforward, It can run in the browser, or server (via NPM).
Lets keep it simple and use it on the server by compiling it to normal browser friendly CSS.
First we need to install LESS, using our trustworthy NPM (requires Node.js) we can do :
$ npm install -g less
This will install it Globally i.e it can be run from the command line from anywhere.
To convert our `.less` files to CSS we need to compile it using the less compiler we just installed, like:
$ lessc styles.less styles.css
And we can use this CSS file as we normally do.
Getting to know LESS
Now that we know how to install and compile LESS, we can move onto LESS itself and see what all it provides.
>> Variables
Variables in LESS are similar to any programming language out there, you simply define a variable with a specific name and value, and then you can use it any where in the file.
LESS variables are actually constants meaning they are defined only once.
@my_awesome_text_color: #bada55;
@pad_10: 10px;

h1, h2, h3, h4 {
    color: @my_awesome_text_color;
}
.some-class {
    color: @my_awesome_text_color;
    padding: @pad_10;
}
In the above example we defined two variables, namely @my_awesome_text_color and @pad_10, which we can use in our entire file since they are defined on top of the file outside of any rules. Variables can be defined inside of rules as well, but then they will only be accessible inside that rule only.
If need arises to update the values, we simply change at one place, and voila. Easy, huh !
Mathematical Operations
We can perform basic mathematical operations on variables in LESS such as Addition, Multiplication, Subtration, Division.
@my_value: 10px;

p.some-class {
    padding: @my_value + 2;
    border: @my_value;
}
Here we simple performed a simple addition to a variable. Manipulating variables is really easy.
We can do similar things to colors, i.e. we can add, subtract colors from colors.
Confusing? let’s see an example:
@my_color: #990055;

p.some-class {
    /* color will be #CC3388 */
    color: @my_color + #333333;

    border: 1px solid @my_color + #111111;
}
Here we are performing the same basic calculations, but on colors, which is very powerful once put into action.
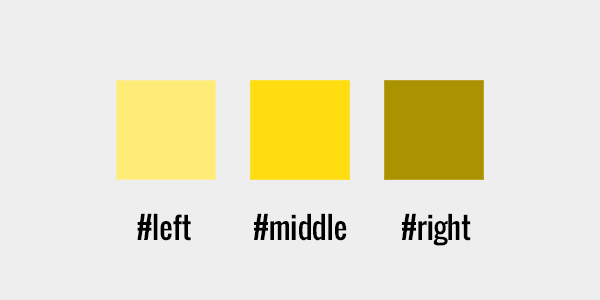
>> Color Functions
Apart from adding and subtracting color, we can also use some inbuilt functions such as saturate(), desaturate(), lighten(), darken() etc. on colors.
Let’s see some examples:
@my_color: #ffdd00;

#left {
    background: lighten(@my_color, 20%);
}
#middle {
    background: @my_color;
}
#right {
    background: darken(@my_color, 20%);
}
@my_color: #0088aa;
#left {
    background: desaturate(@my_color, 40%);
}
#right {
    background: saturate(@my_color, 40%);
}
There you go, easily manageable color modifications using these functions rather than fiddling with exact Hex equivalents.
Rule Nesting
Remember specifying multiple different ruls within a specific selector? Something along the lines of:
#box p { ... }
#box article { ... }
#box article span { ... }
and so on …
Now if we have to change any of that, we would have to make a guess as to which rules will/will not be affected by the change, which most of time are not on the money. Now have a look at the following:
#box {
    article {
        span { ... }
    }
    p { ... }
    .some-class { ... }
}
Wow, that looks so obvious, it is simlar as the HTML markup we write, intuitive … eh!
No more wild guesswork, easy to manage, produces the same CSS we are used to. It is so obvious that this should be in actual CSS spec.
Mixins
Reuse, anybody. Mixins are basically rules that we can use wherever we want to and only writing the actual rule once.
Let’s see mixins in action:
.red-border {
    border: 1px solid #d00;
}
.some-class {
    padding: 10px;
    color: #fff;
    .red-border;    //mixin
}
Wait, what? Yup we used another rule without rewriting anything, sweet huh !
But wait there’s more .. (Yup, I have watched too many TeleBrands Ads!)
If you think that is pretty cool, wait till you see this:
.red-border (@size) {
    border: @size solid #d00;
}
.some-class {
    padding: 10px;
    color: #fff;
    .red-border(3px);    //parametric mixin
}
This awesomeness is called parametric mixins, you can pass arguments to these mixins, making them work sort of like a function.
Now, that is very usable, but lets assume you have a similar sized border everywhere apart from a couple of places, then you pass same value from everywhere, which may not seem like a very re-usable idea, and you’re right, it’s not.
So what can LESS provide for that, well default values:
.red-border (@size:1px) {
    border: @size solid #d00;
}
.some-class {
    padding: 10px;
    color: #fff;
    .red-border;        //1px border
}
.some-other {
    .red-border(3px);   //3px border
}
Now that is useful, very useful indeed. Infact you can have as many arguments as you want.
*Note: You may notice that LESS supports the multiline comments like CSS does, but it also supports those //.. single line comments as well.
Strings
Quite a few times we may want to use arbitary strings in variables such as image paths etc. But how can we store the path and then append more as per our need. For example we have a url http://somesite.com/assets/img/ which we want to use in our stylesheets, since the URL will be same, it makes sense to keep it in a variable, but the actual asset name will be different, so how do we append that to our URL?
Like this:
@images: "http://somesite.com/assets/img";

.img1 {
    background: url('@{images}/img1.jpg');
}
.img2 {
    background: url('@{images}/img2.jpg');
}
We use the { .. } to specify string interpolation to achieve the same.
Now that we have seen the absolute power and simplicity of LESS Pre-processor, it should be much less effort to manage and write highly re-usable and effective CSS.
We can also use various build tools such as GRUNT etc. to automate the process of compiling and minifying these *.less files to CSS, but that is another topic in itself. Hope you enjoyed this basic introduction of LESS CSS.
Till next time,
Ciao.