
InAppPurchase in Android
InAppPurchase, as the name suggests is for purchasing items from within the application i.e., it allows you to put a price tag on your products and sell them in the market using your Android application.
Integration of InAppPurchase in android can be achieved in few steps as follows:
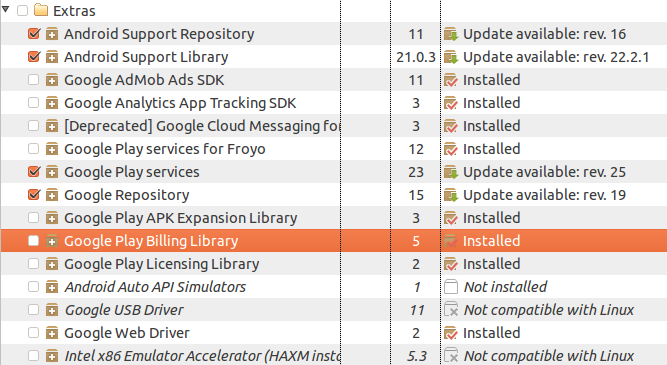
1. The very first you need to do is install Google Play billing library in SDK, check if your SDK has billing package, open SDK manager->extras->Google Play Billing. If it’s not installed, then check it and click install.
2. After Installation, inside SDK->Extras->Google->play_billing folder resides a file i.e., IInAppBillingService.aidl that needs to include with the project that require Google Play billing support. Also there is a sample application present at path samples/TrivialDrive/src/com/example/android/trivialdrivesample/util which consists of classes inside Util folder which will ease the Integration of billing into the application.
3. To get support of inAppBilling you must have following permission in Manifest file.
[sourcecode language=”java”]
<uses-permission android:name="com.android.vending.BILLING"/>
[/sourcecode]
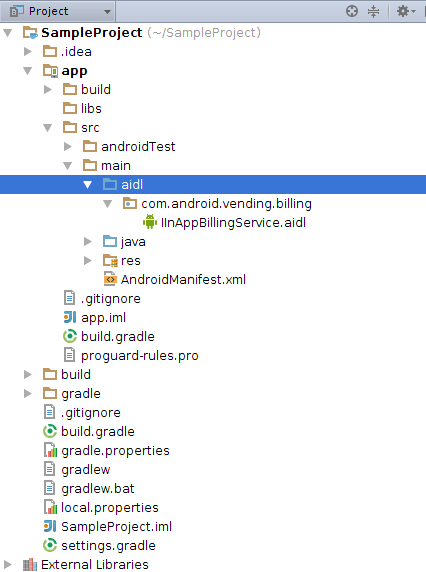
4. Next Step is to add IInAppBillingService.aidl to the project.
Create a new aidl Folder inside src , inside folder create a package com.android.vending.billing and place IInAppBillingService.aidl here.
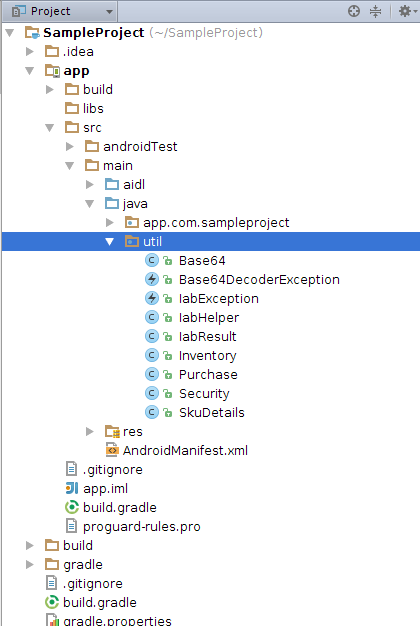
5. After that go to path SDK/Extras/google/play_billing/samples/TrivialDrive/src/com/example/android/trivialdrivesample/util and copy all nine files and Create a new Package inside project->src->java->inappbilling/util and place all nine files there.
6. Now to start the Billing service you need an unique public licence key. To obtain public license key you need to register your application within the Google Play Developer Console. Visit http://play.google.com/apps/publish.
7. On the home page of Google developer console click Add new application, choose language, enter title and then click upload Apk.

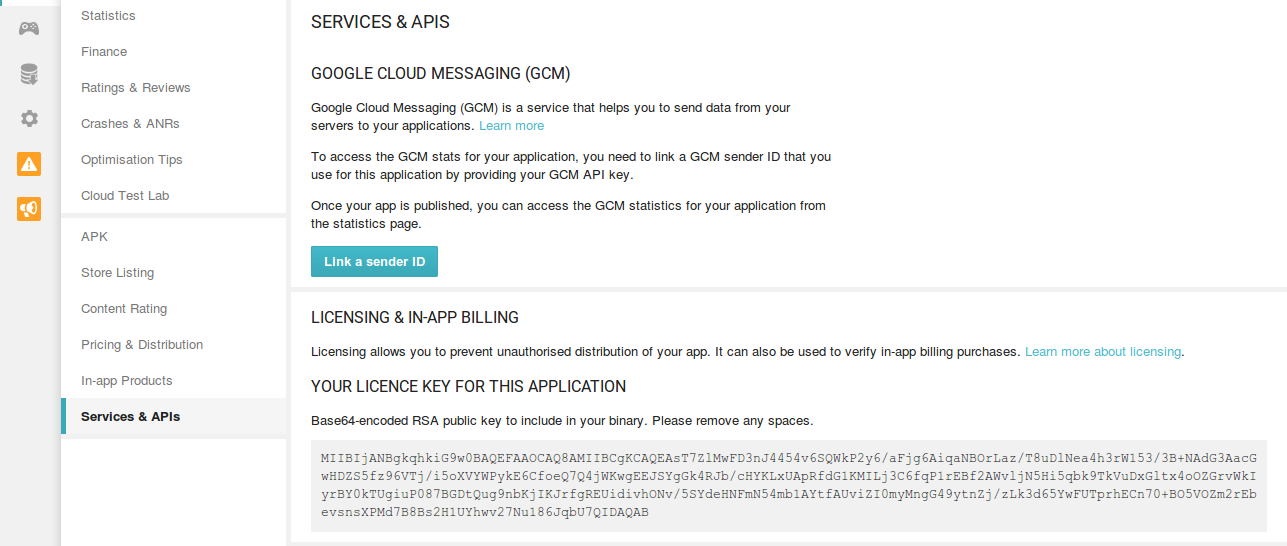
8. After the application has been registered, click on Services & APIs section to display the Base64-encoded public licence key for the application.
9. After having the licence key, create a new BillingActivity extends Activity and initialize billing process as follows:
[sourcecode language=”java”]
public class InAppBillingActivity extends Activity{
Button mButtonBuy;
private static final String TAG =
"com.sampleproject.inappbilling";
IabHelper mHelper;
static final String ITEM_SKU = "product_id";
IabHelper.OnIabPurchaseFinishedListener mPurchaseFinishedListener;
IabHelper.OnConsumeFinishedListener mConsumeFinishedListener;
@Override
protected void onCreate(Bundle savedInstanceState) {
super.onCreate(savedInstanceState);
setContentView(R.layout.activity_in_app_billing);
mButtonBuy = (Button) findViewById(R.id.button_buy);
mButtonBuy.setEnabled(true);
String base64EncodedPublicKey = "PUT YOUR LICENCE KEY HERE";
mHelper = new IabHelper(this, base64EncodedPublicKey);
mHelper.startSetup(new
IabHelper.OnIabSetupFinishedListener() {
public void onIabSetupFinished(IabResult result) {
if (!result.isSuccess()) {
Log.d(TAG, "Billing setup failed" +
result);
} else {
Log.d(TAG, "Billing is ok");
}
}
});
}
}
[/sourcecode]
10. Run your app on physical Android device (Not on emulator) and make sure that you are getting “Billing setup ok” message on logcat. After that, create products on Google developer console, which needs to sell within the application as follows:
11. To create Products, you need to upload a signed apk of your app. So generate a signed apk of your app from Android studio and upload it in alpha or beta testing.

12. Now Select option InAPP products and click Add new Product and it will ask you – What type of product would you like to add? (Managed or subscription).
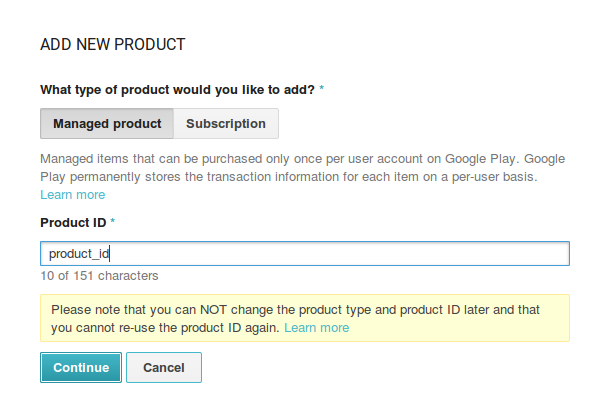
- Managed are the items that can be purchased only once per user account on Google Play. Google Play permanently stores the transaction information for each item on a per-user basis.
- Subscriptions let you sell content, services or features in your app with automated, recurring billing.
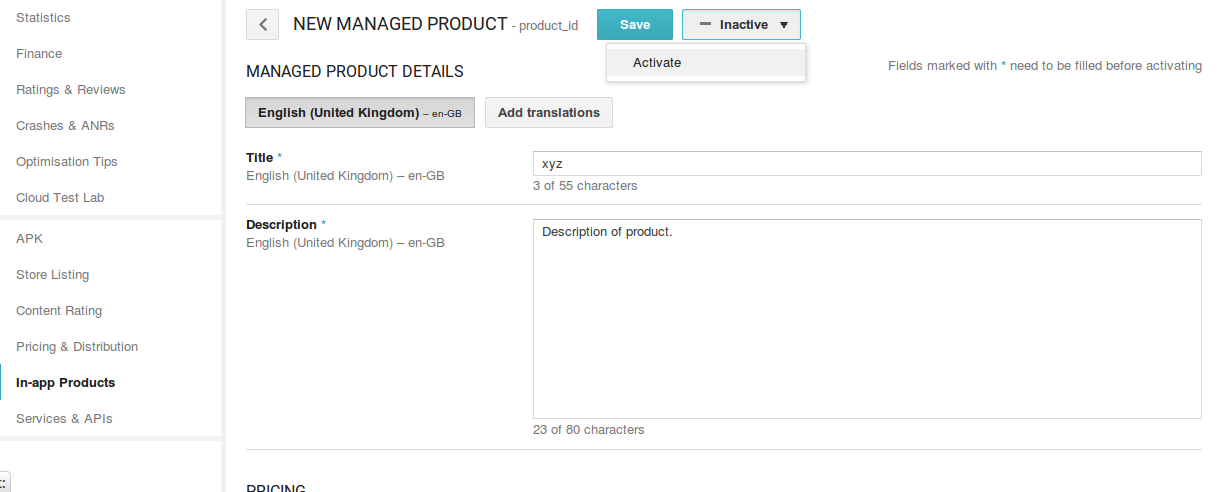
13. Give it a product id and continue to fill the details of your product. Save and activate.
14. Now place a buy button inside activity_billing.xml as
[sourcecode language=”java”]
<Button
android:layout_width="wrap_content"
android:layout_height="wrap_content"
android:text="@string/buy_string"
android:id="@+id/buyButton"
android:layout_centerVertical="true"
android:layout_centerHorizontal="true"
android:onClick="buyClick"/>;
[/sourcecode]
15. Click of button will call buyClick() and buyclick will have :
[sourcecode language=”java”]
public void buyClick(View view) {
mHelper.launchPurchaseFlow(this, PRODUCT_ID, 10001,
mPurchaseFinishedListener, "mypurchasetoken");
}
[/sourcecode]
it will have five parameters i.e
- The first argument is the calling
Activity. - The second argument is the product ID (also called its SKU) of the item to purchase.
- The third argument is a request code value. This value can be any positive integer. Google Play returns this request code to the calling
Activity’sonActivityResultalong with the purchase response. - The fourth argument is a listener that is notified when the purchase operation has completed and handles the purchase response from Google Play.
- Last is the token for the identification of the product.
This will launch the purchase flow with the entered product_id and after finishing it will invoke the purchsedFinishedlistener.i.e:
[sourcecode language=”java”]
IabHelper.OnIabPurchaseFinishedListener mPurchaseFinishedListener
= new IabHelper.OnIabPurchaseFinishedListener() {
public void onIabPurchaseFinished(IabResult result,
Purchase purchase)
{
if (result.isFailure()) {
// Handle error
return;
}
else if (purchase.getSku().equals(ITEM_SKU)) {
consumeItem();
buyButton.setEnabled(false);
}
}
};
[/sourcecode]
The purchase finished listener checks the success of the purchase, it also matches the SKU(Product_Id) of the purchased item with the one specified in the purchase request. On success, you should consume the purchase to allow the user to buy it again.
If the purchase is successful it will invoke method consumeItem() which will be like:
[sourcecode language=”java”]
public void consumeItem() {
mHelper.queryInventoryAsync(mReceivedInventoryListener);
}
IabHelper.QueryInventoryFinishedListener mReceivedInventoryListener
= new IabHelper.QueryInventoryFinishedListener() {
public void onQueryInventoryFinished(IabResult result,
Inventory inventory) {
if (result.isFailure()) {
// Handle failure
} else {
mHelper.consumeAsync(inventory.getPurchase(ITEM_SKU),
mConsumeFinishedListener);
}
}
};
[/sourcecode]
Now method consumeItem() will query the billing system to make sure that the purchase has been made. if it’s successful then it will call the queryInventoryAsync() method of the mHelper object. ReceivedInventoryListener is notified when the query operation has completed and handles the query response. It is safe to make this call from your main thread.
If the item has been purchased, the listener will consume the item via a call to the consumeAsync() method of the mHelper object.
On finished consumption, it will invoke the consumeFinishedListener:
[sourcecode language=”java”]
IabHelper.OnConsumeFinishedListener mConsumeFinishedListener =
new IabHelper.OnConsumeFinishedListener() {
public void onConsumeFinished(Purchase purchase,
IabResult result) {
if (result.isSuccess()) {
success message
} else {
// handle error
}
}
};
[/sourcecode]
16. So this will be the flow. Now open Security.java file present at path src/main/java/InappBilling/util to check whether the purchase is made from valid signature key, which is returned from the Google Play billing server and modify the verifyPurchase() as follows:
[sourcecode language=”java”]
public static boolean verifyPurchase(String base64PublicKey,
String signedData, String signature) {
if (TextUtils.isEmpty(signedData) ||
TextUtils.isEmpty(base64PublicKey) ||
TextUtils.isEmpty(signature)) {
Log.e(TAG, "Purchase verification failed: missing data.");
if (BuildConfig.DEBUG) {
return true;
}
return false;
}
PublicKey key = Security.generatePublicKey(base64PublicKey);
return Security.verify(key, signedData, signature);
}
[/sourcecode]
This will ensure that when the application is running in debug mode the method does not report an error if the signature is missing when a static response SKU purchase is verified. By checking for debug mode in this code, we ensure that this security check will function as intended when the application is built in release mode.
17. Now Go back to Google Developer console and select APK section.
For testing the flow, click Manage list of testers. This will ask for Google community. So create a Google Plus community and share the link of app with the community members.
Note: For more details, visit http://developer.android.com/google/play/billing/billing_overview.html


Great Article. I liked it.