


Why a Startup Check Isn’t Enough
In Part 2, we covered JailMonkey — a library that checks whether a device is rooted or jailbroken when your app launches.
That check matters, but it has a gap.
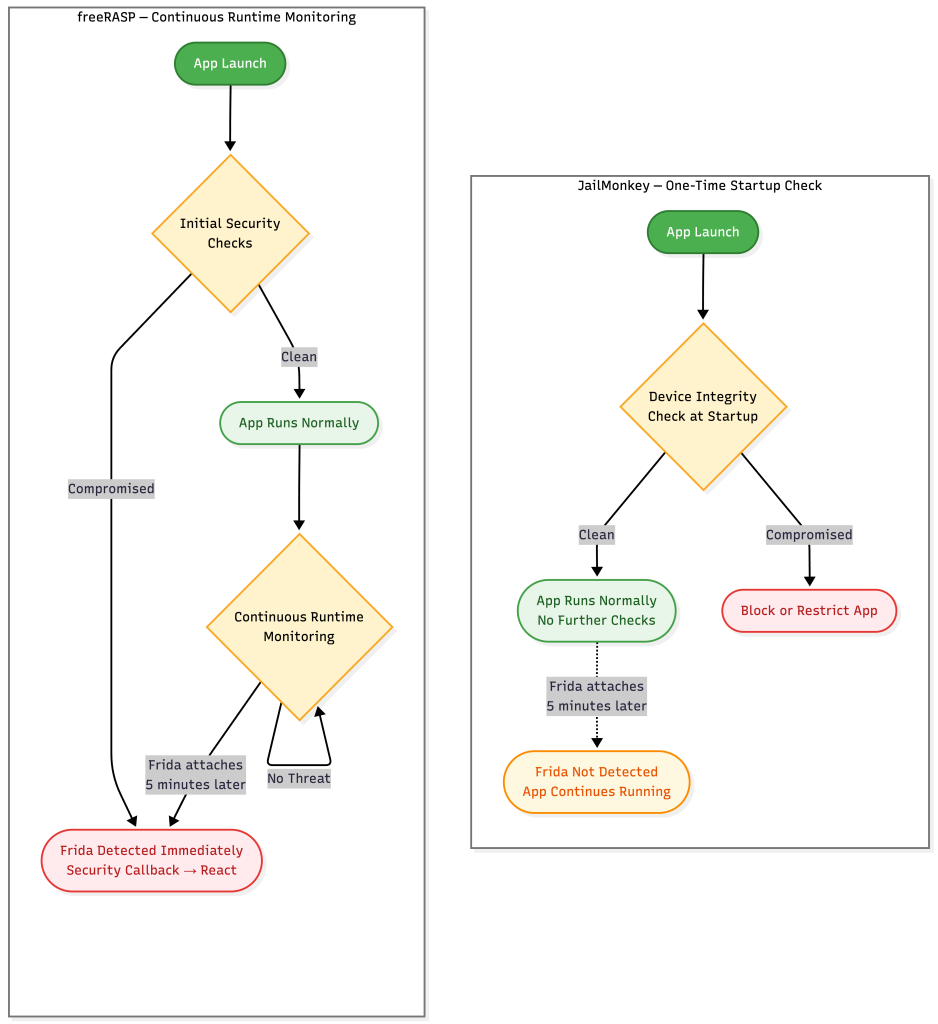
JailMonkey runs once, typically at startup. It tells you what the device looked like at that moment. It doesn’t tell you what happens five minutes into the session, after the user has logged in, after a Frida script attaches to your running process, or after someone hooks a function call mid-transaction.
An attacker doesn’t need to compromise your app before launch. They can attach instrumentation tools while the app is running — long after your one-time check has already passed.
This is the gap that Runtime Application Self-Protection (RASP) is built to close.
We’ll look at:
- What RASP means, and how it differs from a startup-only check
- What freeRASP adds on top of device integrity checks
- How to configure it and react to threats as they happen
- How to actively block screen capture on sensitive screens
- What freeRASP can’t do, and where it fits in a layered strategy
What RASP Actually Means
A startup check is a snapshot. RASP is a process that keeps watching.
Instead of asking “was this device compromised when the app opened,” a RASP library continuously monitors the running app for signs of tampering, hooking, debugging, and instrumentation — for the entire session, not just the first few hundred milliseconds.
When it detects something, it doesn’t just set a flag you can check later. It fires a callback immediately, so your app can react in real time — block a screen, end the session, or in the most aggressive configurations, terminate the process outright.
The difference in coverage is significant. JailMonkey fires once and stops caring. freeRASP keeps watching for the entire session:
freeRASP and JailMonkey, Briefly
If you’ve already implemented JailMonkey from Part 2, you don’t need to throw it away to understand this section — but it’s worth knowing that freeRASP covers everything JailMonkey does (root/jailbreak detection, emulator detection, hook detection, debug mode) and extends well past it. Root and jailbreak detection isn’t the differentiator here; continuous monitoring and reaction is.
The capabilities below are the ones JailMonkey simply doesn’t have.
What freeRASP Adds
Beyond device state, freeRASP watches for things that only matter while the app is running:
- App integrity verification — detecting whether the APK/IPA itself has been repackaged, resigned, or tampered with before it reached the user
- Unofficial store detection — flagging installs that didn’t come through the Play Store or App Store
- Obfuscation issue detection — warning you if an Android release build shipped without ProGuard/R8
- Screen capture and screen recording detection — and the ability to actively block it on sensitive screens
- System VPN, time spoofing, and location spoofing detection
- Kill-on-bypass enforcement — terminating the app if an attacker tries to hook or manipulate freeRASP’s own detection mechanism
That last point is worth sitting with. A library that only detects threats is useful. A library that detects an attacker trying to disable the detector itself, and kills the process in response, is a meaningfully different level of protection.
Installing freeRASP
npm install freerasp-react-native
or
yarn add freerasp-react-native
For iOS:
cd ios && pod install
Android requires minSdkVersion 23 or higher and Kotlin 2.0+. If your project is older, you’ll need to bump these in android/build.gradle before freeRASP will build.
Configuring freeRASP
Unlike JailMonkey, freeRASP needs a small amount of setup specific to your app — your package name or bundle ID, and your release signing certificate hash, so it can verify the app hasn’t been resigned by someone else.
import { useFreeRasp } from 'freerasp-react-native';

const config = {
    androidConfig: {
        packageName: 'com.yourapp',
        certificateHashes: [
            'YOUR_BASE64_SIGNING_CERT_HASH=',
        ],
    },
    iosConfig: {
        appBundleId: 'com.yourapp',
        appTeamId: 'YOUR_APPLE_TEAM_ID',
    },
    watcherMail: 'security@yourcompany.com',
    isProd: !__DEV__,
    killOnBypass: true,
};

useFreeRasp(config);
A couple of things worth calling out:
- isProd: !__DEV__ keeps you from getting blocked on a simulator during development, the same pattern we used with JailMonkey.
- killOnBypass: true is what enables the anti-tamper enforcement described above. Without it, freeRASP only detects — it won’t terminate the app if its own callback mechanism is hooked.
Reacting to Threats
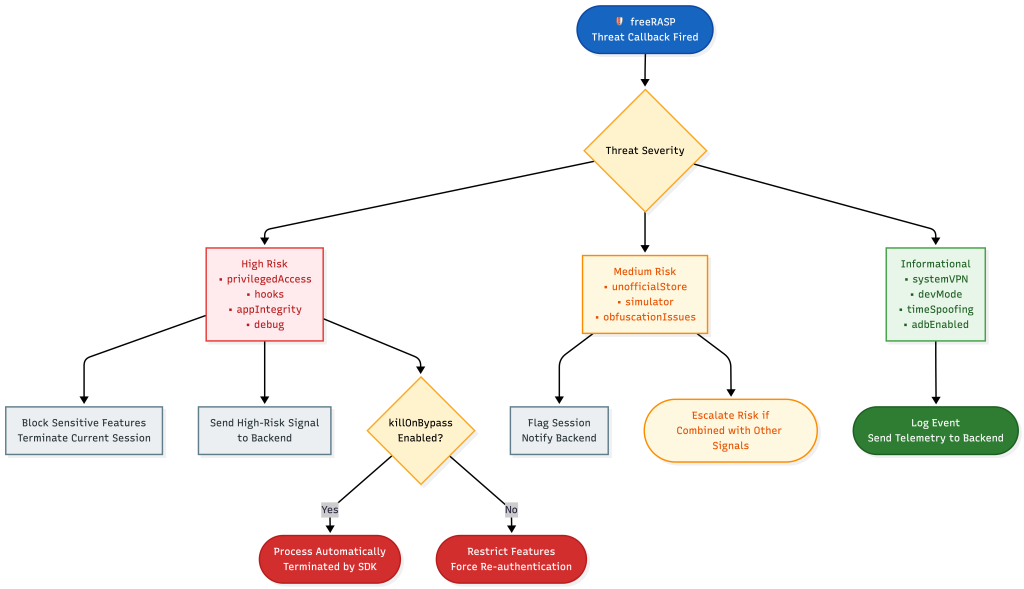
Where JailMonkey gives you a single boolean, freeRASP gives you a callback per threat type, so you can respond differently depending on severity.
const actions = {
    privilegedAccess: () => {
        // Rooted or jailbroken
        flagSession('privileged_access');
    },
    hooks: () => {
        // Frida, Xposed, or similar attached at runtime
        flagSession('hook_detected');
    },
    appIntegrity: () => {
        // App was repackaged or resigned
        flagSession('app_integrity_fail');
    },
    screenshot: () => {
        console.warn('Screenshot taken on a sensitive screen');
    },
    screenRecording: () => {
        console.warn('Screen recording active on a sensitive screen');
    },
};

useFreeRasp(config, actions);
One important detail: useFreeRasp is called at the top level of your component, not inside a useEffect. That’s intentional — freeRASP runs checks continuously through the session, so it needs to stay mounted and active the whole time your app is open, not just fire once and unmount.
Actively Blocking Screen Capture
Detecting a screenshot after it’s already been taken is useful for logging, but for something like a card number or a KYC document, you often want to prevent the capture in the first place. freeRASP can do that directly on screens where it matters:
import { blockScreenCapture } from 'freerasp-react-native';

useEffect(() => {
    blockScreenCapture(true);
    return () => blockScreenCapture(false);
}, []);
Mount this on an account details screen or a payment confirmation screen, and it blocks capture while the component is visible, then restores normal behavior the moment the user navigates away.
How Should Apps Respond?
The same response spectrum from Part 2 applies here, just triggered continuously instead of once at startup:
- Log and flag — send the threat type to your backend so it’s part of the user’s risk profile, without interrupting them
- Restrict sensitive actions — block payments, password changes, or account recovery for the rest of the session
- End the session — force a logout and require re-authentication
- Terminate the app — what killOnBypass does automatically when the detection mechanism itself is attacked
Which response fits depends on the threat. A VPN connection might just be worth logging. A confirmed hook on your authentication function is a different conversation entirely.
Here’s how to think about threat severity and the right response at each level:
A Pricing Caveat Worth Knowing Upfront
freeRASP is free up to 100,000 app downloads under Talsec’s Fair Usage Policy. Past that, you’re expected to move to the paid RASP+ tier, which also swaps the shared free-tier binary for an app-specific hardened one — making it harder for a generic bypass script to work against your app specifically.
If you’re early-stage or still validating the approach, the free tier is genuinely fine to build and ship with. Just budget for RASP+ if you’re a banking or payments app expecting real scale — it’s worth knowing about before you’re 90,000 downloads deep into a free integration.
Limitations
freeRASP raises the bar considerably over a startup-only check, but it’s still running on a device the attacker physically controls. A sufficiently determined attacker with enough time can still attempt to patch around it — killOnBypass makes that meaningfully harder, but “harder” isn’t “impossible.”
The same principle from Part 2 still holds: treat freeRASP’s signals as strong client-side risk indicators, and pair them with server-side enforcement. A device claiming to be clean is not the same as a backend verifying the request actually came from your real app — which is exactly where Part 4 picks up.
What’s Next
In Part 4, we’ll look at Firebase App Check — how to make sure your backend only accepts requests that actually came from your real app, not from a bot script calling your API directly.
Final Thoughts
Device checks at startup catch the casual cases. Continuous runtime protection catches the attacker who waits until your app is already running before they attach their tools.
Neither one replaces the other, and neither one is the whole story by itself. They’re both client-side signals feeding into a backend that makes the real decision — which is the thread running through this entire series.