In any project, we have a large number of APIs, and if we only stick to manual testing, then it will take a lot of time and resource consumption; managing this situation is also very challenging in this recurring release trend in the industry. To overcome this, it is good to start the API Automation and target to automate maximum APIs. The API automation runs very fast and gives us the execution report by which we can analyze the failure cases quickly and take the required action. The automation can be run on a daily basis by which we can quickly look at all the APIs and if anything breaks by the new code change, then we can report the issue on the same day.
1. Introduction to the Rest Assured
It is a java library used to test the Restful Web Services. The full form is (REpresentational State Transfer). Using JAVA we can use this library to create a complete automation suite as per our project requirement. It supports HTTP methods like GET, POST, PUT, PATCH, and DELETE which are widely used in API testing.
2. Getting Started with the framework creation
In order to create the framework first step is we need to set up any IDE in our machine in this case I am using Eclipse the second step is to install JAVA. Now first, create a maven project and then convert it to TestNG.
Steps to create a Maven Project: In the eclipse, navigate to File > New > Other > Select Maven Project > Next > Provide the Group ID and Artifact ID and create the project.
Steps to convert Maven Project in TestNG: Do right-click on the maven project > Select TestNG > Convert TestNG.
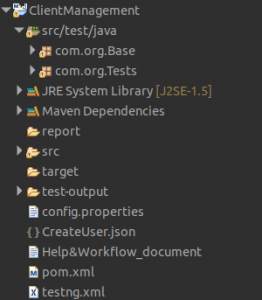
Here the point of focus is that our project name is ‘ClientManagement’ and we have two folders under src/test/java the first one is com.org.Base and the second one is com.org.Tests also I have created one config file with the name config.properties. In this project, we will do the CRUD operations like adding the new user, fetching the record of any existing user in the same way update and deleting the users.
3. Adding the required dependencies in the project
We can add the below dependencies from here https://mvnrepository.com/ it is always recommended to add the latest version of the dependencies. Add all the dependencies in the POM.xml file.
<dependency>
<groupId>junit</groupId> <artifactId>junit</artifactId> <version>3.8.1</version> <scope>test</scope>
</dependency>
<dependency>
<groupId>org.testng</groupId> <artifactId>testng</artifactId> <version>7.0.0</version>
</dependency>
<dependency>
<groupId>io.rest-assured</groupId> <artifactId>rest-assured</artifactId>  <version>4.4.0</version>
</dependency>
<dependency>
<groupId>io.rest-assured</groupId> <artifactId>json-path</artifactId> <version>4.1.2</version>
</dependency>
<dependency>
<groupId>io.rest-assured</groupId> <artifactId>json-schema-validator</artifactId> <version>3.3.0</version>
</dependency>
4. Creating the required classes and adding the methods in the Base Package
Here we will create the classes and common methods that would be used throughout the framework.
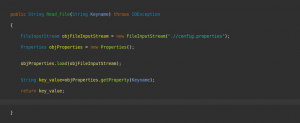
4.1 In the com.org.Base package first, create a Setup class and create a method to read the data from the property file. This method takes a key name as a String and returns the respective value.
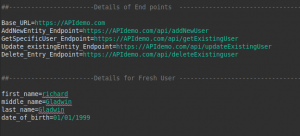
4.2 Prepare the config file
Here we add the URLs and test data that will be used throughout the framework and by the utility that we have already created in the Setup class we would be fetching the values.
Note: All the URLs mentioned here are dummy URLs you can add your own as per your project.
4.3
Again in the com.org.Base package, we create a new class RestUtilities and in this class, we will create some common utilities that will be used in the framework. Here I am creating two methods the first is to add the new user to the system and the second is to get the detail of any existing user.
In the RestUtilities class first, I create the object of the Setup class so that we can call the methods declared in that class.
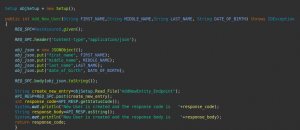
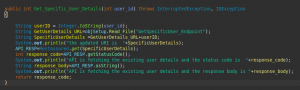
Both methods return the response code based on which we will write the assertion and validate the API. Likewise, we can create other methods to update the user’s details and delete the user from the system.
5. Writing the actual test script based on the requirement
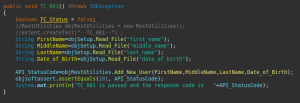
In the com.org.test package first, we create a class TestCase_UserManagement_Operations here we can write all our test cases here I am writing a sample test case to verify that a new user can be added to the system through API, for this, I will call the Add new user method declared in the RestUtilities class and based on the response code I will write the assertion, in this case, the if the response code in 201 then test case will be passed.
Note: We have to use the @Test annotation from the TestNG before each test case this will help at the time of the execution.
6. Configuring the execution file
For the test case execution here we will use the TestNG.xml file, in this, we can manage all our execution control. This is the same file that got generated when we converted our project into TestNG in the initial steps.
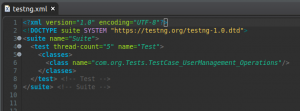
We are doing the execution based on the classes, in the project all the test cases of the class
TestCase_UserManagement_Operations will be executed as we have passed the same class name under the <class> tag in the testNG.xml.
Now we can manually run the complete suite or we can schedule an automated job from any CICD tool.
7. Fetching the data from the response body
In the above example, we are validating the API based on the response code but in real-time we are also required to fetch the response data and its validation. We can use the below code the fetch the data from the response and then write the assertion as per the need.
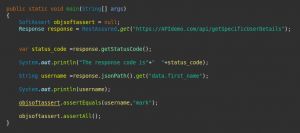
In the above code, we are fetching specific user details using user_id, now using the JsonPath we fetch the first_name from the response and write the assertion.