MongoDB is a popular NoSQL database that stores data in JSON like documents dynamic schemas instead of storing your data in tables and rows as you do with a relational database.
In this blog we will setup Mongo DB replication on single node to demonstrate high availability and failover mechanism.
What is a MongoDB Replica Set ?
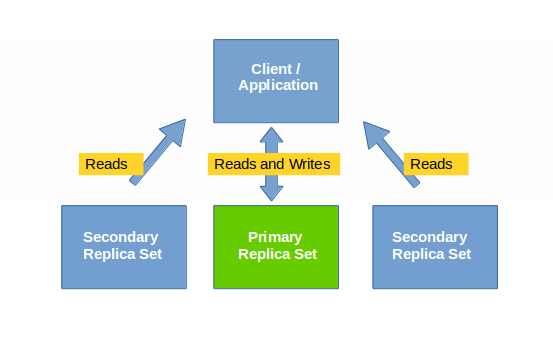
We can achieve high availability and failover with the help of Replica Sets in MongoDB. In this configuration application/client can read and write data from/to primary node. The changes in primary node are replicated to secondary node using oplog (operations log). The secondary node can be used for read only operations depending on the use case. The main advantage of replica set is that it offers automatic failover mechanism in case primary node goes down.
Replica Set Components:
1. Primary Members: By default, all read, write transactions are made on the primary node
2. Secondary Members: Any changes made on primary nodes are replicated to secondary nodes using oplogs.
3. Arbitar Members: An arbitar is an optional member of the replica set that does not take part in replication. It only takes part in the selection process of new primary.
4. Selection Process: In case a primary node goes down, the automatic selection process takes place between remaining secondary nodes. And if number of secondary nodes are even, arbitar member acts as a tie-broker to ensure decision is reached.
Note:
1. Data on secondary node can be outdated as replication between primary and secondary nodes is asynchronous. So this feature should be carefully enabled in production environment.
2. This kind of implementation requires code level changes to redirect read queries to secondary nodes and write queries to primary node.
1. Setup Replica Sets on Single EC2 Instance
For setting up test environment in few clicks, I am using AWS EC2 (Amazon Linux) for demonstration purpose. You can download Mongo package from MongoDB official website. Once you have MongoDB downloaded, you need to create a data folder for each mongo instances. I’m on a Amazon Linux (t2.micro) and created mongo-data0, mongo-data1 and mongo-data2.
Note: In production environment it is not recommended to run multiple Replica Set’s on a single machine with oplogSize 50, I am doing this only for demonstration purpose.
You also need to run each instance on a separate port so I chose 27009, 27010 and 27011. I started the three instances as follows (in three separate Terminals):
[js]mongod –dbpath mongo-data0 –port 27009 –rest –replSet mongo-data –logpath log.mongo-data0 –fork –alogappend –smallfiles –oplogSize 50
mongod –dbpath mongo-data1 –port 27010 –rest –replSet mongo-data –logpath log.mongo-data1–fork –alogappend –smallfiles –oplogSize 50
mongod –dbpath mongo-data2 –port 27010 –rest –replSet mongo-data –logpath log.mongo-data2 –fork –alogappend –smallfiles –oplogSize 50 [/js]
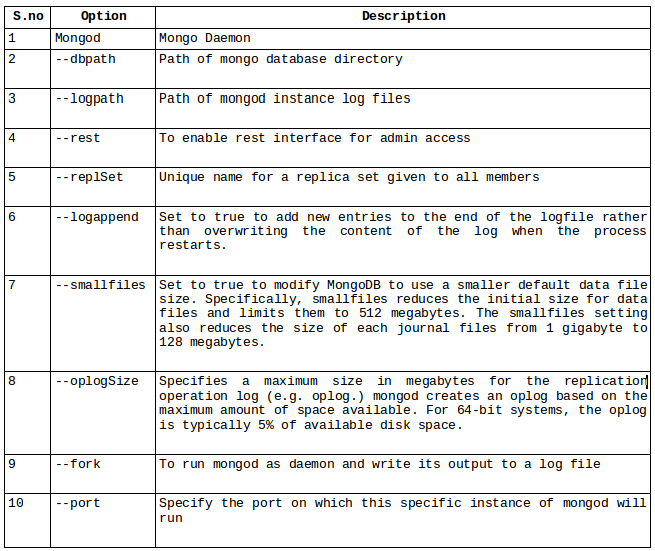
Command Description:
Commands to setup replica set’s on single machines:

Check the list of running mongo processes, using ps -ef | grep mongo (shown below):

2. Access Replica Sets
If you want you can add each node to have a separate name, to do so you can add the following entry to /etc/hosts:
127.0.0.1 mongo1 mongo2 mongo3
Once done you are ready to connect to Mongo DB Replica Set. You can start accessing replica set by using the command below in your terminal
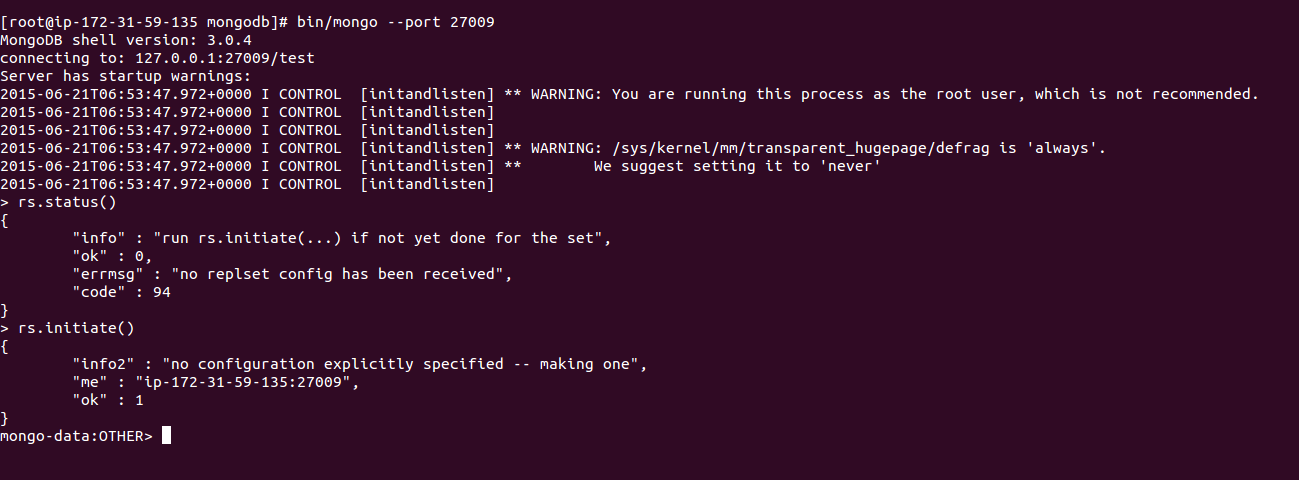
[js]mongo –port 20017
> rs.initiate()
> rs.add("shard1.neerajg.in:27010")
> rs.add("shard1.neerajg.in:27011")[/js]
Note: In case of production environment, you will be running replica set’s on separate hosts, you can also add them using above mentioned command. For example:
[js]>rs.add(“host1.neerajg.in27010”)
>rs.add(“host2.neerajg.in:27010”)[/js]
Access Primary Replica Set (running on port 27009):
a. Initiate Replica Set on Primary mongo instance:
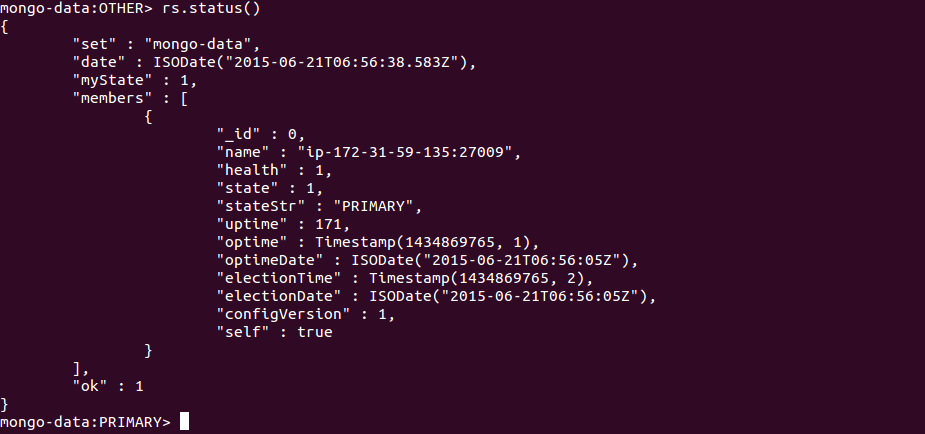
b. Check the status of primary mongo instance again
c. Add Secondary Replica Sets:

d. Print Replication Info:
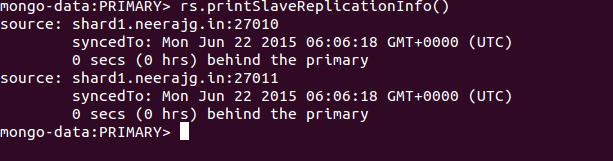
3. Add data to primary node:
At this point we can add objects to the database and they’ll be replicated to the other instances – and you can read from the primary or the slaves.
[js]db.people.save( { name : "Neeraj", age: 26, emailid: "neeraj.gupta@tothenew.com" } )
db.people.find() [/js]
a. Add data to primary mongo instance using the below mentioned commands:

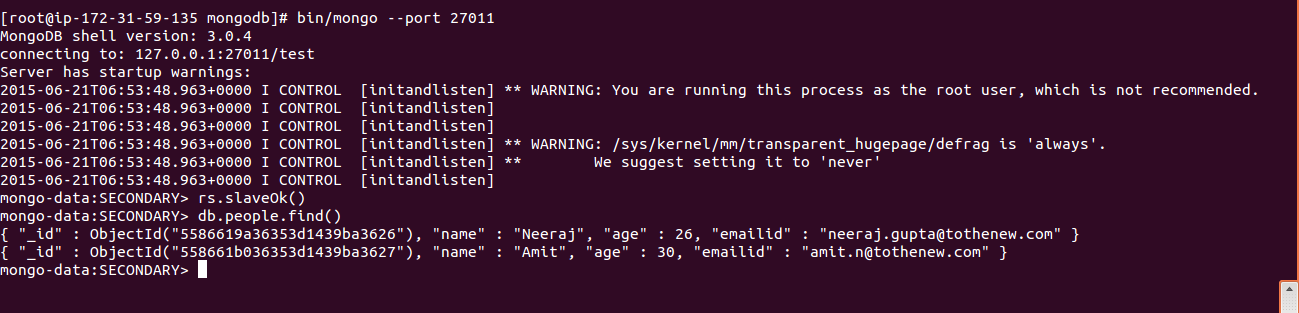
You can try accessing secondary node and read data using the below mentioned commands.
[js]mongo –host mongo2 –port 22017
rs.slaveOk()
db.people.find()[/js]
Access Secondary Replica Set running on port 27010:

Access Secondary Replica Set running on port 27011:
4. Check the log files:
Accessing the log files:
a. Primary Replica Logs (27009):
![]()
b. Secondary Replica Logs (27010):

5. Test failover capabilities:
Now to test failover capabities, do the following:
a. You can either terminate terminal running primary mongodb node or extract process id using the below mentioned command and kill process.
[js]ps -ef | grep mongo
kill PID [/js]
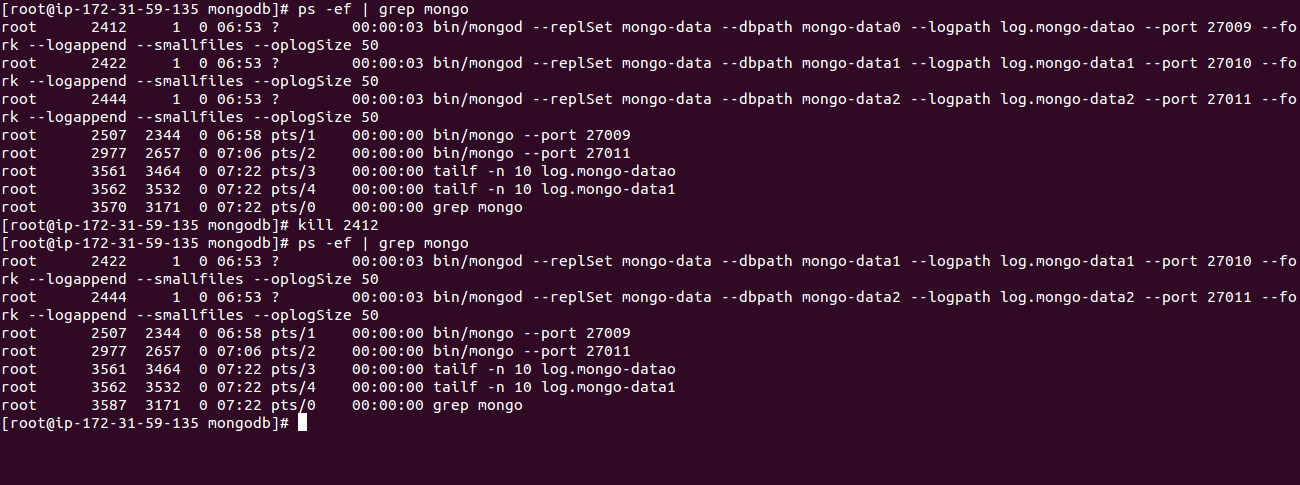
b. During this activity kindly observe the other two terminals. It will show messages like transition to primary complete.

c. After few seconds, try to access the remaining two replica sets running on port 27010 and 27011. One of them will be primary and other will be secondary.
d. Operations supported:
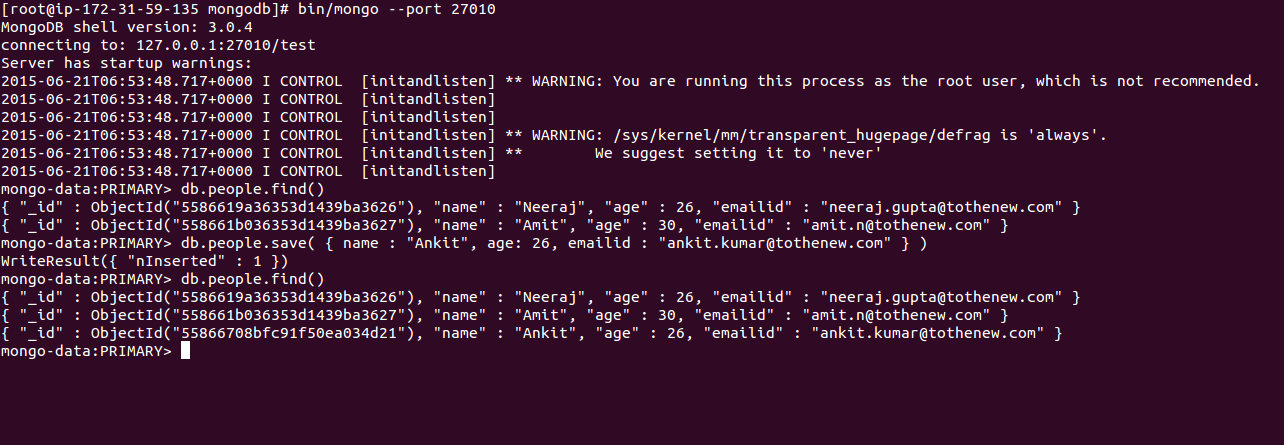
i. Primary Mode: Read, write (to validate this try adding new content to the database by using below mentioned commands):
[js] db.people.save( { name : "Amit", age: 26, emailid: "ankit.kumar@tothenew.com" } ) [/js]
Above command will run successfully and add new content to the db (as shown in the above screenshot)
[js]db.people.find() [/js]
Above command will retrieve all the data stored in people collection
ii. Secondary Mode: Read Only (to validate this try adding new content to the database by using the below mentioned commands):
[js] db.people.save( { name : "Amit", age: 26, emailid: "ankit.kumar@tothenew.com" } ) [/js]
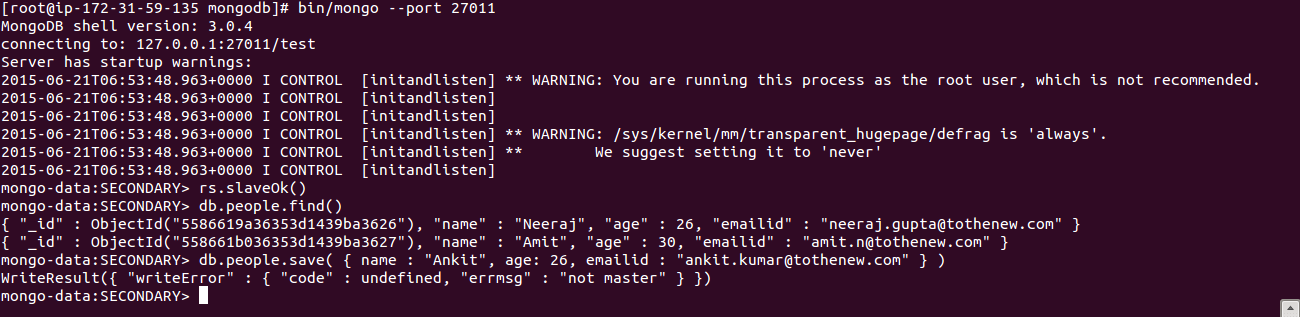
NOTE: Above command will throw error messages, as seconday node runs in read only mode.
[js]db.people.find() [/js]
Above command will retrieve all data stored in people collection
hi Neeraj,
I used you blog and it helped me in setting setting up my cluster. I have one query that when one of my secondary becomes primary and then the node which was primary earlier restarts (considering it was part of an auto scaling group) then how will the new primary add it to the replica set.
Great article. I followed it to setup it on my Ubuntu16.04. 🙂 Works great 🙂 🙂
How to bring the killed replica member to operate again i.e replica member at port 27009?
I have an production environment running with mongodb. Now i am planning to implement replication. Is there something in need to pre-configure before adding secondary members?
Also whenever i add a secondary member to replica set, the primary becomes secondary. How to avoid this.
Thanks for this.
can you also add what would change to do the replication on a different EC2 instance ?
There is no practical point of replicating on the same machine.
Thanks for writing back. The changes required in case you are setting up replica set on multiple machines are:
1. Running mongod on all the EC2 instances with same replica set name
2. Use private DNS endpoints for all the EC2 instances for communication
3. And use new private DNS endpoints while adding replica set nodes.
I am using single machine to run complete replica set for demo/testing purpose only, it is not recommended to run in production environment.
Pingback: Mongo Delayed Node | TO THE NEW Blog