


Introduction
Running Kubernetes workloads on Amazon EKS is easy, but running them in a cost-effective way is a different challenge. Many organizations start their Amazon EKS clusters with Managed Node Groups based on Auto Scaling Groups (ASGs). This is a reliable approach but often results in over-provisioning of infrastructure as worker nodes are kept running even when workloads are minimal.
In one of our production projects, we have switched from the traditional EKS Managed Node Groups to Karpenter, Kubernetes’ next generation node provisioning solution. The main objective was to optimize the AWS infrastructure costs, without affecting application availability and improving efficiency of scaling.

In this blog I will explain the:
- Why did we switch from ASG-based scaling to Karpenter?
- How Karpenter works
- Implementation, step by step
- Example NodePool and EC2NodeClass setup
- Deployment instructions
- Cost optimization best practices
- How to stop an environment using Karpenter
Why did we switch from ASG-based scaling to Karpenter?
When you use the EKS Node Groups the worker nodes are set up using EC2 Auto Scaling Groups. The Cluster Autoscaler is able to increase or decrease the number of nodes. However it does this one instance at a time. That often means there are some nodes just sitting there doing nothing. The Cluster Autoscaler and EKS Node Groups have this issue with capacity.
Some challenges we saw:
- For long durations of time, nodes were underutilized.
- It took a little longer to decide on scaling.
- Less flexibility with fixed instance types.
- EC2 continued to run at low workloads leading to higher infrastructure costs.
Karpenter solves these problems by provisioning nodes on demand, when Kubernetes needs them.
Instead of scaling an Auto Scaling Group on pending pods, Karpenter dynamically launches the most suitable EC2 instance.
Solution Architecture
In this migration, ASG-based workload scaling was replaced by Karpenter.
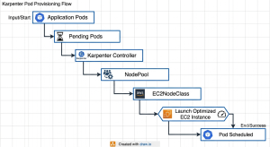
This means that Kubernetes can provision infrastructure on demand, rather than having nodes running permanently.
Prerequisites
Before installing karpenter, ensure that these followings are available:
- Amazon EKS Cluster
- Existing Managed Node Group (for system workloads)
- IAM Role for Karpenter Controller
- OIDC Provider enabled
- AWS SQS interruption queue
- AWS VPC subnets and Security Groups tagged for Karpenter discovery
- Helm installed
- kubectl configured
Step 1 – Karpenter Installation
Deploy Karpenter with Helm.
helm upgrade --install karpenter oci://public.ecr.aws/karpenter/karpenter \
  --namespace kube-system \
  --create-namespace
Check installation.
kubectl get pods -n kube-system
You should see two running Karpenter controller pods.
Step 2 – Deploy the Karpenter Controller
In our deployment we use:
- IAM Role through ServiceAccount
- Webhook enabled
- Two controller replicas
- Metrics endpoint
- Health probes
- High Availability
- Anti-affinity configuration
- Environment tolerations
Example (excerpt of our deployment):
apiVersion: apps/v1
kind: Deployment

metadata:
  name: karpenter

spec:
  replicas: 2

template:
  spec:
    serviceAccountName: karpenter

    containers:
    - name: controller
      image: <your-ecr>/karpenter/controller:1.6.2

      env:
      - name: CLUSTER_NAME
        value: <cluster-name>

      - name: INTERRUPTION_QUEUE
        value: <SQS-Queue-Name>
Also included in our full deployment:
- ServiceAccount
- RBAC
- ClusterRoles
- RoleBindings
- PodDisruptionBudget
- Services
- Webhook configuration
- Readiness and Liveness probes
These are included in the complete karpenter.yaml manifest.
Deploy it using:
kubectl apply -f karpenter.yaml
Step 3 – Create a NodePool
A NodePool describes how Karpenter will provision nodes.
Our configuration provisions are:
- ARM64 instances
- Linux operating system
- On-Demand capacity
- t4g.medium instances
- environment labeling
- Environment taints
- Automatic consolidation
Sample NodePool:
apiVersion: karpenter.sh/v1
kind: NodePool

metadata:
  name: <nodepool-name>

spec:
  template:

    metadata:
      labels:
        ENV: <environment-name>

    spec:

      taints:
      - key: Environment
        value: <environment-name>
        effect: NoExecute

      requirements:
      - key: kubernetes.io/arch
        operator: In
        values:
        - arm64

      - key: karpenter.k8s.aws/instance-family
        operator: In
        values:
        - t4g

      - key: karpenter.k8s.aws/instance-size
        operator: In
        values:
        - medium
Deploy:
kubectl apply -f nodepool.yaml
Step 4 – Configure the EC2NodeClass
EC2NodeClass controls how to launch EC2 instances.
We have the following set up:
- Amazon Linux 2023 AMI
- IAM role for node
- EBS disk encrypted with GP3
- Tagged subnets
- Tag-based security groups
- Custom AMI Environment Tags
Sample configuration:
apiVersion: karpenter.k8s.aws/v1
kind: EC2NodeClass

metadata:
  name: <ec2nodeclass-name>

spec:

  amiFamily: AL2023

  role: <eks-node-role>

  blockDeviceMappings:

  - deviceName: /dev/xvda

    ebs:
      volumeSize: 50Gi
      volumeType: gp3
      encrypted: true

  subnetSelectorTerms:
  - tags:
      karpenter.sh/discovery: <environment-tag>

  securityGroupSelectorTerms:
  - tags:
      karpenter.sh/discovery: <environment-tag>
Step 5 – Verify Karpenter
To check NodePools:
kubectl get nodepool
To check EC2NodeClass:
kubectl get ec2nodeclass
To check NodeClaims:
kubectl get nodeclaims
To watch nodes getting created:
kubectl get nodes -w
Create a deployment with a higher replica count and watch Karpenter automatically provision new nodes.
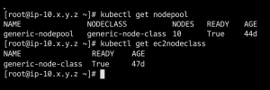
This is the output for Nodepool and EC2NodeClass:
Step 6 – Enable Consolidation
One of the biggest benefits of Karpenter is automatic consolidation.
Our NodePool includes:
disruption:

  consolidationPolicy: WhenEmptyOrUnderutilized

  consolidateAfter: 10m
This means:
- Empty nodes are automatically terminated.
- Consolidating under-utilized nodes.
- Idle EC2 costs are greatly reduced.
- Kubernetes workloads runs without any manual intervention.
Stopping a Karpenter Environment
Unlike traditional ASGs where you manually scale the number of nodes, Karpenter automatically scales node scaling with workload demand.
To completely shut down an environment running on karpenter, first scale all application workloads to zero replicas so that no pods require worker nodes.
For example:
kubectl scale deployment <deployment-name> \
--replicas=0 \
-n <namespace>
If using StatefulSets:
kubectl scale statefulset <statefulset-name> \
--replicas=0 \
-n <namespace>
If your workloads are managed by helm:
helm upgrade <release-name> \
<chart-name> \
--set replicaCount=0
Upon deletion of all application pods, Karpenter will detect the nodes are empty and will automatically terminate them according to the configured consolidation policy.
You can also set the NodePool CPU limit to 0 if your NodePool uses CPU limits, so that when the environment is stopped, Karpenter does not provision any other nodes.
Example:
limits:
  cpu: 0
Apply the updated configuration:
kubectl apply -f nodepool.yaml
This way no new nodes are created until the CPU limit is increased again.
Benefits Achieved
After we moved to Karpenter we saw a few operational improvements:
- Faster node provisioning
- Better pod scheduling
- Removing permanently idle worker nodes
- Automatically deleting idle nodes
- Flexibility on instance provisioning
- Easier infrastructure management
- Amazon EC2 cost reductions
Instead of fixed-capacity Auto Scaling Groups, Karpenter constantly provisions infrastructure according to the actual needs of the workload.
Best Practices
When using Karpenter, consider the following suggestions:
- Have one small managed node group for system pods.
- Apply taints and labels to segregate environments.
- Enable Consolidate for maximum savings.
- Use GP3 encrypted type for the EBS volumes.
- Tag the security group and subnets.
- Regularly monitor the karpenter logs and NodeClaims.
- Control scale of infrastructure by setting sensible CPU limits on NodePools.
- Test the scaling behaviour in non-prod environments then production.
Conclusion
The transitioning from EKS Managed Node Groups with Auto Scaling Groups to karpenter has significantly improved the efficiency of our Kubernetes infrastructure. Karpenter eliminates the need for always-on worker nodes, dynamically provisioning the right compute resources to meet the needs of your pods and automatically scaling down unused capacity when workloads decrease.
We built a more responsive Kubernetes platform and reduced infrastructure costs and operational overhead by combining NodePools, EC2NodeClasses, clever consolidation and workload-aware provisioning.
If you are running Amazon EKS with variable workloads, Karpenter is a compelling alternative to traditional ASG based scaling. Begin in a non-production environment to validate your NodePool configurations and observe the provisioning behavior and then gradually rollout the implementation across your clusters. If you’re already using Karpenter or are considering a migration, please share your experience or questions in the comments – I’d love to hear how you’re optimizing your Kubernetes infrastructure.