State Machine Overview
Spring state machine is a spring-module that allows us to describe well known, well understood transitions from one state to another. You have probably built a million state machines in your life if you have ever done any kind of programming. For example any kind of if-then-else statement at some point will constitute a state machine. So, any transition which is predictable, or deterministic from one state to another which may have actions associated with it is a state machine and is a very fundamental part of what we do.
But things can go ugly with these if-else statements, if state transitions just become a little complex where a developer will get lost in the nested structure of if-else statements instead of solving a business problem. And to make life worse, if workflow has changes, the developer needs to scour different layers of the codebase where all complex decisions reside.
State machines are a nice way to think about the progressions of our applications, how things should happen, and how they should move. Modelling your business project in terms of the state machine is useful even if you don’t plan to. State machines describe state over a long running process, so if you have a long-running process with lots of moving parts, the state machine comes into picture.
State machine has the benefit of being queryable. You can interrogate where we are in the fulfilment flow. For example, I am fulfilling an order and we have a number of steps involved from tons of actors. Being able to poke at the state machine to check where we are and where we will proceed after the actor performs any deterministic action.
We will be building the State machine using the spring state machine project.
Step 1
We will be building a gradle project with the following build.gradle.
 plugins {
 id 'java'
 id 'org.springframework.boot' version '3.0.0'
 id 'io.spring.dependency-management' version '1.1.0'
 }

 group = 'com.ttn'
 version = '0.0.1-SNAPSHOT'
 sourceCompatibility = '17'

 configurations {
 compileOnly {
 extendsFrom annotationProcessor
 }
 }

 repositories {
   mavenCentral()
 }

 dependencies {
   implementation 'org.springframework.boot:spring-boot-starter-data-jpa'
   implementation 'org.springframework.boot:spring-boot-starter-web'
   compileOnly 'org.projectlombok:lombok'
   runtimeOnly 'com.mysql:mysql-connector-j'
   annotationProcessor 'org.projectlombok:lombok'
   testImplementation 'org.springframework.boot:spring-boot-starter-test'
   implementation group: 'org.springframework.statemachine', name: 'spring-statemachine-core', version: '3.2.0'
   }
Step 2
Let’s define the states of Order
public enum OrderStates {
   SUBMITTED, PAID, FULFILLED, CANCELED
}
Step 3
Let’s create some Events
public enum OrderEvents {
   PAY, FULFILL, CANCEL;
}
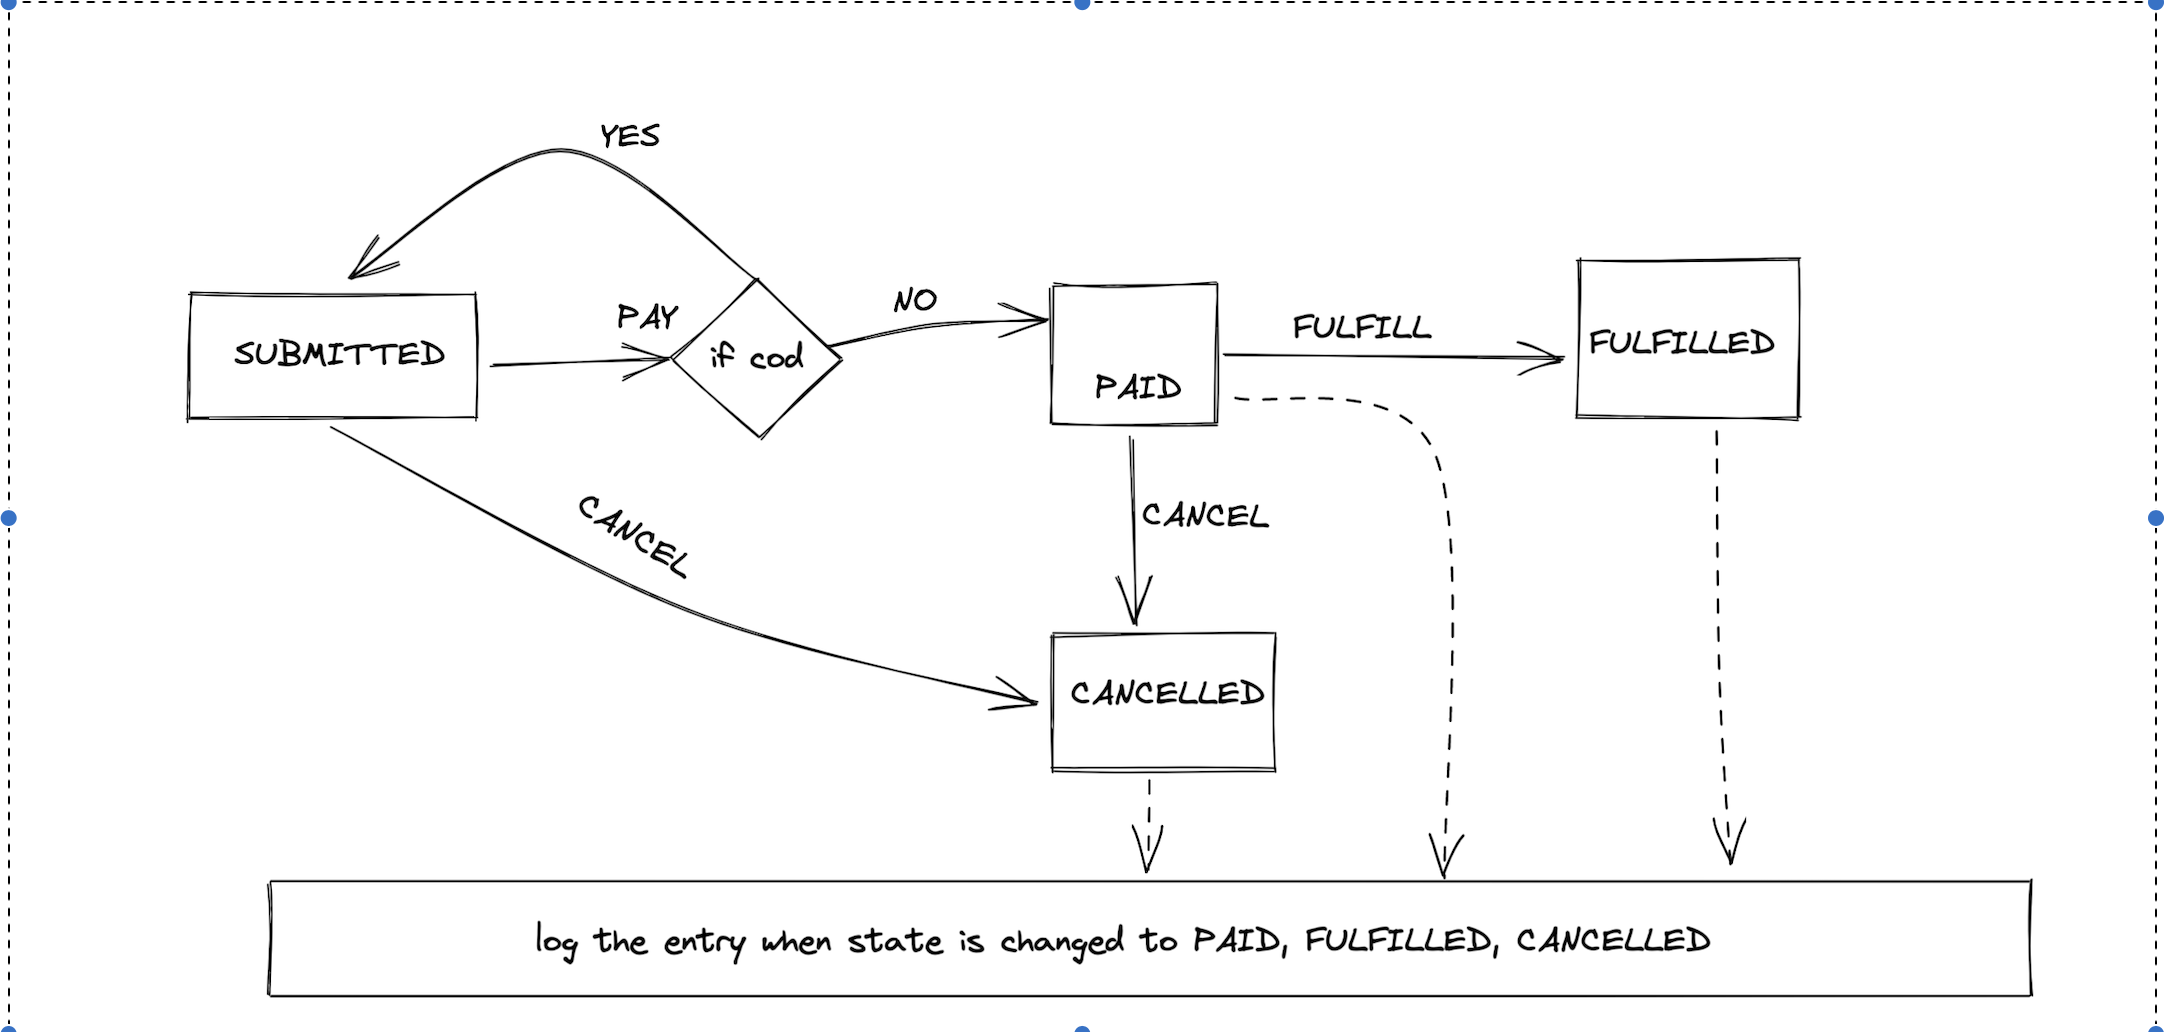
Our state are changing like below:
1. When the order is created it will be in SUBMITTED state.
2. From there, if PAY event happens, state will change to PAID
3. From PAID, if FULFILL event happens, state will change to FULFILLED
4. FULFILLED state is the end state
5. But from FULFILLED, if CANCEL event happens, state will change to CANCELED
6. Also, from PAID, if CANCEL event happens, state will change to CANCELED
7. CANCELED state is also the end state
We need to cover the above transition. First we create a State machine with Order States.
Step 4:
Configuring Spring State Machine
 @Slf4j
 @Configuration
 @EnableStateMachineFactory
 class SimpleStateMachineConfiguration extends StateMachineConfigurerAdapter<OrderStates,OrderEvents> {..
We need to override methods of the above StateMachineConfigurerAdapter to configure our state machine
The below override method helps us define the states of the machine
 @Override
 public void configure(StateMachineStateConfigurer<OrderStates, OrderEvents> states) throws Exception {
    states.withStates()
            .initial(OrderStates.SUBMITTED)
            .state(OrderStates.PAID)
            .end(OrderStates.FULFILLED)
            .end(OrderStates.CANCELLED);
 }
The below override method help us to define the transitions we have discussed above
 @Override
 public void configure(StateMachineTransitionConfigurer<OrderStates,
       OrderEvents> transitions) throws Exception {
   transitions
           .withExternal()
           .source(OrderStates.SUBMITTED)
           .target(OrderStates.PAID)
           .event(OrderEvents.PAY)
           .guard(ctx -> {
               log.info(“true->statechanged. false->do not change ”);
               var paymentType = String.class.cast(ctx.getExtendedState()
                       .getVariables().get("paymentType"));
               if (!StringUtils.isEmpty(paymentType) && paymentType.equals("cod"))
                   return false;
               else return true;
           })

           .and()
           .withExternal()
           .source(OrderStates.PAID)
           .target(OrderStates.FULFILLED)
           .event(OrderEvents.FULFILL)
           .action(ctx -> {
             log.info("This PAID handler where we can perform some logging");
           })

           .and()
           .withExternal()
           .source(OrderStates.SUBMITTED)
           .target(OrderStates.CANCELLED)
           .event(OrderEvents.CANCEL)
           .action(ctx -> {
             log.info("This SUBMITTED handler where we can perform some logging");
           })


           .and()
           .withExternal()
           .source(OrderStates.PAID)
           .target(OrderStates.CANCELLED)
           .event(OrderEvents.CANCEL)
           .action(ctx -> {
               log.info("This PAID handler where we can perform some logging");
           });

 }
Here we define first the source state, from source we define the destination state when a particular event is triggered. Along with source, target and event we have also defined Guards and Actions.
Here, we can see that for state FULFILLED, CANCELLED, PAID we have used an Action which can be used for cross cutting concerns like logging.
Also, we have used Guard, which can be used to make a decision whether we want to block the state from being changed. If true, the state will change, otherwise it will not.
Guard
We can define a guard as a separate bean and then call it from guard directly.
Guard is a functional interface and hence we have used lambda for its implementation. The implementing method needs to return true or false. True means the state will change and false means the state will not change.
 @Bean
 public Guard<OrderStates, OrderEvents> guard() {
   return ctx -> return true;
 }
Action
We can define action as a separate bean and then call it directly from action. Action is a functional interface and hence we have used lambda for its implementation. It’s just taking a consumer.
 @Bean
 public Action<OrderStates, OrderEvents> guard() {
   return ctx -> log.inf("logging");
 }
Step 5
Let’s create a simple OrderInvoice Entity for which we are going to change the state using our state machine.
 @Entity
 @Getter
 @Setter
 public class OrderInvoice {

   @Id
   @GeneratedValue
   private  Long id;
   private LocalDate localDate;
   private String state;

   @Transient
   String event;

   @Transient
   String paymentType;

 }
public interface OrderRepository extends JpaRepository<OrderInvoice,Long> {}
Step 6
We will create simple controller class to first create a OrderInvoice for which state will be in SUBMITTED state
 @PostMapping("/createOrder")
 public OrderInvoice createOrder(){
   OrderInvoice order = new OrderInvoice();
   order.setState(OrderStates.SUBMITTED.name());
   order.setLocalDate(LocalDate.now());
   return orderRepository.save(order);
 }
Step 7
Now we need to create another handler that will use state machine to change the state of this order
 @RestController
 @RequiredArgsConstructor
 public class WorkflowController {


   private final OrderRepository orderRepository;

   private final StateMachineFactory<OrderStates, OrderEvents> stateMachineFactory;


   @PutMapping("/change")
   public String changeState(@RequestBody OrderInvoice order){

        //making the machine in current state of the order
         StateMachine<OrderStates, OrderEvents> sm =    build(order);
         sm.getExtendedState().getVariables().put("paymentType",order.getPaymentType());
         sm.sendEvent(
                 MessageBuilder.withPayload(OrderEvents.valueOf(order.getEvent()))
                         .setHeader("orderId",order.getId())
                         .setHeader("state",order.getState())
                         .build()
                 );
        return "state changed";
    }
 }
Here we can see the build(order) method which is very important. This method aims to get the state machine from state machine factory and set it to a state in which our current order is in. Usually current state is pulled from the database.
Spring MessageBuilder is quite useful in sending events as it allows us to attach headers which we have used to send events. In the following steps we would be defining an interceptor where we will be using the header inputs.
Step 8
(Most important step)
Pulling the state from the database and reset the machine to that state. This is the most important part and may look cumbersome at first glance.
 public StateMachine<OrderStates,OrderEvents> build(final OrderInvoice orderDto){
   var orderDb =  this.orderRepository.findById(orderDto.getId());
   var stateMachine =  this.stateMachineFactory.getStateMachine(orderDto.getId().toString());
   stateMachine.stop();
   stateMachine.getStateMachineAccessor()
      .doWithAllRegions(sma -> {
        sma.resetStateMachine(new DefaultStateMachineContext<>(OrderStates.valueOf(orderDb.get().getState()), null, null, null));
     });
    stateMachine.start();
    return stateMachine;
 }
As, we can see that we have pulled the state machine first from stateMachineFactory which we have injected already, then we have stopped it, then we have reset the machine to a state of OrderInvoice which we have pulled from the database.
Step 9
Once we have reset the machine to existing state with help of db, we just have to send the event which we have received in the request.
But we still need to persist the order state in our db when the state machine has altered the state of the order. We may take help of some interceptors as shown below
 public StateMachine<OrderStates,OrderEvents> build(final OrderInvoice orderDto){
   var orderDb =  this.orderRepository.findById(orderDto.getId());
   var stateMachine =  this.stateMachineFactory.getStateMachine(orderDto.getId().toString());
   stateMachine.stop();
   stateMachine.getStateMachineAccessor()
           .doWithAllRegions(sma -> {
               sma.addStateMachineInterceptor(new StateMachineInterceptorAdapter<>() {
                   @Override
                   public void preStateChange(State<OrderStates, OrderEvents> state, Message<OrderEvents> message, Transition<OrderStates, OrderEvents> transition, StateMachine<OrderStates, OrderEvents> stateMachine, StateMachine<OrderStates, OrderEvents> rootStateMachine) {
                      var orderId = Long.class.cast(message.getHeaders().get("orderId"));
                      var order =  orderRepository.findById(orderId);
                       if(order.isPresent()){
                           order.get().setState(state.getId().name());
                           orderRepository.save(order.get());
                       }
                   }
               });
               sma.resetStateMachine(new DefaultStateMachineContext<>(OrderStates.valueOf(orderDb.get().getState()), null, null, null));
           });

    stateMachine.start();
    return stateMachine;

 }
Here we have added the addStateMAchineInterceptorAdaptor and override preStateChange method.
It’s time to test our application through curl commands
Test Step 1:
First we simply create the order. This will persist the order in SUBMITTED state
curl --location --request POST 'localhost:8080/createOrder' \
--data-raw ''
Test Step 2:
We simply send an event of PAY for order id 1
 curl --location --request PUT 'localhost:8080/change' \
 --header 'Content-Type: application/json' \
 --data-raw '{
     "id": 1,
     "event": "PAY",
     "paymentType" : "cash"
 }'
The above curl will change the state to PAID as payment type is cash
But if the curl is as below
 curl --location --request PUT 'localhost:8080/change' \
 --header 'Content-Type: application/json' \
 --data-raw '{
     "id": 1,
     "event": "PAY",
     "paymentType" : "cod"
 }'
Since we have a guard which will not allow to change the state if the action payment type is “cod”.
This blog is originally published here.