


1. Introduction
The article will explain how to configure Single Sign On (SSO) on an AEM Author/Publisher instance using Microsoft Azure AD. SAML is a widely adopted, industry-standard protocol for enterprise SSO. SSO allows users to log in once and gain access to multiple systems. SAML (Security Assertion Markup Language) acts as an industry-standard protocol to exchange authentication and authorization data between identity providers (IdPs) like Microsoft Entra ID (formerly Azure AD).or Okta, and service providers (SPs) such as AEM, Salesforce, or other business applications.
2. Prerequisites
To get started, you need the following components:
2.1 Azure:
- Azure Subscription
- Azure AD SAML Signing Certificate
- Azure AD Login URL
- Azure AD Logout URL
- Azure AD Identifier (Entity ID)
- App Federation Metadata URL
2.2 AEM :
- AEM 6.x Author or Publish instance enabled over SSL using TLS1.1 or above
- AEM Package Manager console
- AEM OSGi Access
- Deployment Pipeline access to deploy/update the Dispatcher changes.
3. Configuration changes in the Azure
- Create Application named Adobe Experience Manager in Azure portal.
- Access Azure Portal – portal.azure.com.
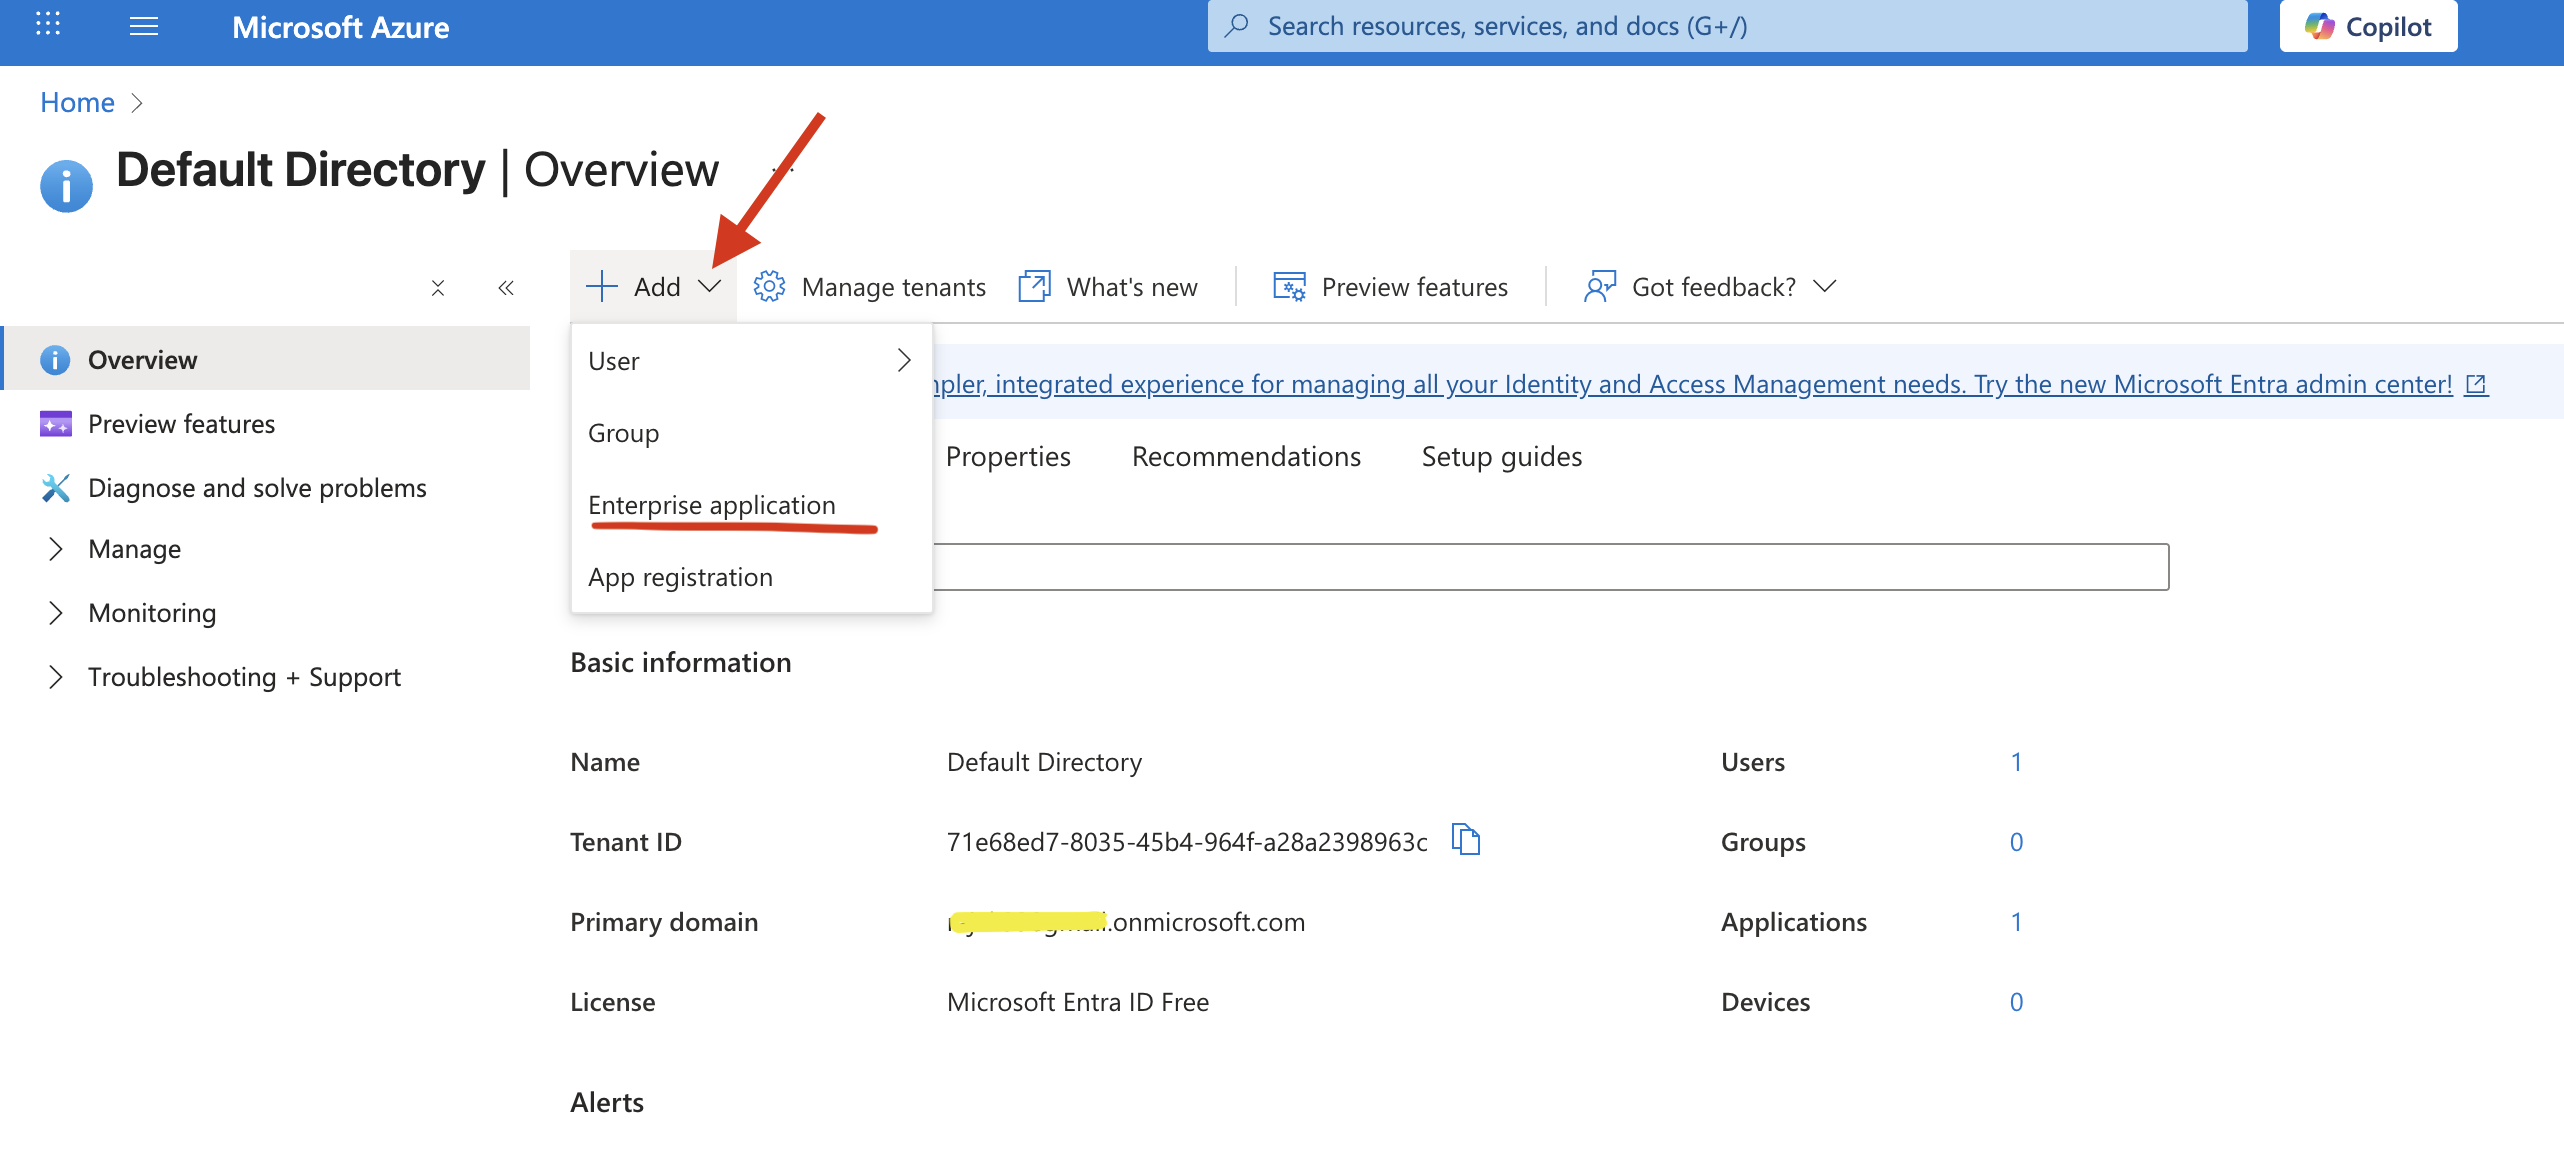
- Look for “Microsoft Entra ID” service → Click “+” → select “Enterprise applications“.
- From gallery section, type Adobe Experience Manager in the search box.
- Select Adobe Experience Manager from results panel and then add the application. Wait a few seconds while the app is added to your tenant.

- Once the application created → Adobe Experience Manager → Manage → select “Single sign-on” → “SAML“

- Click on pencil icon to edit the Basic SAML Configuration

- On the Basic SAML Configuration section, if you wish to configure the application in IDP initiated mode, enter the values for the following fields:
- In the Identifier text box, type a unique value that you define on your AEM server.
- In the Reply URL text box, type a URL using the following pattern: https://<AEM Server Url>/saml_login .
- In the Sign-on URL text box should be configured for the application in SP initiated mode.

- On samepage, in the SAML Signing Certificate section, click Download to download the Certificate (Base64) from the given options as per your requirement and save it on your computer (this certificate can be used in AEM configuration)

- On the Set up Adobe Experience Manager section, copy the appropriate URL(s) as per your requirement. Login URL should be used in the AEM SAML Configuration (section 4.4)

3.1 Create a Microsoft Entra user to test the flow:
In this section, you will create a test user called “Test User”
- Look for “Microsoft Entra ID” service → Click Add “+” → Users → Create User

- In the Display name field, enter test.user.
- In the User principal name field, enter the username@companydomain.extension. For example, test.user@test.com.
- Setup the password and Select Review + Create.

In this section, you’ll enable test.user to use single sign-on by granting access to Adobe Experience Manager application.
- Navigate to application overview page, select Users and groups.

- Select Add user/group, then select Users and groups in the Add Assignment dialog.
- In the Users and groups dialog, select test.user from the Users list, then click the Select button at the bottom of the screen.
- If you are expecting a role to be assigned to the users, you can select it from the Select a role dropdown. If no role has been set up for this app, you see “Default Access” role selected.
- In the Add Assignment dialog, click the Assign button.
4. Configuration changes in the AEM side
4.1 Create Trust Store Certificate:
- Login to AEM instance
- Navigate to Tools → Security → Trust Store → https://<IP address>/libs/granite/security/content/truststore.html.

- Click on “Trust Store“
- Click the empty box titled “Add Certificate from CER file” and upload the downloaded Azure certificate.
- Make sure the “Map Certificate to User” text box remains empty.
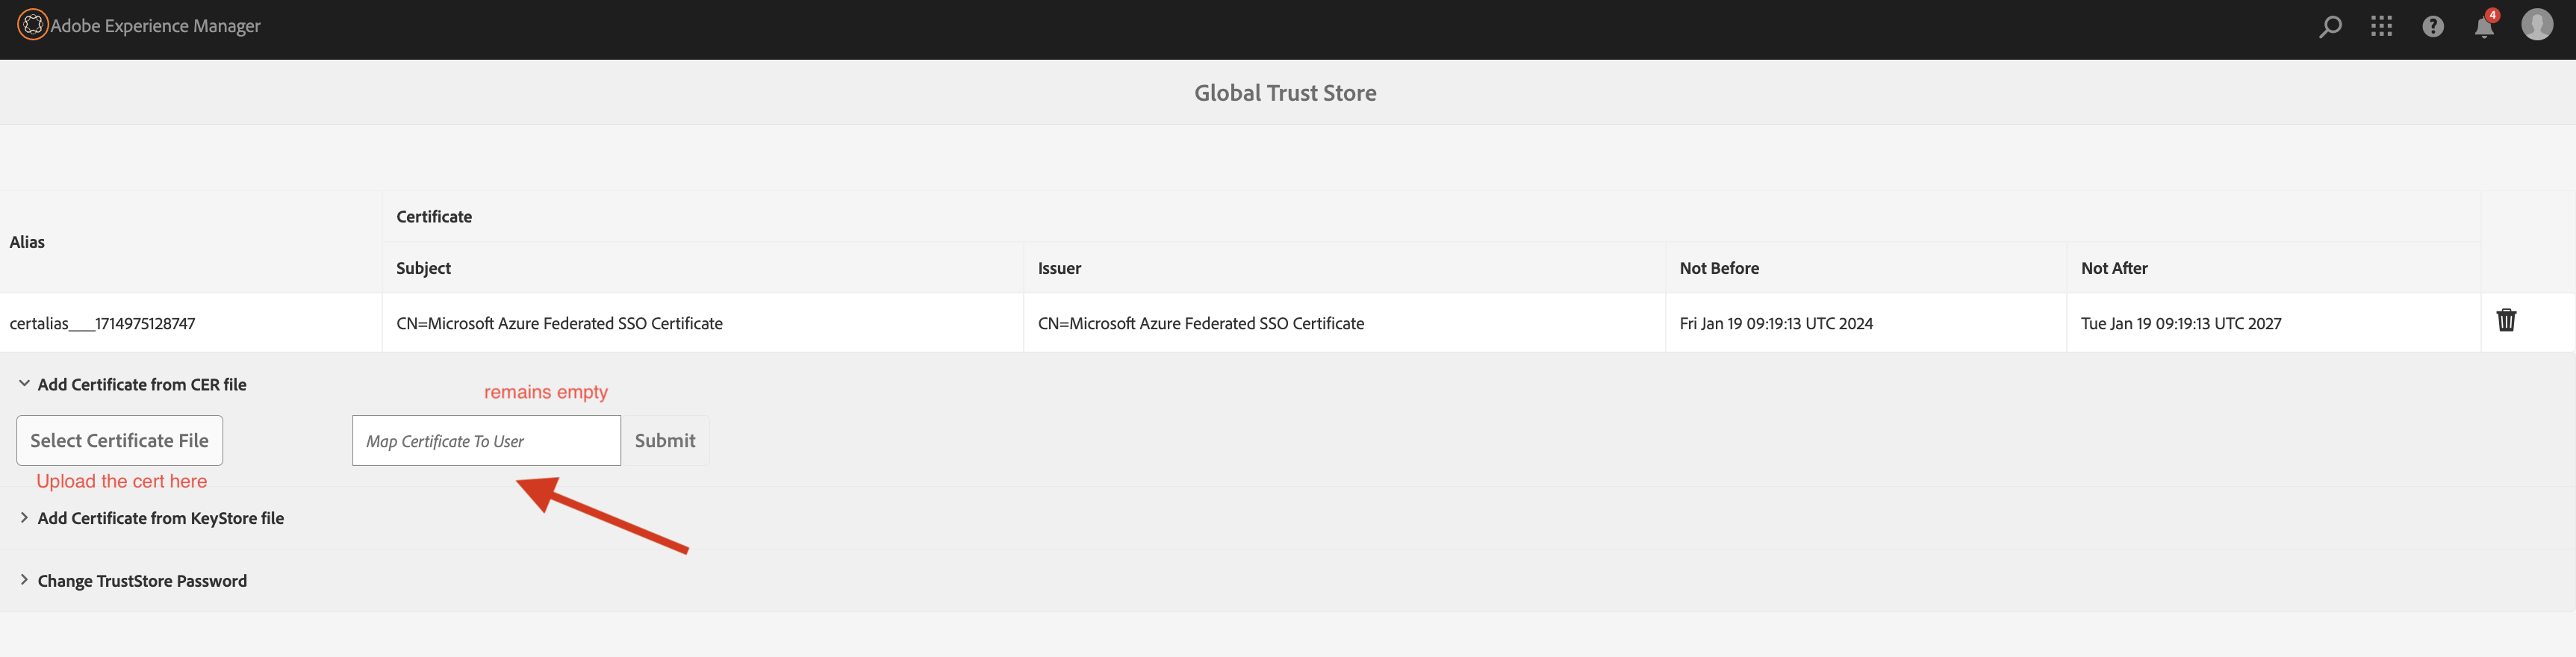 Copy the Cert Alias name where it should be configured in the AEM SAML configuration.
4.2 Generate AEM Keys and Certificate:
Generate and configure the AEM key pair (public and private). In Azure AD, the private key is used to sign SAML messages, whereas the public key (certificate) is used to encrypt the message and validate the signatures. AEM (the SP) uses its private key to sign the AuthnRequest and Azure uses AEM’s public certificate to encrypt assertions returned to AEM.
AEM setup requires a private key in PKCS8 format. Generate RSA private and public keys, plus a certificate. To accomplish this, execute the following command and complete the form.
Define a PEM pass phrase while generating the key (execute the bold highlighted openssl commands)
openssl req -x509 -sha256 -days 365 -newkey rsa:4096 -keyout aem.key -out aem.crt
Convert PEM into DER format. Enter the PEM pass phrase created in above step to write into RSA key
openssl rsa -in aem.key -outformat der -out aem.der
The DER key for PKCS8 must be nocrypt; otherwise, AEM gives an error when inserting the DER key
openssl pkcs8 -topk8 -inform der -nocrypt -in aem.der -outform der -out aem-pkcs8.der
You should now have-
├── aem-pkcs8.der
├── aem.crt
├── aem.der
└── aem.key
4.3 Create Keystore for authentication-service user:
- Login to the AEM instance.
- Go to Tools → Security → Users
- Search for “authentication-service” → Click on Keystore.

- Create a keystore password (this password should be used in SAML configuration section 4.4 )

- On the new pop-up box, enter the alias name, upload the “aem-pkcs8.der” certificate in the Private key area, and upload “aem.crt” and then click Submit.

- We would need the Alias name, keystore password to be configured in the AEM SAML configuration.
4.4 Configure AEM SAML:
Search”Adobe Granite SAML 2.0 Authentication Handler” configuration and create a new configuration by selecting the “+” button and then update the following properties:
Consider that we are enabling SSO authentication for the path /content/brandportal. Enabling SSO on a specific page is also feasible.
- path – Configure the specific content paths that the SAML handler should listen for and redirect to the SSO login page. When we configure “/” SSO authentication, it applies to all content paths in the AEM repository.
- IDP URL – Enter the Azure AD Login URL value from Step 13 of section 3 – Configuration changes in the Azure.
- IDP Certificate Alias – Enter the Certificate Alias value that you added in TrustStore.
- Service Provider Entity ID – Enter the endpoint URL that users can access (Entity ID).
- Assertion Consumer Service URL – Enter the Reply URL value that you configured in the section 3. including the content path that ends with saml_login.
- SP Private Key Alias – Alias name defined in the Authenticate-user keystore setup.
- Password of Key Store – The key store password defined in the Authenticate-user keystore setup (keystore password created in this section – 4.3)
- Use Encryption – Initially complete SAML setup without encryption and re-enable once flow is working. Using this way, it is easy to debug the issue.
- Auto create CRX Users — Keeping it checked will create a user in AEM using the User ID attribute specified above.
- Logout URL (Optional) – Azure AD Logout URL

4.5 Apache Sling Referrer Filter :
Search for Apache “Sling Referrer Filter” configuration and update the below settings:
- Ensure allow.empty value is set to true.
- Add “login.microsoftonline.com” to the Allow Hosts.
- Click Save

4.6 Apache Sling Authentication Service:
- Allow Anonymous Access to be allowed if SSO is only enabled for the Publish instance.
- Update the content path to enable SSO authentication for a specified path.
- Save the configuration.

5. Configure the following rules in the specific site filter file of the Dispatcher configuration:
Append following rules in the filter section of your dispatcher:
/0200 { /type “allow” /method “POST” /url “*/saml_login” }
/0201 { /type “allow” /method “GET” /url “/system/sling/logout” }
/0202 { /type “allow” /method “GET” /url “/system/sling/login” }
6. Test SSO
Make sure the ACL url and Dispatcher Filter rules are appropriately defined; otherwise, we may notice a 500 error after login and a blocked error in the dispatcher logs.
- Click on “Test this application” on the Azure SSO configuration page , this will redirect to Adobe Experience Manager Sign-on URL, which you set up the SSO
- Access the AEM Endpoint URL to see if it redirects to the SAML authentication screen and then complete the flow.

7. Troubleshooting Steps
Navigate to Activity tab to check the Audit log and Sign-in logs to triage the user login issues.

Common Issues observed
Error: com.adobe.granite.auth.saml.model.Assertion Invalid Assertion: Signature invalid.com.adobe.granite.auth.saml.SamlAuthenticationHandler Private key of SP not provided: Cannot sign Authn request
Solution: Delete and re-upload the truststore certificates (.pem) and keystore private keys (aem-pkcs8.der and aem.crt).
Error: /libs/granite/core/content/login.error?j_reason=user_not_found on console. com.adobe.granite.auth.saml.extidp.DefaultUserSync User synchronisation failed. Could not access the repository.
Solution: Enable Auto-Create User in the AEM SAML.
Error: Identifier Not Found:
Solution: Configured Identifier name in the Azure Basic SAML configuration is not matching with Service Provider Entity ID in AEM SAML configuration.