Introduction
Publishing iOS builds manually can become repetitive very quickly.
Every release usually involves:
- Opening Xcode
- Selecting the correct scheme
- Creating an archive
- Exporting an .ipa
- Uploading to TestFlight
- Adding release notes
- Waiting for processing
Doing this repeatedly increases the chances of mistakes and slows down release cycles.
This is where Fastlane becomes extremely useful.
What is Fastlane?
Fastlane is an open-source automation tool used for mobile app deployment.
It helps automate repetitive tasks like:
- Building iOS apps
- Managing certificates and provisioning profiles
- Generating app archives
- Uploading builds to TestFlight or App Store
- Running screenshots and tests
- Automating release workflows in CI/CD pipelines
Instead of manually performing these tasks in Xcode every time, Fastlane lets you automate everything using simple commands.
Why Do We Need Fastlane?
Without Fastlane, a typical iOS release process looks like this:
- Open Xcode
- Select correct environment/scheme
- Clean build
- Archive app
- Export .ipa
- Open App Store Connect uploader
- Upload build
- Add release notes manually
This process:
- Takes time
- Is repetitive
- Can easily lead to human error
- Becomes difficult to scale for teams
Fastlane solves this by converting the entire workflow into a single command.
Example:
fastlane build_and_upload
That one command can:
- Clean the project
- Generate the archive
- Export the .ipa
- Upload to TestFlight
- Attach release notes
Benefits of Using Fastlane
Faster Release Cycles
No need to manually create builds from Xcode every time.
Consistent Builds
Every developer follows the same automated process.
Reduced Human Error
Prevents mistakes like:
- Wrong provisioning profile
- Wrong scheme
- Missing release notes
- Incorrect export method
One-Command Deployment
Complete deployment with a single command.
Alternatives to Fastlane
Although Fastlane is one of the most popular solutions, there are alternatives available.

However, Fastlane remains popular because:
- It integrates directly with iOS tooling
- Works locally and in CI/CD
- Gives full control over deployment flow
- Is lightweight and flexible
Step 1 — Install Fastlane
Install Fastlane globally using Homebrew:
brew install fastlane
Verify the installation:
fastlane –version
Step 2 — Initialize Fastlane in Your iOS Project
Move into the iOS folder of your React Native project:
cd ios
Initialize Fastlane:
fastlane init
During setup, Fastlane will ask:
“What would you like to use fastlane for?”
Choose:
2) Automate beta distribution to TestFlight
Fastlane will then create a dedicated fastlane folder inside your ios directory.
Typical structure:
ios/
└── fastlane/
├── Appfile
├── Fastfile
└── .env
Understanding Fastlane Files
When Fastlane initializes, it creates a few important files.
Understanding these files is important for beginners.
1. Appfile
Location: ios/fastlane/Appfile
Purpose:
The Appfile stores global app configuration used by Fastlane.
Usually contains:
app_identifier(“com.example.app”)
apple_id(“your@email.com”)
team_id(“XXXXXXXX”)
What it means
| Field | Purpose |
| app_identifier | Your iOS bundle ID |
| apple_id | Apple Developer account email |
| team_id | Apple Developer Team ID |
This avoids repeating the same configuration in multiple places.
2. Fastfile
Location: ios/fastlane/Fastfile
Purpose:
This is the main automation file.
It defines:
- Build steps
- Archive steps
- Upload steps
- Deployment lanes
Think of it as the “script” that controls your release pipeline.
Example:
lane :build_and_upload do
# Build logic
# Upload logic
end
Running:
fastlane build_and_upload
executes everything inside that lane.
3. .env
Location: ios/fastlane/.env
Purpose:
Stores sensitive environment variables securely.
Example:
FASTLANE_APPLE_APPLICATION_SPECIFIC_PASSWORD=your_password
This helps avoid hardcoding passwords directly inside the Fastfile.
Important Note About React Native Environment Files
Fastlane does not manage your React Native environment files like:
.env.dev
.env.qa
.env.prod
Your React Native project continues handling environments exactly as usual.
Fastlane simply builds whichever environment/scheme you configure.
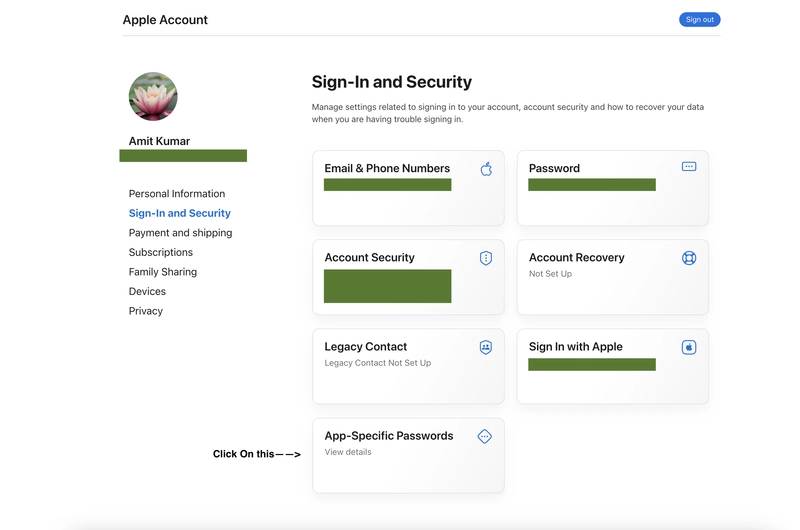
Step 3 — Generate an App-Specific Password
Apple requires an app-specific password for authentication while uploading builds to TestFlight.
Create the password
- Open your Apple ID account page
- Sign in with your Apple Developer account
- Navigate to:Sign-In and Security
- App-Specific Passwords
- Generate a new password
- Copy the generated value
Apple Developer Account
Step 4 — Configure Environment Variables
Inside:
ios/fastlane/
Create a .env file:
touch .env
Add the following:
FASTLANE_APPLE_APPLICATION_SPECIFIC_PASSWORD=your_generated_password
This keeps authentication secure and avoids hardcoding sensitive values in source code.
Step 5 — Configure Your Fastfile
Open: ios/fastlane/Fastfile
Now that the environment is ready, here’s the Fastlane configuration for building your app and uploading it to TestFlight.
default_platform(:ios)
platform :ios do
desc “Build and upload to TestFlight”
lane :build_and_upload do
# Configuration
app_identifier = “com.xxxx.xxxx.xxx” # Replace with your actual bundle ID
profile_name = “YOUR PROJECT NAME – Prod Distribution” # Found in Xcode > Signing & Capabilities
build_ios_app(
workspace: “YOUR_PROJECT.xcworkspace”,
scheme: “YOUR_SCHEME”, # Typically the same as your project name
export_method: “app-store”,
clean: true,
export_options: {
provisioningProfiles: {
app_identifier => profile_name
},
method: “app-store”
},
output_directory: “./build”,
output_name: “YOURIPANAME.ipa”
)
upload_to_testflight(
ipa: “./build/YOURIPANAME.ipa”,
skip_waiting_for_build_processing: true,
changelog: File.read(File.expand_path(“../../release_notes.txt”, File.dirname(__FILE__)))
)
end
end
Make sure to replace the placeholders like:
- YOUR_PROJECT.xcworkspace
- YOUR_SCHEME
- YOURIPANAME.ipa
- app_identifier
Step 6 — Add Release Notes
Creating release_notes.txt
Place this file in your root directory (above ios):
release_notes.txt
Example of release_notes.txt:
New Features
– Added support for voice recognition
– Improved video playback performance
Bug Fixes
– Fixed crash on iOS 17 during startup
– Resolved notification issues on background mode
Step 7 — Trigger the Build
Run the lane from the ios directory:
cd ios && fastlane release_beta
Fastlane will automatically:
- Clean the project
- Generate the production build
- Export the .ipa
- Upload the build to TestFlight
- Attach release notes
All with a single command.
Final Tips
- Keep .env out of version control by adding it to .gitignore.
- Automate the entire flow with CI/CD tools like GitHub Actions or Bitrise.
- Use Fastlane actions like clean_build_artifacts or clear_derived_data for a fresh build.
- Use –verbose flag for debugging when something goes wrong.
Wrapping Up
By automating your iOS builds and TestFlight uploads with Fastlane, you’re saving time, reducing human error, and improving consistency across release cycles.
This setup is a great follow-up to the iOS Fastlane flow, making your entire React Native deployment process fully automated.