

Introduction
Alloy.js is the JavaScript library that powers the Adobe Experience Platform Web SDK (often abbreviated as AEP Web SDK). It represents Adobe’s modern, unified approach to client-side data collection, designed to replace multiple siloed libraries (such as AppMeasurement.js, at.js for Adobe Target, and DIL.js for Audience Manager) with a single, lightweight SDK.
Rather than sending data directly to individual Adobe product endpoints, Alloy.js routes all data through the Adobe Experience Platform Edge Network — a globally distributed, low-latency data collection infrastructure. From the Edge Network, data is forwarded to the appropriate Adobe solutions (Analytics, Target, RTCDP, Journey Optimizer, etc.) based on the configured datastream.
This article will cover the details and different ways to send data using alloy.js library using Adobe Tags (Launch). But, before beginning the implementation, there are few pre-requisite steps mentioned below, which are covered at a high level as they are not in scope of the article.
Configure DataStream, XDM & Web SDK Extension
- The first step is to configure an XDM schema to track the data in a defined field format.
- Next step is to configure data stream. Data send from Adobe Launch, reaches Data Stream and then from here it is sent to different services like Adobe Analytics, AEP, Target etc.
- Adobe Documentation: https://experienceleague.adobe.com/en/docs/experience-platform/datastreams/configure
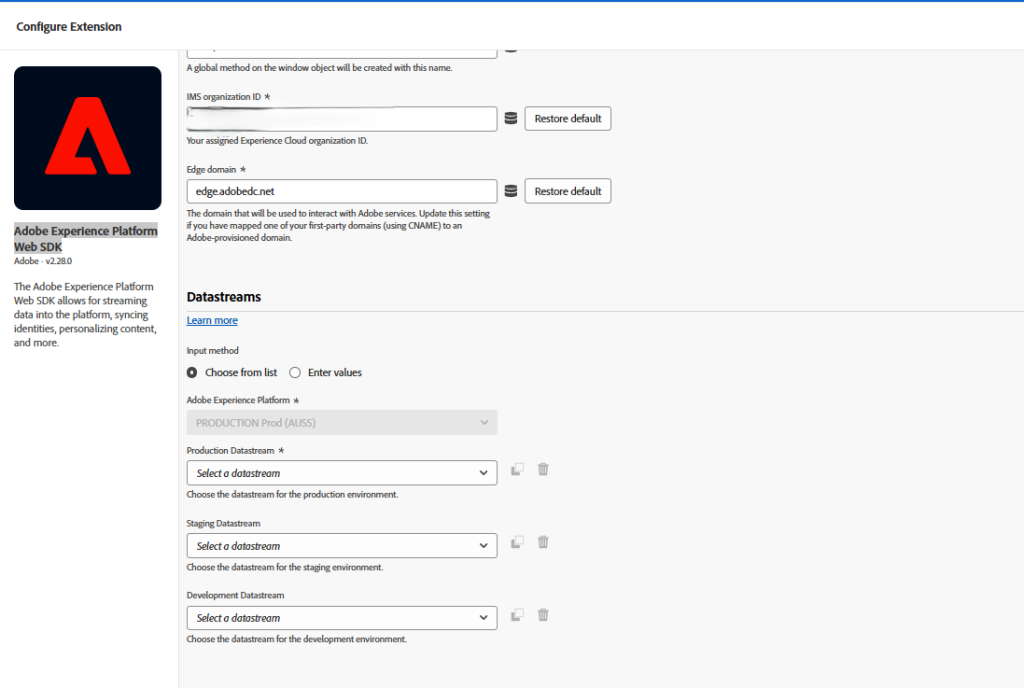
- Adobe Experience Platform Web SDK is needed to configure the setting and load alloy.js library for web tracking using Adobe Launch. The mandatory step is to map the DataStream for the development, staging and production environment respectively. Similar to app measurement, you can also configure OOTB link tracking, edit data before it is sent to Adobe Edge Servers etc in the extension.
Implementing Tracking Using XDM
The recommended way to send data with Alloy.js is by using an XDM (Experience Data Model) object. XDM is a standardized, open-source schema specification maintained by Adobe that defines a common language for customer experience data.
There are two ways to create & populate the XDM Object and send the data to Adobe Edge. The major difference between the two approaches is how and where the XDM is populated. In the first approach where we create an XDM Object Data element, we populate it there and directly send it in rule, but when creating an XDM Variable, we populate it before sending the event in a rule. Additionally, in the Variable approach, it provides a custom code editor, so we can write custom logics and manipulate the XDM there, similar to the “On Before Send Event” section in the extension.
Approach 1: Implementing Tracking using an XDM Schema Data Object
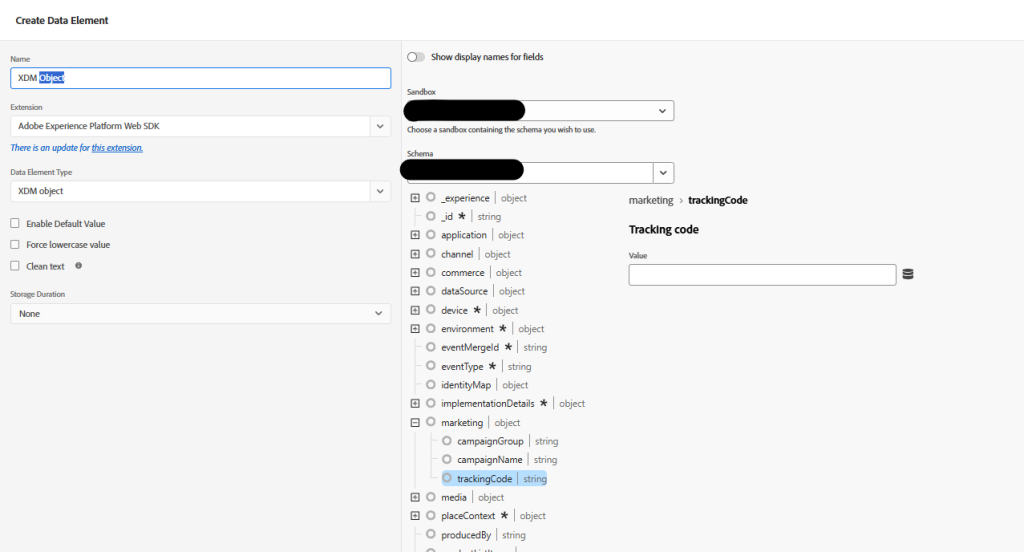
- Creating the XDM Object.
- Select the Adobe Experience Platform Web SDK in extensions.
- Select XDM Object in the Data Element Type
- Then select your sandbox
- Then select the schema for which you want to create the data element.
- Then populate the schema with the values needed to be sent to the Adobe Edge Network
- Create the Rule and send the data to adobe servers.
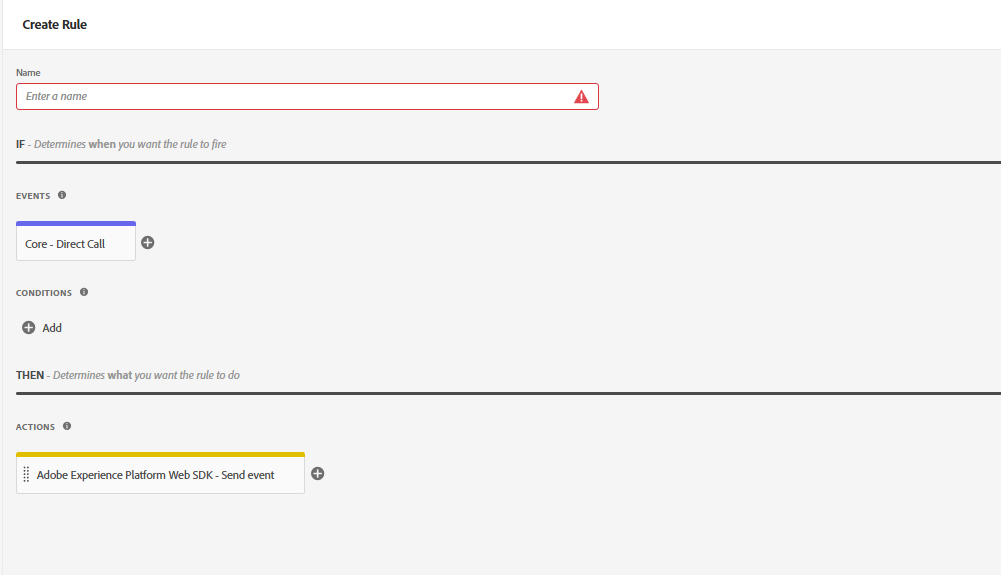
- Select the appropriate event and condition as done in any implementation.
- Under actions, select the Adobe Experience Platform Web SDK Extension
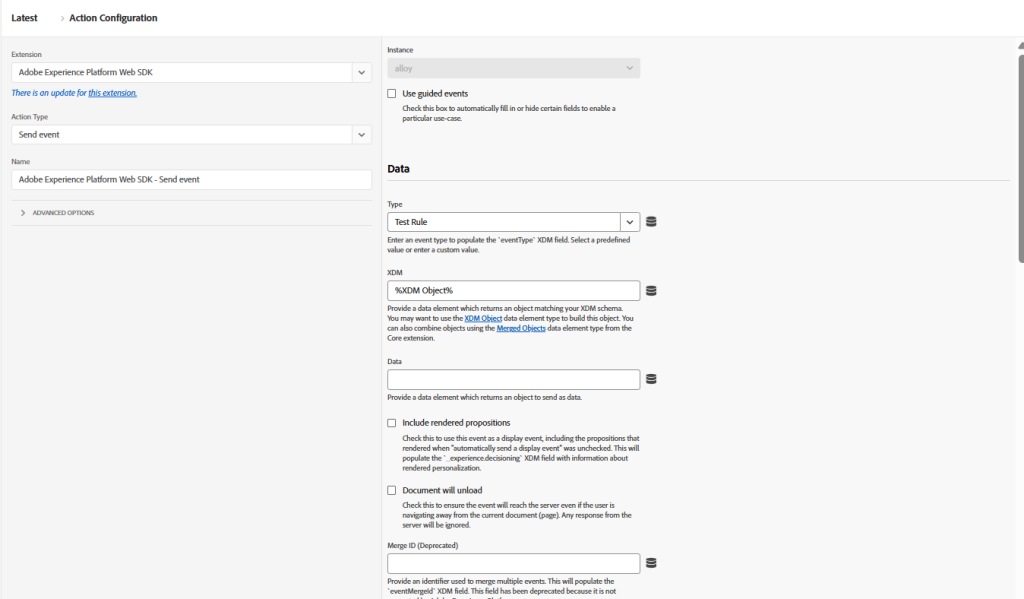
- Then select action type as send event.
- In the XDM filed, select the XDM populated in step one and fill the event type and other information as needed.
Approach 2: Implementing Tracking using an XDM Schema Update Variable
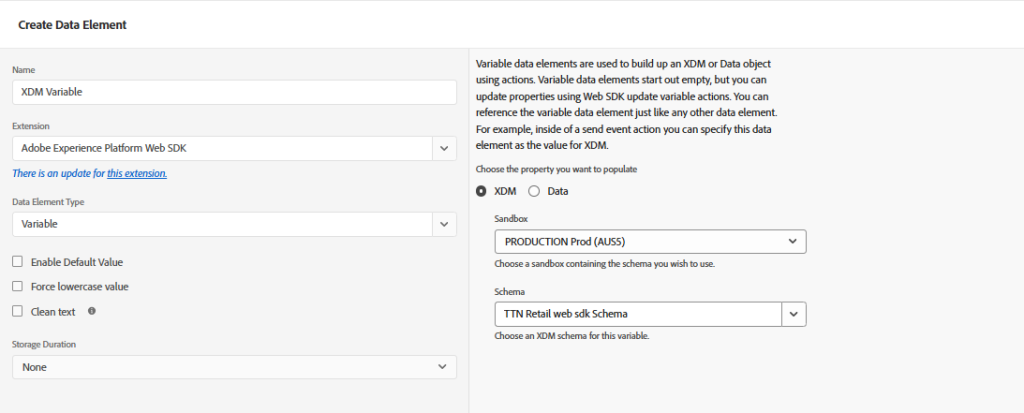
- Creating the XDM Variable
- Select the Adobe Experience Platform Web SDK in extensions.
- Select Variable in the Data Element Type
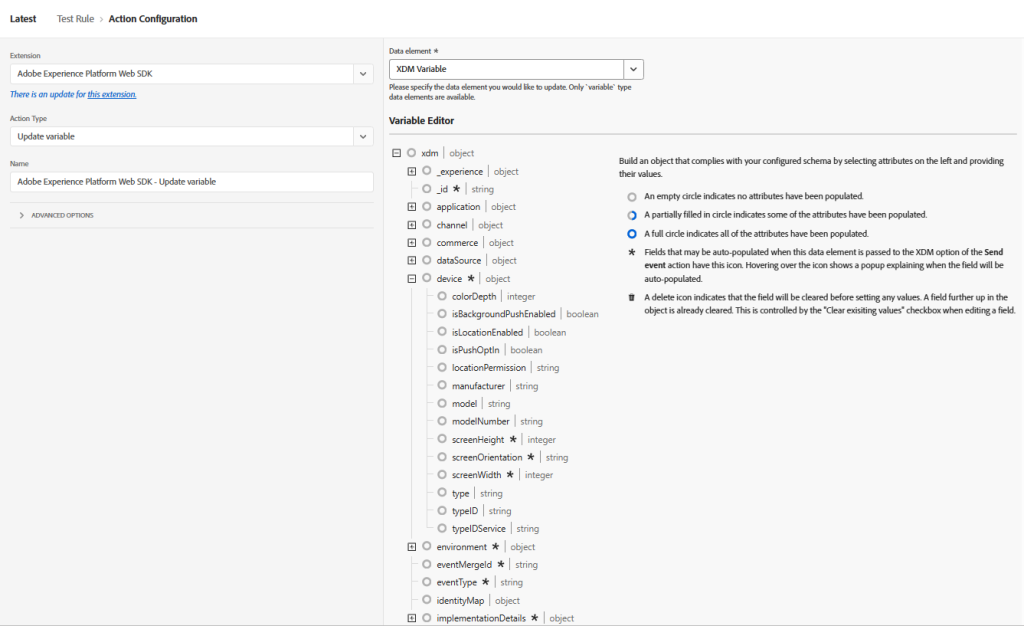
- Then select XDM from the radio button
- Then select the sandbox and the schema for which you want to create the data element.
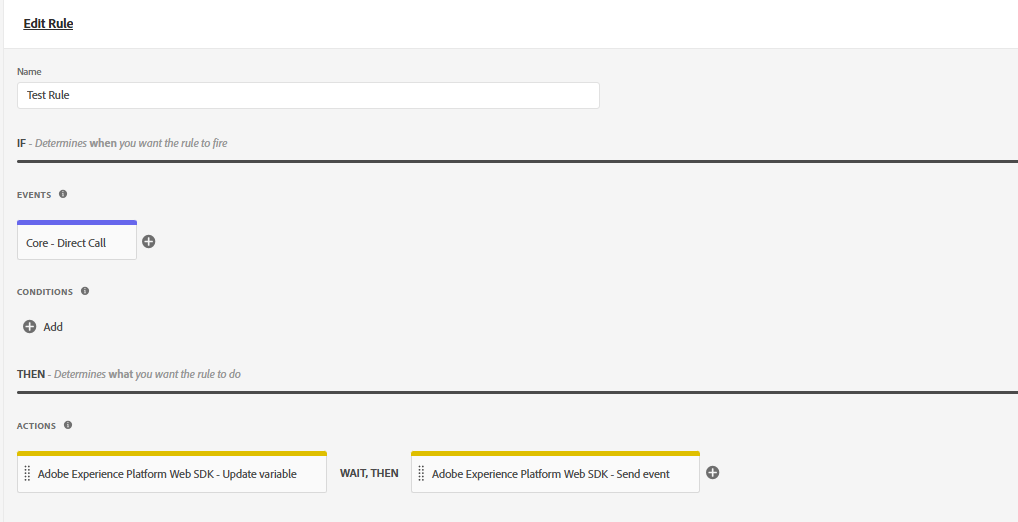
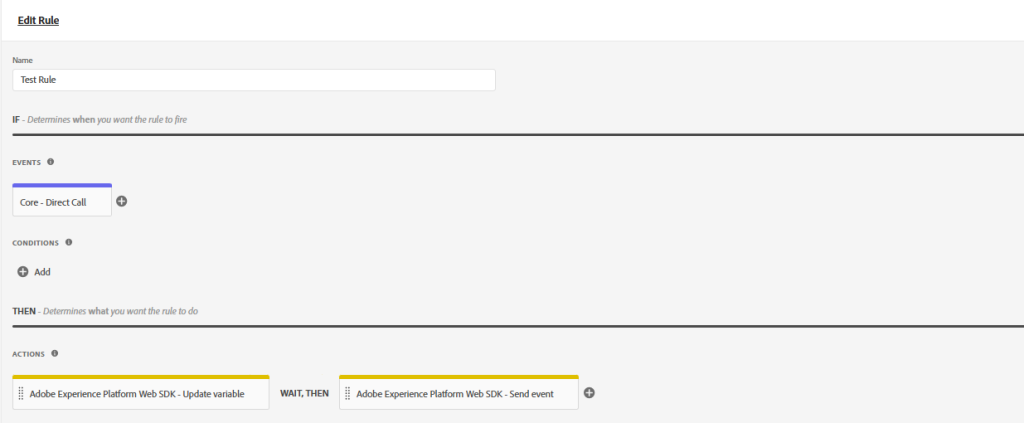
- Create the Rule and send the data to adobe servers
- Select the appropriate event and condition as done in any implementation.
- Under actions, select the Adobe Experience Platform Web SDK Extension
- Then select update variable as the action type and then select the variable created in previous step and populate it.
- Under actions, select the Adobe Experience Platform Web SDK Extension
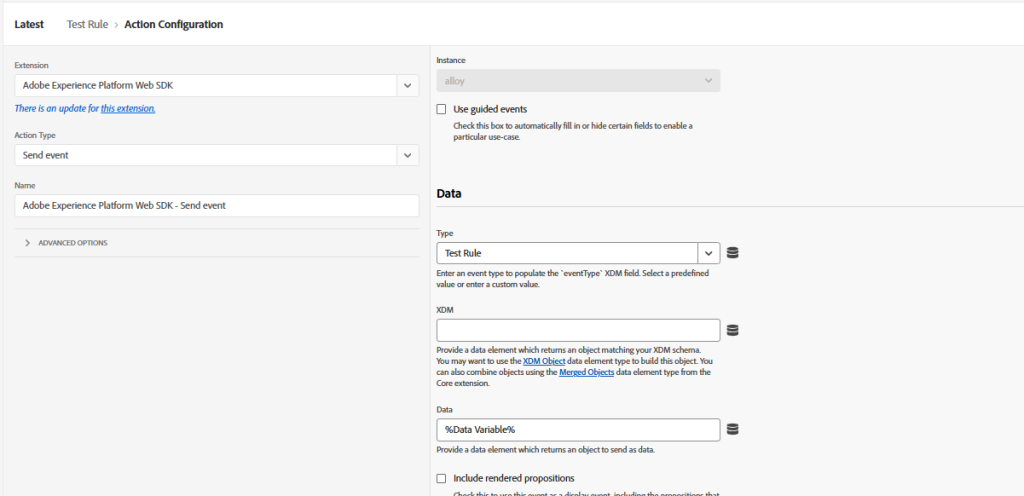
- Then select action type as send event.
- In the XDM field, select the XDM created in step one and fill the event type and other information as needed.
Implementing Tracking Using the Data Object (Without XDM)
For teams migrating from AppMeasurement.js who want to leverage Alloy.js without immediately building out a full XDM schema, Adobe provides an alternative approach using the data object. This allows you to pass Adobe Analytics variables in a familiar format, bypassing the XDM schema requirement.
Key points when using the data object approach:
- No XDM schema setup is required in Adobe Experience Platform.
- The Analytics variables are passed in a structure very similar to AppMeasurement.js, lowering the barrier to migration.
- This approach is officially supported by Adobe and is well-suited for phased migrations.
- However, data sent purely through the data object does not benefit from XDM’s standardization, portability, or reuse across non-Analytics AEP services.
- Teams are generally encouraged to move toward XDM over time for the full benefits of the Adobe Experience Platform.
The steps to implement tracking are very similar to those of the XDM Variable Approach
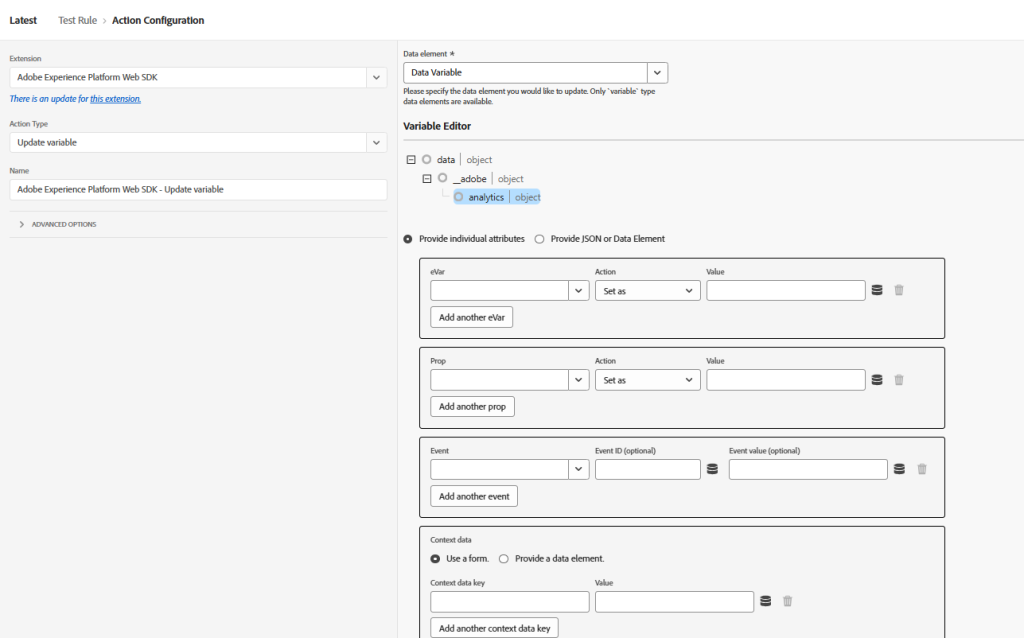
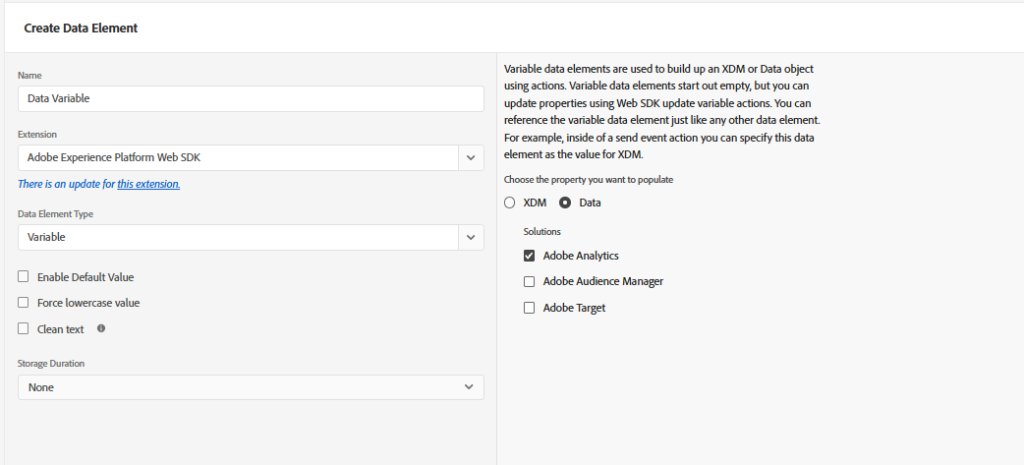
- Creating the Data Variable
- Select the Adobe Experience Platform Web SDK in extensions.
- Select Variable in the Data Element Type
- Then select the Data option from the radio button.
- Finally, select the products for which you want to send data, in our case Analytics.
- Create the Rule and send the data to adobe server.
- Select the appropriate event and condition as done in any implementation.
- Under actions, select the Adobe Experience Platform Web SDK Extension
- Then select update variable as the action type and then select the variable created in previous step and populate it.
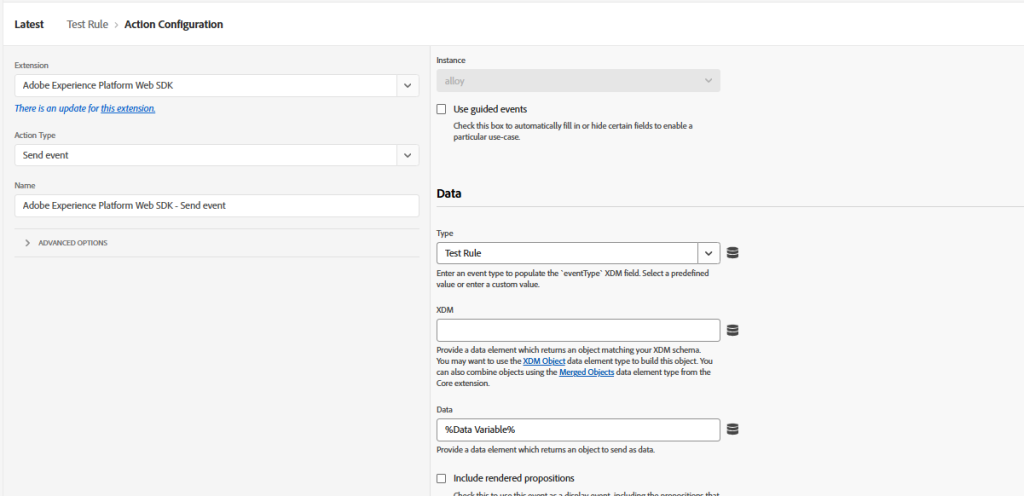
- Under actions, select the Adobe Experience Platform Web SDK Extension
- Then select action type as send event.
- In the Data field, select the Variable created in step one and fill the event type and other information as needed.