In my previous blog, I had given an overview of Spinnaker and its capabilities. And in this blog, we will see how spinnaker can be set up for continuous delivery.
We will set up Spinnaker in an AWS environment, though Spinnaker can be set up on any platform (Google Cloud, Azure, Cloud Foundry etc.) and it can be later integrated with other providers.
The setup process can be divided broadly into 2 parts:
- Setting up Cloud Provider (AWS)
- Setting up Spinnaker Instance
1. Setting up AWS:
Note: The naming convention used in the below steps are for the default configuration. You can choose to use your own names, but in that case, you might need to perform a lot of customization in Spinnaker.
- Create a VPC in your AWS account. We will name it “defaultvpc”.
Create a subnet in your VPC created above. We will name it “defaultvpc.internal.us-east-1”. You can name it according to the region you have created your VPC in.
Create an internet gateway and attach to above subnet.
Add a default route for your subnet with this internet gateway.
The instances brought up by spinnaker will be in this VPC/Subnet. - Create an EC2 IAM Role and name it “BaseIAMRole”. The instances created by Spinnaker will have this Role attached to them. You can skip this step if you do not want to assign any Role to the instances brought up by Spinnaker.
- Create AWS Keypair to access the spinnaker instance. You can create the key pair at the time of bringing up instance as well. You can also skip this step if you already have a keypair.
Now that AWS setup is complete, Let’s bring up the Spinnaker instance.
2. Setting up Spinnaker Instance:
1. The Spinnaker instance will bring up and down other instances in your AWS account. So we need to grant it access to perform the necessary tasks. Create a new EC Role for the Spinnaker instance, and let’s call it “spinnakerRole”. We need to attach the policy “PowerUserAccess”.
Create a new Inline policy through policy generator to provide custom “PassRole” role from IAM. For creating this policy, select “AWS Identity and Access Management” from the AWS Service pulldown and select “PassRole” for Actions.
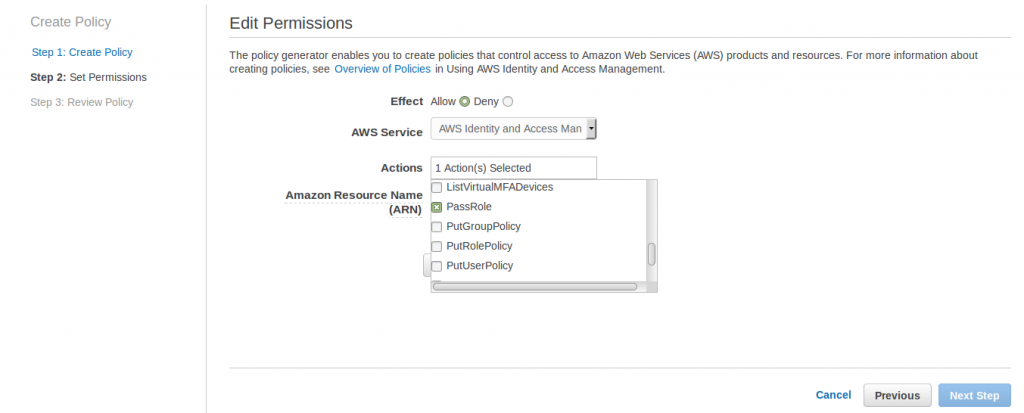 Type * in Amazon Resource Name (ARN) box and apply the changes.
Attach this policy to the Role you created above.
2. Launch an m4.xlarge instance from EC2 console. Spinnaker has already built AMIs for you to set up Spinnaker. These AMIs are different for different regions. You can choose your AMI according to your region choice from this link. You can auto-assign public IP while launching, although it will be good if you attach elastic IP for your spinnaker instance.
Add storage and create a security group. Don’t forget to enable SSH port from your IP address.
Attach the key pair created above to this instance.
3. Once your instance is up login into the instance and set a hostname for it. Make required changes in /etc/hostname and /etc/hosts files.
4. We will create an SSH tunnel from your machine to Spinnaker instance. Spinnaker UI will be accessed from this tunnel only. In order to create the tunnel, let us set up the SSH configuration on our machine (workstation). In ~/.ssh/config file of your machine, create the following entry:
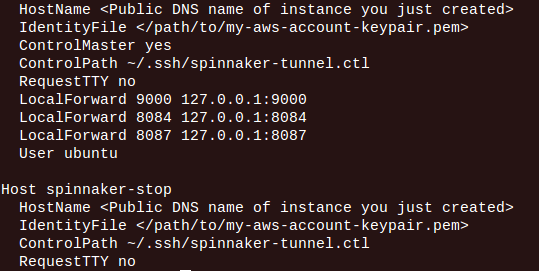
Make sure to change the hostname and identity file.
5. We will now create a script to easily start and stop the tunnel. Create a file named “spinnaker-tunnel.sh” with content as given below:
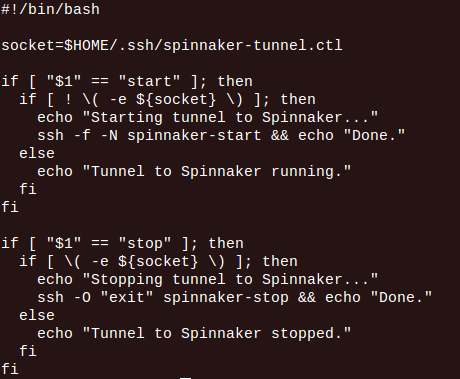
Provide execute permissions to it.
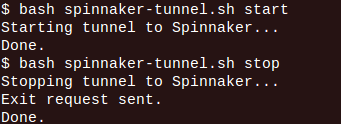
6. To start and stop the tunnel, you can execute following commands:
That is all you need to do to set up Spinnaker on AWS. The Spinnaker management console can be accessed from the following URL:
You need to follow the steps mentioned above to create a tunnel so that spinnaker is available via SSH tunnel only. This is because we have not used any SSL certificates, so this secures the whole communication. Also, you don’t need to open additional ports in the security group. Only SSH port needs to be allowed. However, if you want, you can choose to access Spinnaker directly over HTTP, and for that, you need to open required ports in your security group. If you choose to do so, it’s better to use (self-signed) certificates as well.
In the next blog, we will see how we can bring up the clusters in Spinnaker, and how pipelines are set up in Spinnaker.