![]()
In this blog, we will learn how to setup Kubernetes cluster on servers running on CentOS (Bare-metal installation) as well as deploy add-on services such as DNS and Kubernetes Dashboard.
If you are new to Kubernetes cluster and want to understand its architecture then you can through the blog on the Introduction on Kubernetes. So, Let’s get started with the installation.
Prerequisites:
You need at least 2 servers for setting Kubernetes cluster. For this blog, we are using three servers to form Kubernetes cluster. Make sure that each of these servers has at least 1 core and 2 GB memory.
Master 172.16.0.1
Minion1 172.16.0.2
Minion2 172.16.0.3
Cluster Configuration:
- Infrastructure Private subnet IP range: 172.16.0.0/16
- Flannel subnet IP range: 172.30.0.0/16 (You can choose any IP range just make sure it does not overlap with any other IP range)
- Service Cluster IP range for Kubernetes: 10.254.0.0/16 (You can choose any IP range just make sure it does not overlap with any other IP range)
- Kubernetes Service IP: 10.254.0.1 (First IP from service cluster IP range is always allocated to Kubernetes Service)
- DNS service IP: 10.254.3.100 (You can use any IP from the service cluster IP range just make sure that the IP is not allocated to any other service)
Step 1: Create a Repo on all Host i.e. Master, Minion1, and Minion2.
[js]
vim /etc/yum.repos.d/virt7-docker-common-release.repo
[virt7-docker-common-release]
name=virt7-docker-common-release
baseurl=http://cbs.centos.org/repos/virt7-docker-common-release/x86_64/os/
gpgcheck=0
[/js]
Step 2: Installing Kubernetes, etcd and flannel.
[js]
yum -y install –enablerepo=virt7-docker-common-release kubernetes etcd flannel
[/js]
The above command also installs Docker and cadvisor.
Step 3: Next Configure Kubernetes Components.
Kubernetes Common Configuration (On All Nodes)
Let’s get started with the common configuration for Kubernetes cluster. This configuration should be done on all the host i.e. Master and Minions.
[js]
vi /etc/kubernetes/config
# Comma separated list of nodes running etcd cluster
KUBE_ETCD_SERVERS="–etcd-servers=http://172.16.0.1:2379"
# Logging will be stored in system journal
KUBE_LOGTOSTDERR="–logtostderr=true"
# Journal message level, 0 is debug
KUBE_LOG_LEVEL="–v=0"
# Should this cluster be allowed to run privileged docker containers
KUBE_ALLOW_PRIV="–allow-privileged=false"
# Api-server endpoint used in scheduler and controller-manager
KUBE_MASTER="–master=http://172.16.0.1:8080"
[/js]
ETCD Configuration (On Master)
Next, we need to configure etcd for Kubernetes cluster. Etcd configuration is stored in /etc/etcd/etcd.conf
[js]
vi /etc/etcd/etcd.conf
#[member]
ETCD_NAME=default
ETCD_DATA_DIR="/var/lib/etcd/default.etcd"
ETCD_LISTEN_CLIENT_URLS="http://0.0.0.0:2379"
#[cluster]
ETCD_ADVERTISE_CLIENT_URLS="http://0.0.0.0:2379"
[/js]
All the configuration data of Kubernetes is stored in etcd. To increase security, etcd can be bind to the private IP address of the master node. Now, etcd endpoint can only be accessed from the private Subnet.
API Server Configuration (On Master)
API Server handles the REST operations and acts as a front-end to the cluster’s shared state. API Server Configuration is stored at /etc/kubernetes/apiserver.
Kubernetes uses certificates to authenticate API request. Before configuring API server, we need to generate certificates that can be used for authentication. Kubernetes provides ready made scripts for generating these certificates which can be found here.
Download this script and update line number 30 in the file.
[js]
# update the below line with the group that exists on Kubernetes Master.
/* Use the user group with which you are planning to run kubernetes services */
cert_group=${CERT_GROUP:-kube}
[/js]
Now, run the script with following parameters to create certificates:
[js]
bash make-ca-cert.sh "172.16.0.1" "IP:172.16.0.1,IP:10.254.0.1,DNS:kubernetes,DNS:kubernetes.default,DNS:kubernetes.default.svc,DNS:kubernetes.default.svc.cluster.local"
[/js]
Where 172.16.0.1 is the IP of the master server, 10.254.0.1 is the IP of Kubernetes service. Now, we can configure API server:
[js]
vi /etc/kubernetes/apiserver
# Bind kube API server to this IP
KUBE_API_ADDRESS="–address=0.0.0.0"
# Port that kube api server listens to.
KUBE_API_PORT="–port=8080"
# Port kubelet listen on
KUBELET_PORT="–kubelet-port=10250"
# Address range to use for services(Work unit of Kubernetes)
KUBE_SERVICE_ADDRESSES="–service-cluster-ip-range=10.254.0.0/16"
# default admission control policies
KUBE_ADMISSION_CONTROL="–admission-control=NamespaceLifecycle,NamespaceExists,LimitRanger,SecurityContextDeny,ServiceAccount,ResourceQuota"
# Add your own!
KUBE_API_ARGS="–client-ca-file=/srv/kubernetes/ca.crt –tls-cert-file=/srv/kubernetes/server.cert –tls-private-key-file=/srv/kubernetes/server.key"
[/js]
Note: Please make sure service cluster IP range doesn’t overlap with infrastructure Subnet IP range.
Controller Manager Configuration (On Master)
[js]
vi /etc/kubernetes/controller-manager
# Add your own!
KUBE_CONTROLLER_MANAGER_ARGS="–root-ca-file=/srv/kubernetes/ca.crt –service-account-private-key-file=/srv/kubernetes/server.key"
[/js]
Kubelet Configuration (On Minions)
Kubelet is a node/minion agent that runs pods and make sure that it is healthy. It also communicates pod details to Kubernetes Master. Kubelet configuration is stored in /etc/kubernetes/kubelet
[On Minion1]
[js]
vi /etc/kubernetes/kubelet
# kubelet bind ip address(Provide private ip of minion)
KUBELET_ADDRESS="–address=0.0.0.0"
# port on which kubelet listen
KUBELET_PORT="–port=10250"
# leave this blank to use the hostname of server
KUBELET_HOSTNAME="–hostname-override=172.16.0.2"
# Location of the api-server
KUBELET_API_SERVER="–api-servers=http://172.16.0.1:8080"
# Add your own!
KUBELET_ARGS=""
[/js]
[On Minion2]
[js]
vi /etc/kubernetes/kubelet
# kubelet bind ip address(Provide private ip of minion)
KUBELET_ADDRESS="–address=0.0.0.0"
# port on which kubelet listen
KUBELET_PORT="–port=10250"
# leave this blank to use the hostname of server
KUBELET_HOSTNAME="–hostname-override=172.16.0.3"
# Location of the api-server
KUBELET_API_SERVER="–api-servers=http://172.16.0.1:8080"
# Add your own!
KUBELET_ARGS=""
[/js]
Before Configuring Flannel for Kubernetes cluster, we need to create network configuration for Flannel in etcd.
So start the etcd node on the master using the following command:
[js]
systemctl start etcd
[/js]
Create a new key in etcd to store Flannel configuration using the following command:
[js]
etcdctl mkdir /kube-centos/network
[/js]
Next, we need to define the network configuration for Flannel:
[js]
etcdctl mk /kube-centos/network/config "{ \"Network\": \"172.30.0.0/16\", \"SubnetLen\": 24, \"Backend\": { \"Type\": \"vxlan\" } }"
[/js]
The above command allocates the 172.30.0.0/16 subnet to the Flannel network. A flannel subnet of CIDR 24 is allocated to each server in Kubernetes cluster.
Note: Please make sure Flannel subnet doesn’t overlap with infrastructure subnet or service cluster IP range.
Flannel Configuration (On All Nodes)
Kubernetes uses Flannel to build an overlay network for inter-pod communication. Flannel configuration is stored in /etc/sysconfig/flanneld
[js]
vi /etc/sysconfig/flanneld
# etcd URL location. Point this to the server where etcd runs
FLANNEL_ETCD="http://172.16.0.1:2379"
# etcd config key. This is the configuration key that flannel queries
# For address range assignment
FLANNEL_ETCD_PREFIX="/kube-centos/network"
# Any additional options that you want to pass
FLANNEL_OPTIONS=""
[/js]
Step 4: Start services on Master and Minion
On Master
[js]
systemctl enable kube-apiserver
systemctl start kube-apiserver
systemctl enable kube-controller-manager
systemctl start kube-controller-manager
systemctl start kube-scheduler
systemctl start kube-scheduler
systemctl enable flanneld
systemctl start flanneld
[/js]
On Minions
[js]
systemctl enable kube-proxy
systemctl start kube-proxy
systemctl enable kubelet
systemctl start kubelet
systemctl enable flanneld
systemctl start flanneld
systemctl enable docker
systemctl start docker
[/js]
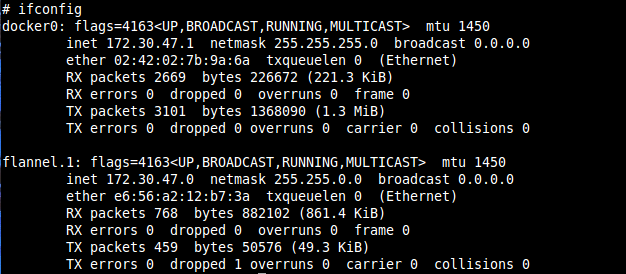
Note: In each host, make sure that IP address allocated to Docker0 is the first IP address in the Flannel subnet, otherwise your cluster won’t work properly. To check this, use “ifconfig” command.
Step 5: Check Status of all Services
Make sure etcd, kube-apiserver, kube-controller-manager, kube-scheduler, and flanneld is running on Master and kube-proxy, kubelet, flanneld, and docker is running on the slave.
Deploying Addons in Kubernetes
Configuring DNS for Kubernetes Cluster
To enable service name discovery in our Kubernetes cluster, we need to configure DNS for our Kubernetes cluster. To do so, we need to deploy DNS pod and service in our cluster and configure Kubelet to resolve all DNS queries from this DNS service (local DNS).
You can download DNS Replication Controller and Service YAML from my repository. You can also download the latest version of DNS from official Kubernetes repository (kubernetes/cluster/addons/dns).
Next, use the following command to create a replication controller and service:
[js]
Kubectl create -f DNS/skydns-rc.yaml
Kubectl create -f DNS/skydns-svc.yaml
[/js]
Note: Make sure you have entered correct cluster IP for DNS service in skydns-svc.yaml
For this blog, we have used 10.254.3.100 as DNS service IP.
Now, configure Kubelet in all Minion to resolve all DNS queries from our local DNS service.
[js]
vim /etc/kubernetes/kubelet
# Add your own!
KUBELET_ARGS="–cluster-dns=10.254.3.100 –cluster-domain=cluster.local"
[/js]
Restart kubelet on all Minions to load the new kubelet configuration.
[js]
systemctl restart kubelet
[/js]
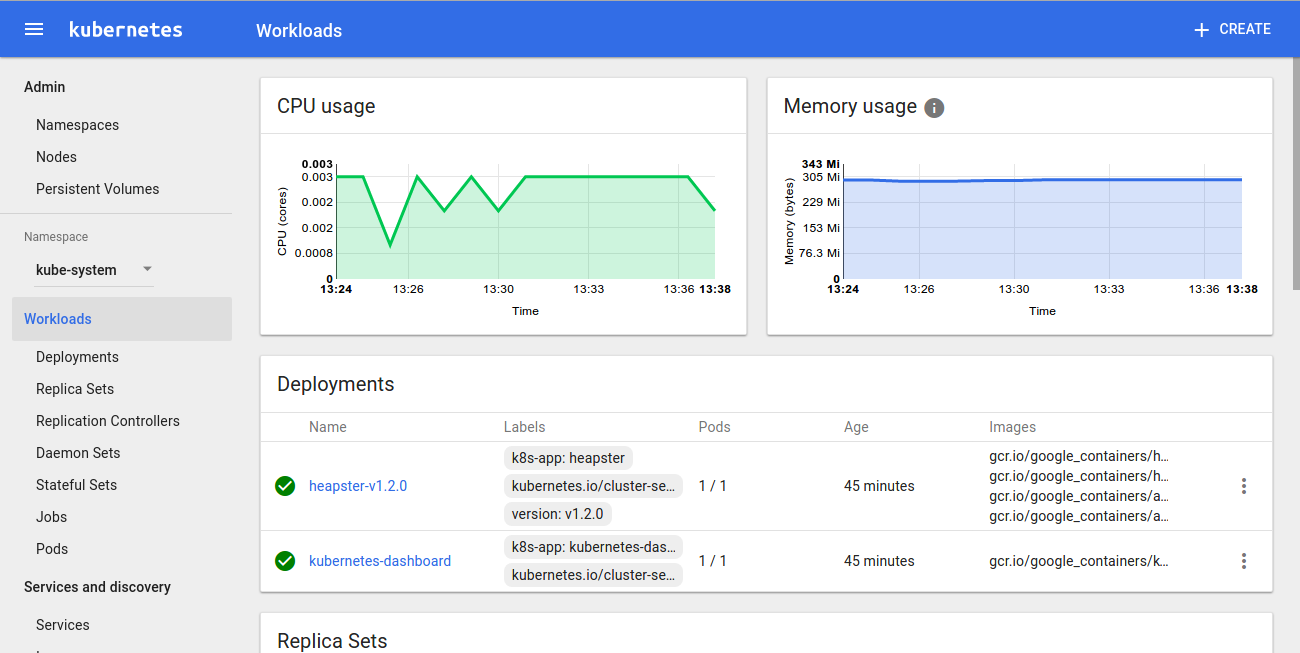
Configuring Dashboard for Kubernetes Cluster
Kubernetes Dashboard provides User Interface through which we can manage Kubernetes work units. We can create, delete or edit all work unit from Dashboard.
Kubernetes Dashboard is also deployed as a Pod in the cluster. You can download Dashboard Deployment and Service YAML from my repository. You can also download the latest version of Dashboard from official Kubernetes repository (kubernetes/cluster/addons/dashboard)
After downloading YAML, run the following commands from the master:
[js]
Kubectl create -f Dashboard/dashboard-controller.yaml
Kubectl create -f Dashboard/dashboard-service.yaml
[/js]
Now you can access Kubernetes Dashboard on your browser.
Open http://master_public_ip:8080/ui on your browser.
Note: Don’t forget to secure your Dashboard. You can install Nginx or Apache web server on your master that proxy pass to localhost: 8080 port and enable http_auth on it to secure your Dashboard.
Configuring Monitoring for Kubernetes Cluster
Kubernetes provides detail resource usage monitoring at the container, Pod, and cluster level. The user can monitor their application at all these levels. It provides a user deep insights of their application that allows user to easily find bottlenecks. To enable monitoring, we need to configure the monitoring stack for Kubernetes. Heapster lies at the heart of the monitoring stack. Heapster runs as a POD in the cluster. It discovers all the nodes in the cluster and query usage information from kubelet of all node. This usage information is stored in influxDB and visualized using grafana. More information on this can be found here.
Kubernetes provide ready made YAML configs for the monitoring stack. These YAML configs aren’t meant to be used directly. So, we need to make some changes. Download latest version of monitoring stack from official Kubernetes repository (kubernetes/cluster/addons/cluster-monitoring/influxdb). We only need to update heapster-controller.yaml. Remove the template from the top of the file and replace the variables with their values in the body.
Updated YAML configs for monitoring stack can also be found here.
Using the following command to launch monitoring stack:
[js]
kubectl create -f cluster-monitoring/influxdb
[/js]
Check Cluster Configuration
Next, we need to check if all the addons are working properly.
Run the following command to check if all the addon services are running: kubectl cluster-info

This command will help users to see if the add-ons are working properly.
can please fix this link
https://github.com/kubernetes/kubernetes/blob/master/cluster/saltbase/salt/generate-cert/make-ca-cert.sh
probably it is broken.
can I use latest centos – kubernetes 110 repo with these instructions given above
cbs.centos.org/repos/virt7-kubernetes-110-release/x86_64/os
Error on running dashboard:
[root@muk8smaster-corp ~]# kubectl –namespace=kube-system get all
CONTROLLER CONTAINER(S) IMAGE(S) SELECTOR REPLICAS AGE
NAME LABELS SELECTOR IP(S) PORT(S) AGE
kubernetes-dashboard k8s-app=kubernetes-dashboard,kubernetes.io/cluster-service=true k8s-app=kubernetes-dashboard 10.254.136.51 80/TCP 14m
NAME READY STATUS RESTARTS AGE
NAME LABELS STATUS VOLUME AGE
But on the WebPage:
kind “Status”
apiVersion “v1”
metadata {}
status “Failure”
message “endpoints \”kube-ui\” not found”
reason “NotFound”
details
name “kube-ui”
kind “endpoints”
code 404
I see you have setup 1.5 version of kubernetes, Share steps for upgrading to higher version complete cluster
Hi,
I have installed kubernetes via yum. But for now, I can’t run systemctl enable kube-apiserver and other services on Master server.
What have I done wrong?
Thanks,
-Lusine
Try the below solution it worked for me:
openssl genrsa -out /tmp/serviceaccount.key 2048
vim /etc/kubernetes/apiserver:
KUBE_API_ARGS=”–service_account_key_file=/tmp/serviceaccount.key”
vim /etc/kubernetes/controller-manager
KUBE_CONTROLLER_MANAGER_ARGS=”–service_account_private_key_file=/tmp/serviceaccount.key”
systemctl restart kube-controller-manager.service
kubedns does nt work as per your steps. Im nt able to resolve
kubectl exec -ti busybox — nslookup kubernetes.default
kubectl exec -it busybox — nslookup kubernetes.default.svc.cluster.local
Thanks for the nice writeup. I was seeing below error while running some pods. Any thoughts?
“`
/var/run/secrets/kubernetes.io/serviceaccount/token: no such file or directory.
“`
“`
# kubectl get serviceAccounts
NAME SECRETS AGE
default 0 14d
“`
i get error while running dashboard
Hi,
Did you manage to sort this serviceaccount/token file missing? I’m facing same challenge.