Chef is a systems and cloud infrastructure automation framework. No matter the size of the infrastructure, it easy to deploy servers and applications to any physical, virtual, or cloud location. In short chef is infrastructure automation and management tool.
In this article , we will understand the Chef architecture , its working and will write a sample cookbook . This sample cookbook will install a web server on Amazon EC2 instance and will deploy a static website having single index.html page.
Understanding Chef Architecture
Before jumping into architecture let us understand which Chef is right for you. Chef is available in two flavors: Enterprise Chef and Open Source Chef.
Enterprise Chef is a powerful solution for big enterprises for managing and automating large-scale infrastructure that includes premium features like multi-tenancy, role-based access control, reporting . This includes support from automation experts at Chef.
Open source Chef is an open-source free version of Chef server that is the basis for both versions of Chef.
Hence basic architecture is same for both flavors.
Architecture

Reference : docs.opscode.com
Workstation
A workstation is a computer that is configured to run Knife, to synchronize with the 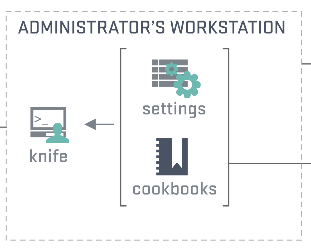 chef-repo, and interact with a single Chef server.The workstation is the location from which most users will do most of their work, including:
— Developing cookbooks and recipes
— Keeping the chef-repo synchronized with version source control
–Using Knife to upload items from the chef-repo to the Chef server
— Configuring organizational policy, including defining roles and environments and ensuring that critical data is stored in data bags
— Interacting with nodes, as (or when) required, such as performing a bootstrap operation
Knife
Knife is a command-line tool that provides an interface between a local chef-repo and the Chef server. Knife helps users to manage:
— Nodes
— Cookbooks and recipes Roles
— Stores of JSON data (data bags), including encrypted data
— Environments
— Cloud resources, including provisioning
— The installation of the chef-client on management workstations
Nodes
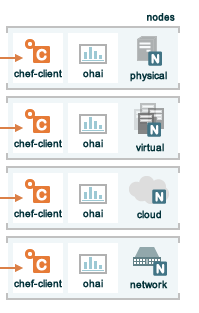
— Each node stores its own private key locally.
— This private key is generated as part of the bootstrap process that initially installs the chef-client on the node.
— The first time chef-client runs on that node,it uses the chef-validator to authenticate, but then on each subsequent run it uses the private key generated for that client by the Chef server.
Configuring knife
We can configure knife by running command knife configure -i on linux machine.
After running this command it will ask for chef URL and key files, assign it accordingly.
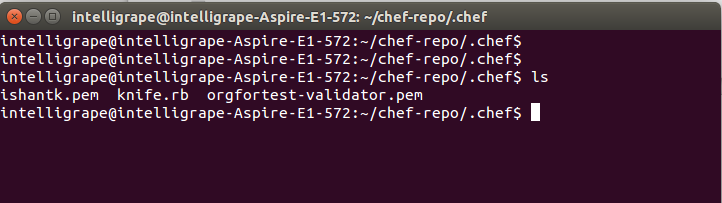
Second option is we can download knife configuration directly from chef server and can place it to our machine where we want to configure workstation. This will give you a directory say chef-repo. In this directory a hidden directory named .chef will be there . Inside this directory you would be having one knife.rb file, one user’s key having knife authorization and one server-validation key.
It looks like below
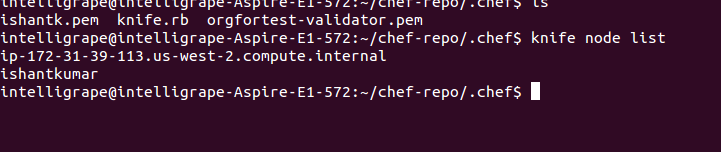
You can test the knife by running this command :
#knife node list
(This will lists all the nodes associated with the organization for which knife is configured).
Writing First cookbook
A cookbook is the fundamental unit of configuration and policy distribution. Each cookbook defines a scenario, such as everything needed to install and configure httpd server, and then it contains all of the components that are required to support that scenario.
Action Performed in order to write a cookbook and apply it to node :
— create a new cookbook and add a recipe to it
— upload your cookbook to the Chef server
— configure your node’s run list
— run chef-client to trigger the configuration process on your target node
Note : before doing any knife operation your current directory should be .chef directory
Create cookbook by passing the command
#knife cookbook create test
You can see the contents of test cookbook by changing cookbooks directory like below
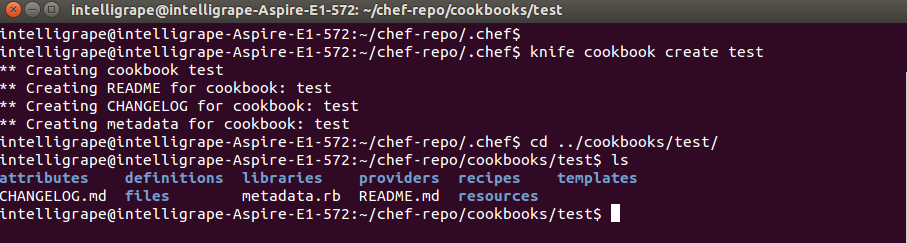
So above image shows the directory structure of any typical chef cookbook.
Write the recipe by editing the file /cookbooks/test/recipes/default.rb
Add this content :
[js]
package ‘httpd’ do
action :install
end
service ‘httpd’ do
action [ :enable, :start ]
end
cookbook_file ‘/var/www/html/index.html’ do
source ‘index.html’
mode ‘0644’
end
[/js]
The code written above is nothing but Ruby DSL. The first block installs httpd server , second block starts the service and third block copies the file (index.html) from cookbook files directory to /var/www/html/ of web server.
Now lets edit the content of index.html
open this file with text editor cookbooks/test/files/default/index.html
Add the content –
[js]
</pre>
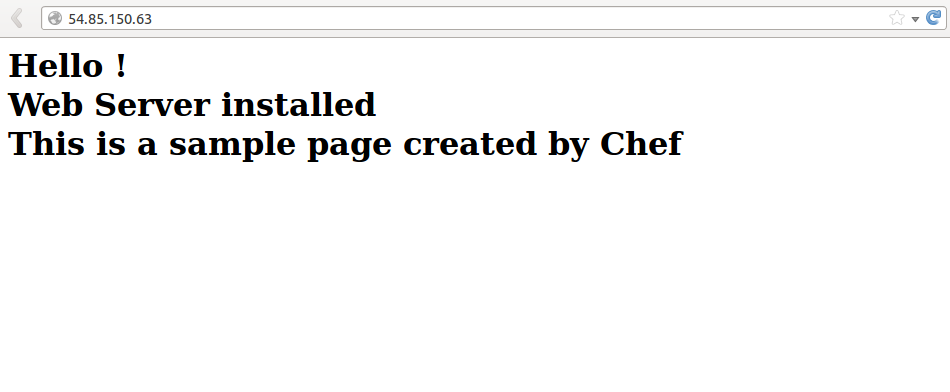
<h1>Hello !
Web Server installed
This is a sample page created by Chef</h1>
<pre>
[/js]
Now your cookbook is ready to upload .
Run this command in order to upload it to server.
#knife cookbook upload test
Bootstraping node :
Now we have a Ec2 instance in AWS having public ip .
From knife we’ll bootstrap a node (Ec2 Instance) with its public ip, assign it a Chef Recipe and will run chef-client.
Bootstrap means it will connect to EC2 instance, will install chef-client , copy validation key & client.rb and run chef-client. As we are passing recipe name in bootstrap command it will also run the cookbook recipe on node by putting recipe in its run list.
Command :
knife bootstrap <machine_ip> -x user_name -i <key_path> -r recipe[recipe_name] –sudo
For Example :
knife bootstrap <machineIP> -x ec2-user -i xyz.pem -r recipe[test] –sudo
This will install httpd server on machine and we can test the sample site by hitting the public ip in the browser like below .
You can find more information in Chef Documentation