
PayPal SDK Integration in Android Applications
I recently had to integrate a PayPal payment mechanism in one of my Android applications.
So I thought to share my knowledge with the community that you can easily integrate payment mechanism in your application.
What is PayPal?
Established in 1998, PayPal is an American company allowing payments and money transfers to be made through the internet. PayPal is one of the world’s largest internet payment companies. The company performing payment processing for online vendors, auction sites and other commercial users. It supports 26 currencies across 193 nations.
PayPal Android SDK:
PayPal provides its Android SDK to incorporate in-app payment mechanism for any service user avails or any purchase the user do using your application. The Android SDK makes it easy to add PayPal or Credit Card payments to mobile applications. The payments will directly be credited to registered account on PayPal.
Steps to integrate it in your Android application:
Step 1.
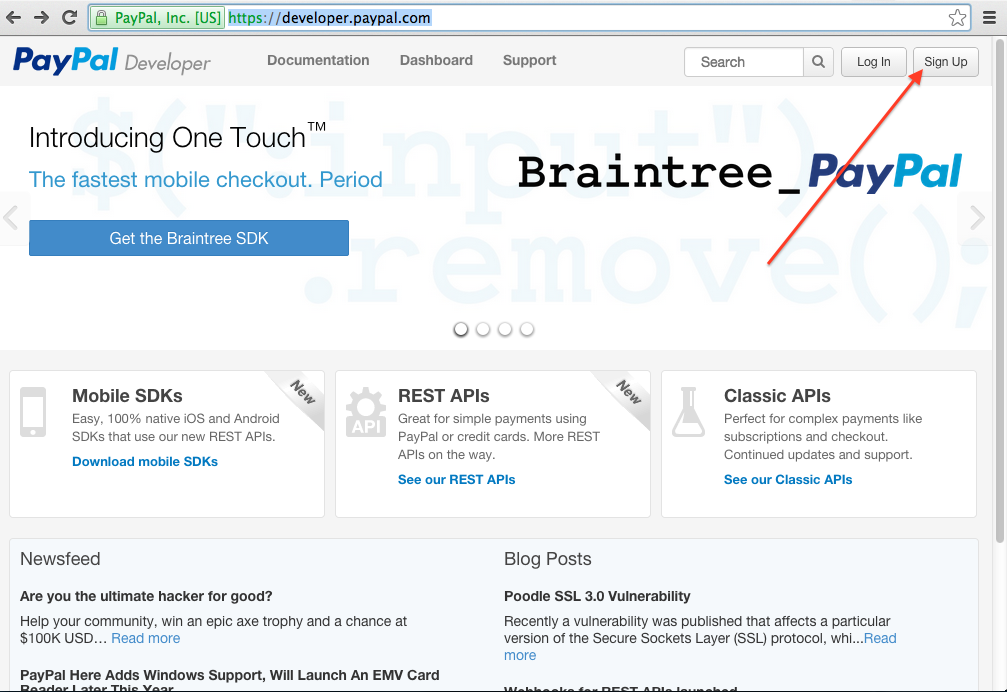
Go to PayPal developer website and create a PayPal account by signing up.
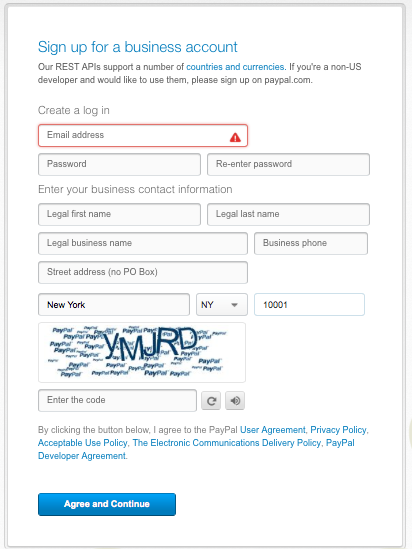
After clicking “Sign Up” button, the registration form will open. Fill up the registration form. Note it takes only five digit zip code and probably only USA addresses. When you enter a valid zip code of USA, it automatically fills up the country code and city name fields.
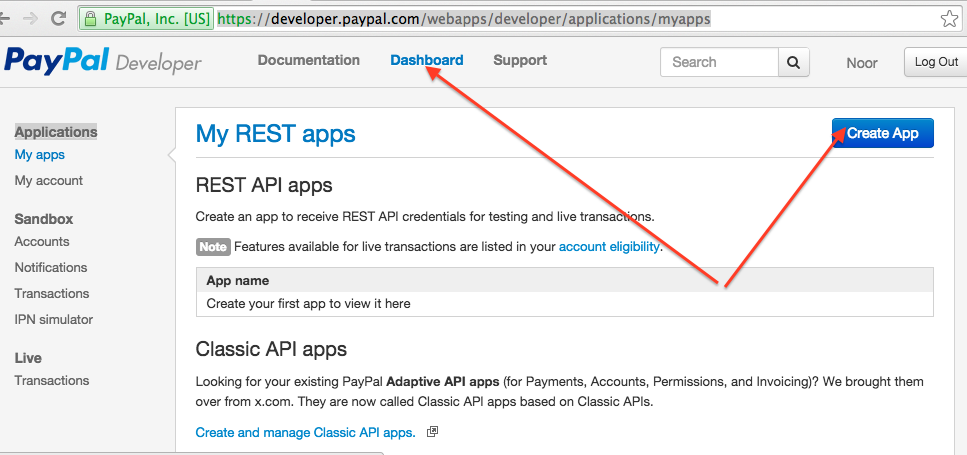
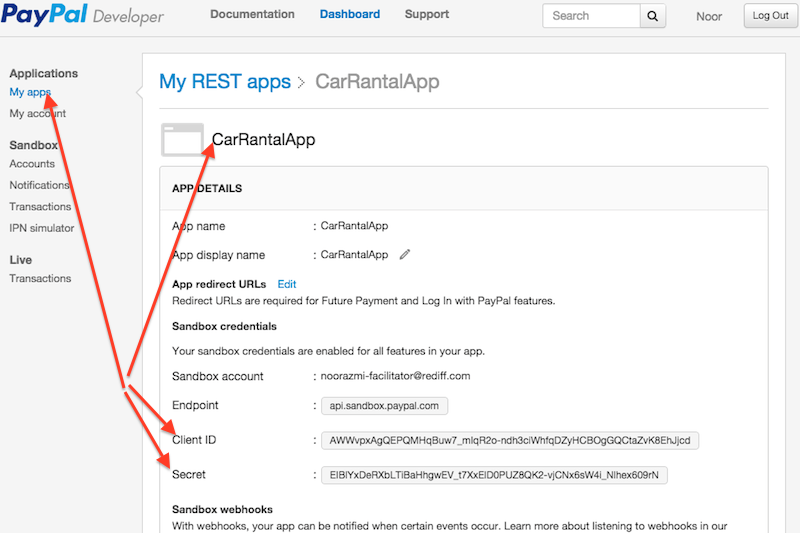
After creating a PayPal account, sign in into PayPal developer website by clicking “Sign In” button on the top right corner. After Sign In, go to “Dashboard” tab and click “Create App” button to create an application.
Fill up the create app form and click “Create App” button. It will create your application and by default it also creates a Sandbox developer account for you and this default account can not be edited, however you can create new accounts for testing your application. This account will be used to test your application during development phase. Since it is used for testing, it is called a sandbox developer account. This account later can be upgraded to production account for live application.
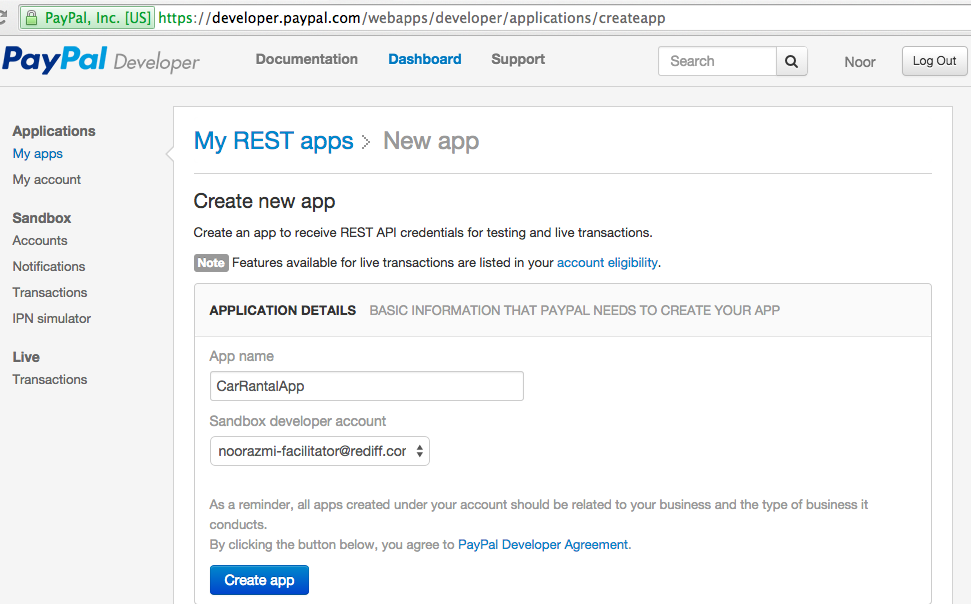
When you will press “Create app” button you will get an application created for you with “Client Id” and a “Secret” key. “Client Id” will be used by your Android application to perform transaction and “Secret” key will be used to verify a transaction, or getting user permission for direct future transactions or getting permission from user to get user profile data from user’s PayPal account such as date of birth, email address etc.
You can see your all applications under “My apps” tab.
Step 2.
Download PayPal Android SDK form Github.
Unzip PayPal-Android-SDK-master.zip file and from the lib folder copy all the contents and paste it in your Android project’s lib folder. Note if you don’t have a lib folder already in your project create one and if you already have lib folder in your project just paste the SDK’s lib folder’s contents in it. If you already have “armeabi” and other such folders in your project’s lib folder, then manually copy paste the contents of the these folders in your projects respective folders inside the lib folder.
The SDK also has a sample Android application to understand the code implementation. Run the application and see its flow and try to understand its code. It has proper description in the form of comments to understand it easily.
Now open the Android.manifest file of your Android project and declare the following attributes in it:
<!– for card.io card scanning –> <uses-permissionandroid:name=“android.permission.CAMERA” /> <uses-permissionandroid:name=“android.permission.VIBRATE” />
<uses-featureandroid:name=“android.hardware.camera” android:required=“false/>
<uses-featureandroid:name=“android.hardware.camera.autofocus” android:required=“false” />
<!– for most things, including card.io & paypal –> <uses-permissionandroid:name=“android.permission.ACCESS_NETWORK_STATE”/> <uses-permissionandroid:name=“android.permission.INTERNET”/>
Step 3.
There are three use cases of this SDK.
1. Single Payment 2. Future Payment 3. Profile Sharing
1. Single Payment:
Receive a single immediate payment from your application either via PayPal account or via Debit or Credit Card.
When you initiate a single payment, the SDK presents a UI to gather user PayPal account or Credit or Debit card info and perform transaction and returns a proof of payment with payment id using which user can verify the payment transaction. For payment verification PayPal provides web apis which can be used by setting up our own server for verification.
User can make payment either using PayPal account or using credit or debit card.
Inside the activity:
1. Create a PayPalConfigration Object :
[sourcecode language=”java” wraplines=”false” collapse=”false”]
private static PayPalConfiguration config = new PayPalConfiguration()
// Start with mock environment. When ready, switch to sandbox (ENVIRONMENT_SANDBOX)
// or live (ENVIRONMENT_PRODUCTION)
.environment(PayPalConfiguration.ENVIRONMENT_NO_NETWORK)
.clientId("<YOUR_CLIENT_ID>");
[/sourcecode]
2. Start PayPalService when your activity is created and stop it upon destruction:
[sourcecode language=”java” wraplines=”false” collapse=”false”]
@Override
protected void onCreate(Bundle savedInstanceState) {
super.onCreate(savedInstanceState);
setContentView(R.layout.activity_main);
Intent intent = new Intent(this, PayPalService.class);
intent.putExtra(PayPalService.EXTRA_PAYPAL_CONFIGURATION, config);
startService(intent);
}
@Override
public void onDestroy() {
stopService(new Intent(this, PayPalService.class));
super.onDestroy();
}
[/sourcecode]
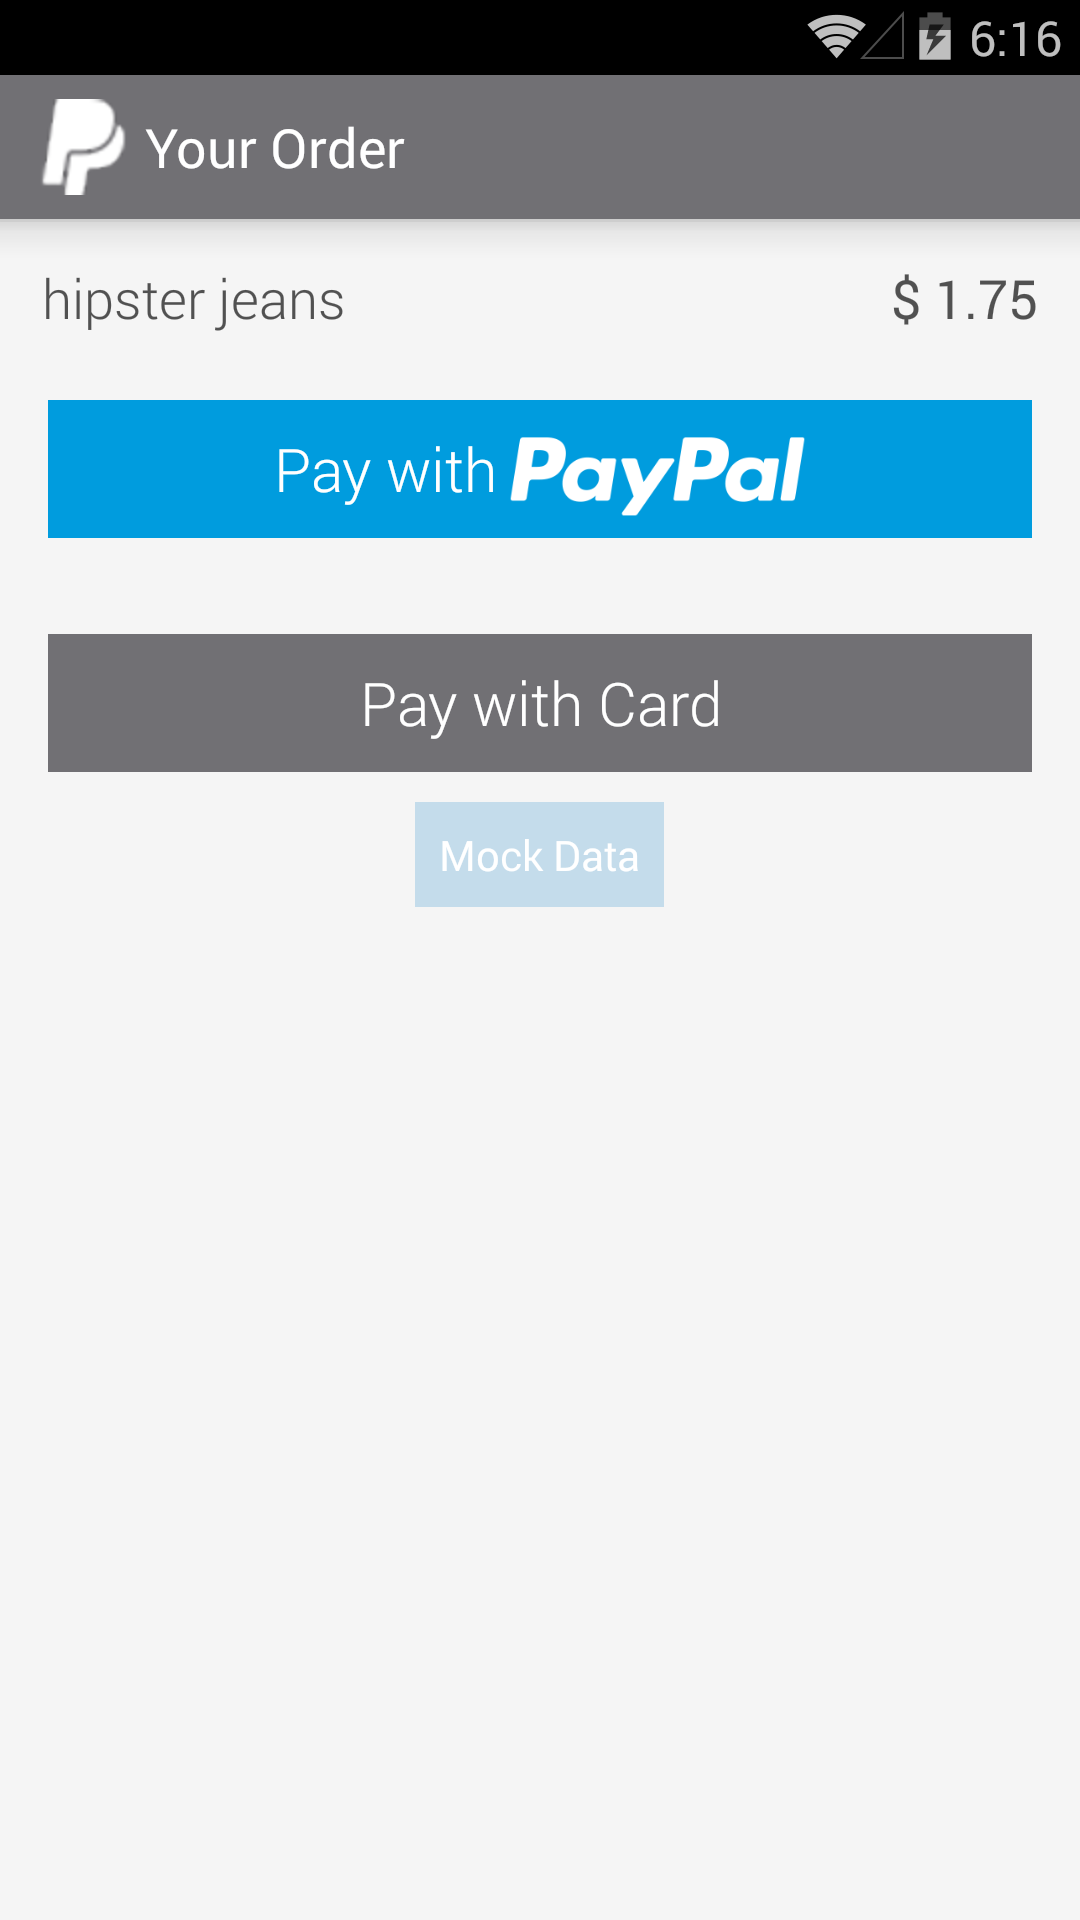
3. Create the PayPalPayment object and launch the PaymentActivity intent, for example, when a button is pressed:
[sourcecode language=”java” wraplines=”false” collapse=”false”]
public void onBuyPressed(View pressed) {
// PAYMENT_INTENT_SALE will cause the payment to complete immediately.
// Change PAYMENT_INTENT_SALE to
// – PAYMENT_INTENT_AUTHORIZE to only authorize payment and capture funds later.
// – PAYMENT_INTENT_ORDER to create a payment for authorization and capture
// later via calls from your server.
PayPalPayment payment = new PayPalPayment(new BigDecimal("1.75"), "USD", "hipster jeans",
PayPalPayment.PAYMENT_INTENT_SALE);
Intent intent = new Intent(this, PaymentActivity.class);
// send the same configuration for restart resiliency
intent.putExtra(PayPalService.EXTRA_PAYPAL_CONFIGURATION, config);
intent.putExtra(PaymentActivity.EXTRA_PAYMENT, payment);
startActivityForResult(intent, 0);
}
[/sourcecode]
4. Implement onActivityResult():
[sourcecode language=”java” wraplines=”false” collapse=”false”]
@Override
protected void onActivityResult (int requestCode, int resultCode, Intent data) {
if (resultCode == Activity.RESULT_OK) {
PaymentConfirmation confirm = data.getParcelableExtra(PaymentActivity.EXTRA_RESULT_CONFIRMATION);
if (confirm != null) {
try {
Log.i("paymentExample", confirm.toJSONObject().toString(4));
// TODO: send ‘confirm’ to your server for verification.
// see https://developer.paypal.com/webapps/developer/docs/integration/mobile/verify-mobile-payment/
// for more details.
} catch (JSONException e) {
Log.e("paymentExample", "an extremely unlikely failure occurred: ", e);
}
}
}
else if (resultCode == Activity.RESULT_CANCELED) {
Log.i("paymentExample", "The user canceled.");
}
else if (resultCode == PaymentActivity.RESULT_EXTRAS_INVALID) {
Log.i("paymentExample", "An invalid Payment or PayPalConfiguration was submitted. Please see the docs.");
}
}
[/sourcecode]
5. Send the proof of payment to your servers for verification, as well as any other processing required for your business fulfilment.
Tip: At this point, the payment has been completed, and the user has been charged. If you can’t reach your server, it is important that you save the proof of payment and try again later.
2. Future Payments:
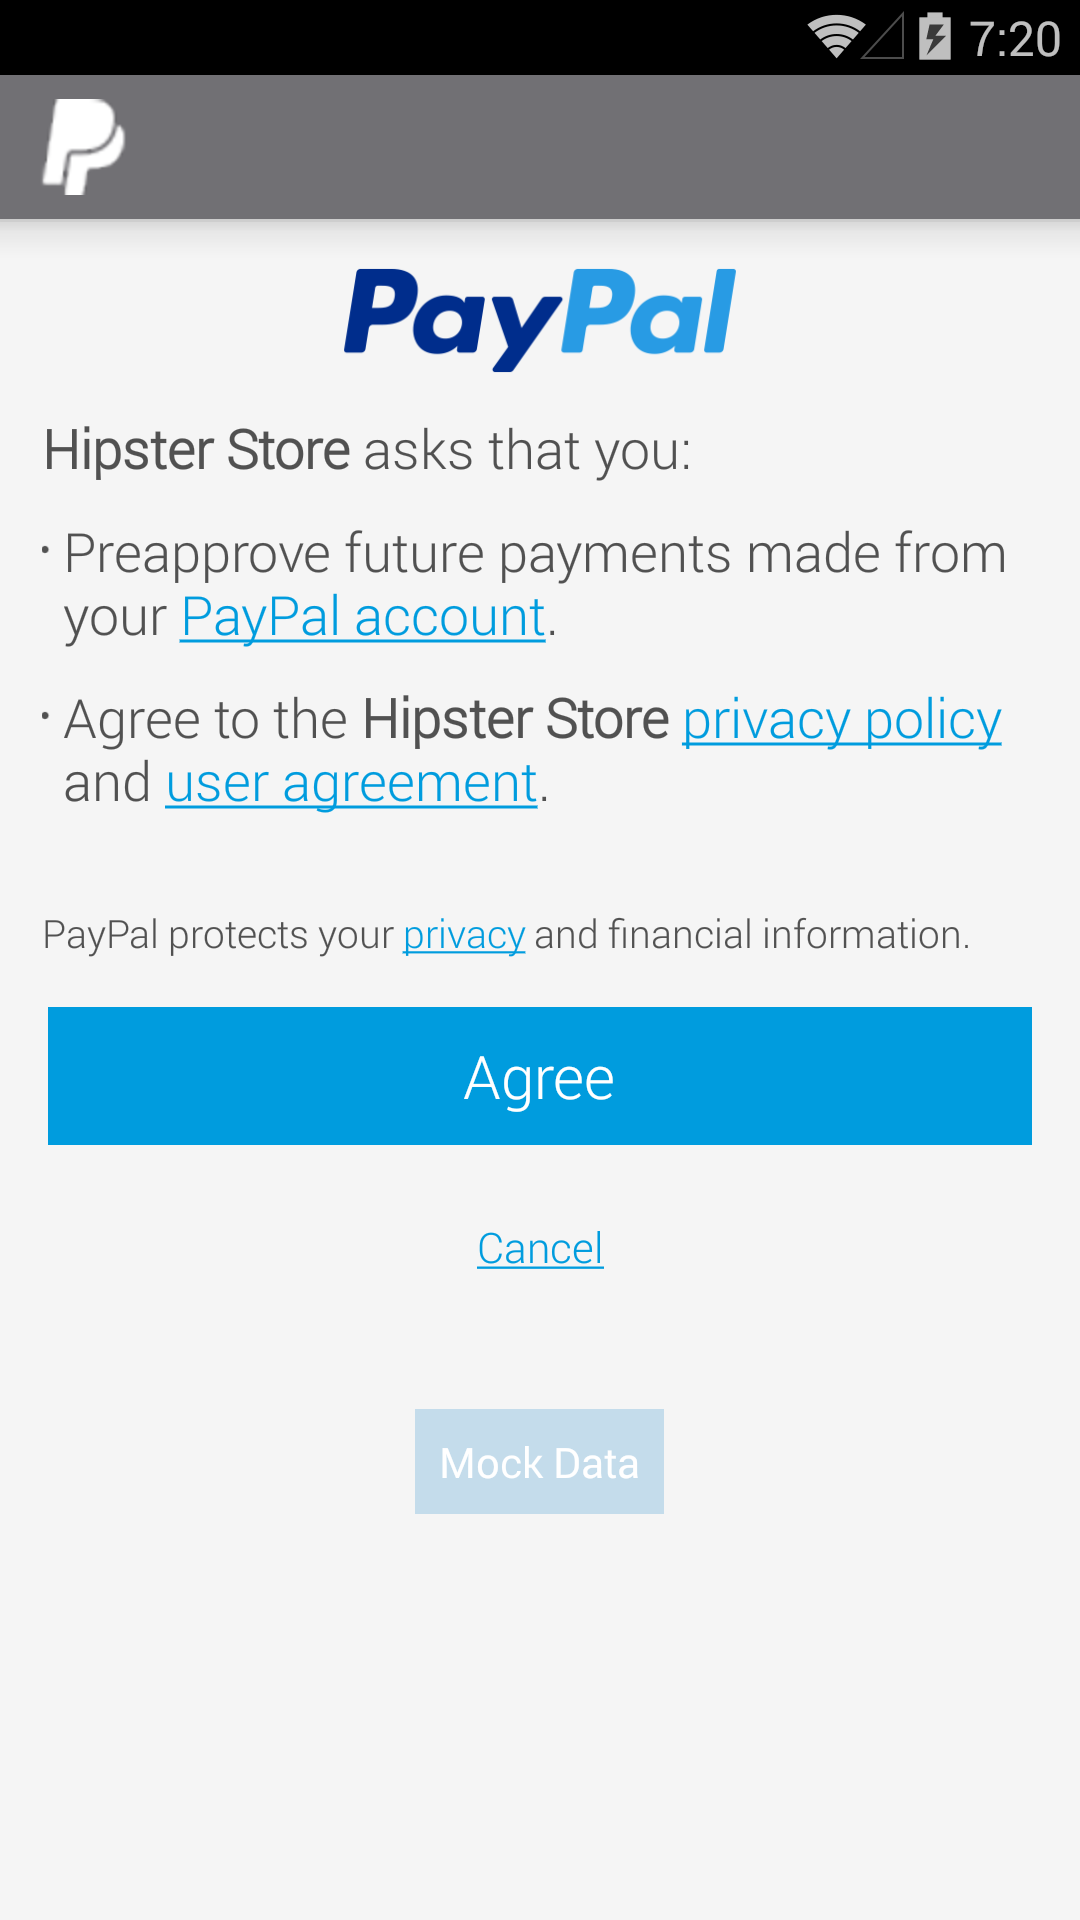
This section will show how to obtain a user’s authorized consent for future payments using their PayPal account.
First, you must obtain customer’s consent to take payments from their PayPal account. PayPal Android SDK presents a UI for your user to authenticate using their PayPal account and asks user to consent to OAuth access token scope to use PayPal for future payments.
It returns an OAuth2 authorization code to your app. Send the authorisation code to your server, which then exchanges the code for OAuth2 access and refresh tokens.
Later, when initiating a pre-consented payment, you must obtain a Client Metadata ID. The PayPal Android SDK provides a Cient Metadata ID. Sends the client metadata ID and transaction information to your server. Your server then uses its OAuth2 tokens, Client Metadata ID, and transaction info to create a payment.
Inside your Activity code:
1. Create a PayPalConfiguration object. This object allows you to configure various aspects of the SDK.
[sourcecode language=”java” wraplines=”false” collapse=”false”]
private static PayPalConfiguration config = new PayPalConfiguration()
// Start with mock environment. When ready, switch to sandbox (ENVIRONMENT_SANDBOX)
// or live (ENVIRONMENT_PRODUCTION)
.environment(PayPalConfiguration.ENVIRONMENT_NO_NETWORK)
.clientId("<YOUR_CLIENT_ID>")
// Minimally, you will need to set three merchant information properties.
// These should be the same values that you provided to PayPal when you registered your app.
.merchantName("Hipster Store")
.merchantPrivacyPolicyUri(Uri.parse("https://www.example.com/privacy"))
.merchantUserAgreementUri(Uri.parse("https://www.example.com/legal"));
[/sourcecode]
2. Start PayPalService when your activity is created and stop it upon destruction:
[sourcecode language=”java” wraplines=”false” collapse=”false”]
@Override
protected void onCreate(Bundle savedInstanceState) {
super.onCreate(savedInstanceState);
setContentView(R.layout.activity_main);
Intent intent = new Intent(this, PayPalService.class);
intent.putExtra(PayPalService.EXTRA_PAYPAL_CONFIGURATION, config);
startService(intent);
}
@Override
public void onDestroy() {
stopService(new Intent(this, PayPalService.class));
super.onDestroy();
}
[/sourcecode]
3. Launch the PayPalFuturePaymentActivity, for example, when a button is pressed:
[sourcecode language=”java” wraplines=”false” collapse=”false”]
public void onFuturePaymentPressed(View pressed) {
Intent intent = new Intent(SampleActivity.this, PayPalFuturePaymentActivity.class);
// send the same configuration for restart resiliency
intent.putExtra(PayPalService.EXTRA_PAYPAL_CONFIGURATION, config);
startActivityForResult(intent, REQUEST_CODE_FUTURE_PAYMENT);
}
[/sourcecode]
4. Implement onActivityResult():
[sourcecode language=”java” wraplines=”false” collapse=”false”]
@Override
protected void onActivityResult (int requestCode, int resultCode, Intent data) {
if (resultCode == Activity.RESULT_OK) {
PayPalAuthorization auth = data
.getParcelableExtra(PayPalFuturePaymentActivity.EXTRA_RESULT_AUTHORIZATION);
if (auth != null) {
try {
String authorization_code = auth.getAuthorizationCode();
sendAuthorizationToServer(auth);
} catch (JSONException e) {
Log.e("FuturePaymentExample", "an extremely unlikely failure occurred: ", e);
}
}
} else if (resultCode == Activity.RESULT_CANCELED) {
Log.i("FuturePaymentExample", "The user canceled.");
} else if (resultCode == PayPalFuturePaymentActivity.RESULT_EXTRAS_INVALID) {
Log.i("FuturePaymentExample",
"Probably the attempt to previously start the PayPalService had an invalid PayPalConfiguration. Please see the docs.");
}
}
[/sourcecode]
5. Send the authorization response to your server in order to complete the process.
[sourcecode language=”java” wraplines=”false” collapse=”false”]
private void sendAuthorizationToServer(PayPalAuthorization authorization) {
// TODO:
// Send the authorization response to your server, where it can exchange the authorization code
// for OAuth access and refresh tokens.
//
// Your server must then store these tokens, so that your server code can execute payments
// for this user in the future.
}
[/sourcecode]
6. Obtain a Client Metadata ID:
When initiating a pre-consented payment (a “future payment”) from a mobile device, your mobile application must obtain a Client Metadata Id from the Mobile SDK to pass to your server. Your server must include this Client Metadata ID in its payment request sent to PayPal. PayPal uses this Client Metadata ID to verify that the payment is originating from a valid, user-consented device+application.
Example:
[sourcecode language=”java” wraplines=”false” collapse=”false”]
public void onFuturePaymentPurchasePressed(View pressed) {
// Get the Client Metadata ID from the SDK
String metadataId = PayPalConfiguration.getClientMetadataId(this);
// TODO: Send metadataId and transaction details to your server for processing with
// PayPal…
}
[/sourcecode]
When your server makes its payment request to PayPal, it must include a PayPal-Client-Metadata-Id HTTP header with this Client Metadata ID value obtained from the SDK.
Future Payments Server-Side Integration:
Once a user has authorized your app to use their PayPal account, you can then use that authorization to obtain tokens that let you create future payments from that user.
Read Future Payments Server-Side Integration to exchange the authorization code for OAuth2 tokens and create payments with an access token and a Metadata ID.
3. Profile Sharing:
This section will show how to obtain a user’s authorized consent for profile sharing from their PayPal account.
Your customer logs in to PayPal and consents to PayPal sharing information with you:
You must obtain customer consent to share information from their PayPal account.
How this works:
- On the PayPal Developer site…
- Specify the pieces of information that you wish your customers to share with you.
- The PayPal Android SDK…
- Presents UI for your user to authenticate using their PayPal account.
- Asks your user to consent to OAuth access token scope to use PayPal for profile sharing.
- Returns an OAuth2 authorization code to your app.
- Your app…
- Specifies the required scopes in SDK request
- Receives an OAuth2 authorization code from the SDK.
- Sends the authorization code to your server, which then exchanges the code for OAuth2 access and refresh tokens.
- Your server then uses its OAuth2 tokens to request the relevant customer information from PayPal.
Specify Desired Information for Sharing On the PayPal Developer site:
- Log in to the PayPal Developer site.
- Select your app.
- Under
APP CAPABILITIESselectLog In with PayPal, and clickAdvanced options. - Under
Information requested from customersselect the items (“scope attributes”) you wish to have shared. - If you provide Privacy Policy and User Agreement URLs under
Links shown on customer consent page, these will override the corresponding URLs that you provide below in thePayPalConfigurationobject.
Obtain Customer Consent:
1. Create a PayPalConfiguration object. This object allows you to configure various aspects of the SDK:
[sourcecode language=”java” wraplines=”false” collapse=”false”]
private static PayPalConfiguration config = new PayPalConfiguration()
// Start with mock environment. When ready, switch to sandbox (ENVIRONMENT_SANDBOX)
// or live (ENVIRONMENT_PRODUCTION)
.environment(PayPalConfiguration.ENVIRONMENT_NO_NETWORK)
.clientId("<YOUR_CLIENT_ID>")
// Minimally, you will need to set three merchant information properties.
// These should be the same values that you provided to PayPal when you registered your app.
.merchantName("Hipster Store")
.merchantPrivacyPolicyUri(Uri.parse("https://www.example.com/privacy"))
.merchantUserAgreementUri(Uri.parse("https://www.example.com/legal"));
[/sourcecode]
2. Start PayPalService when your activity is created and stop it upon destruction:
[sourcecode language=”java” wraplines=”false” collapse=”false”]
@Override
protected void onCreate(Bundle savedInstanceState) {
super.onCreate(savedInstanceState);
setContentView(R.layout.activity_main);
Intent intent = new Intent(this, PayPalService.class);
intent.putExtra(PayPalService.EXTRA_PAYPAL_CONFIGURATION, config);
startService(intent);
}
@Override
public void onDestroy() {
stopService(new Intent(this, PayPalService.class));
super.onDestroy();
}
[/sourcecode]
3. Launch the PayPalProfileSharing activity, for example, when a button is pressed:
[sourcecode language=”java” wraplines=”false” collapse=”false”]
public void onProfileSharingPressed(View pressed) {
Intent intent = new Intent(SampleActivity.this, PayPalProfileSharingActivity.class);
// send the same configuration for restart resiliency
intent.putExtra(PayPalService.EXTRA_PAYPAL_CONFIGURATION, config);
intent.putExtra(PayPalProfileSharingActivity.EXTRA_REQUESTED_SCOPES, getOauthScopes());
startActivityForResult(intent, REQUEST_CODE_PROFILE_SHARING);
}
[/sourcecode]
The PayPalOAuthScopes are initialized with a set of scope names:
[sourcecode language=”java” wraplines=”false” collapse=”false”]
private PayPalOAuthScopes getOauthScopes() {
/* create the set of required scopes
* Note: see https://developer.paypal.com/docs/integration/direct/identity/attributes/ for mapping between the
* attributes you select for this app in the PayPal developer portal and the scopes required here.
*/
Set<String> scopes = new HashSet<String>(
Arrays.asList(PayPalOAuthScopes.PAYPAL_SCOPE_EMAIL, PayPalOAuthScopes.PAYPAL_SCOPE_ADDRESS) );
return new PayPalOAuthScopes(scopes);
}
[/sourcecode]
4. Implement onActivityResult():
[sourcecode language=”java” wraplines=”false” collapse=”false”]
@Override
protected void onActivityResult (int requestCode, int resultCode, Intent data) {
if (resultCode == Activity.RESULT_OK) {
PayPalAuthorization auth = data
.getParcelableExtra(PayPalProfileSharingActivity.EXTRA_RESULT_AUTHORIZATION);
if (auth != null) {
try {
String authorization_code = auth.getAuthorizationCode();
sendAuthorizationToServer(auth);
} catch (JSONException e) {
Log.e("ProfileSharingExample", "an extremely unlikely failure occurred: ", e);
}
}
} else if (resultCode == Activity.RESULT_CANCELED) {
Log.i("ProfileSharingExample", "The user canceled.");
} else if (resultCode == PayPalProfileSharingActivity.RESULT_EXTRAS_INVALID) {
Log.i("ProfileSharingExample",
"Probably the attempt to previously start the PayPalService had an invalid PayPalConfiguration. Please see the docs.");
}
}
[/sourcecode]
5. Send the authorization response to your server in order to complete the process:
[sourcecode language=”java” wraplines=”false” collapse=”false”]
private void sendAuthorizationToServer(PayPalAuthorization authorization) {
// TODO:
// Send the authorization response to your server, where it can exchange the authorization code
// for OAuth access and refresh tokens.
//
// Your server must then store these tokens, so that your server code can use it
// for getting user profile data in the future.
}
[/sourcecode]
Profile Sharing Server Side Integration:
Read Profile Sharing Server-Side Integration to exchange the authorization code for OAuth2 tokens and retrieve the customer information from PayPal.
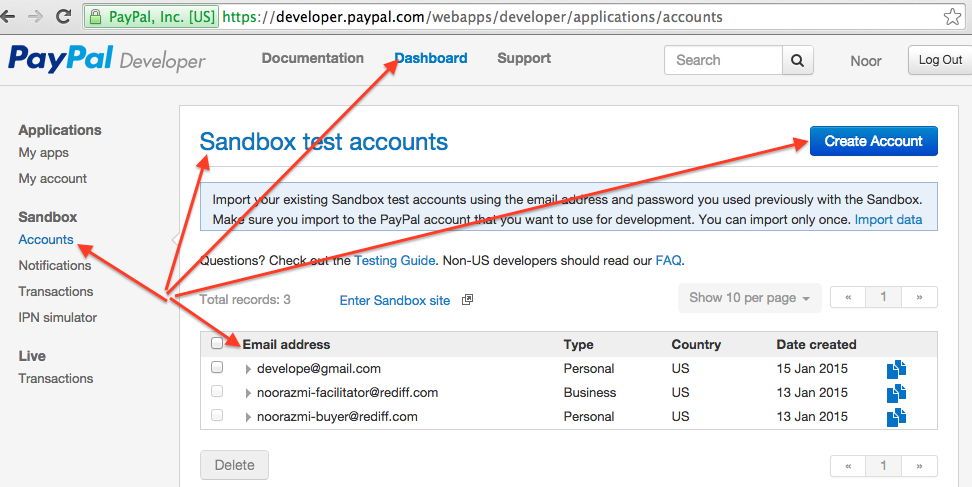
The Sandbox Environment:
PayPal provides a test environment, called Sandbox, using which developer can mock transactions to test and debug his/her application.
By using fictitious Sandbox test accounts and their associated authentication credentials in your PayPal API calls, you can test and debug your application without referencing any real PayPal users or their live PayPal accounts. The Sandbox lets you operate your application in a safe environment and provides you a way to fine tune your PayPal routines before moving your product into production.
When you initiate a transaction using Sandbox test accounts, PayPal creates a mock transaction that behaves exactly like a transaction in the live environment.
The PayPal Sandbox environment comprises the following:
- The Sandbox Test Site (https://www.sandbox.paypal.com/)
- The Sandbox Accounts page (accessed through https://developer.paypal.com)
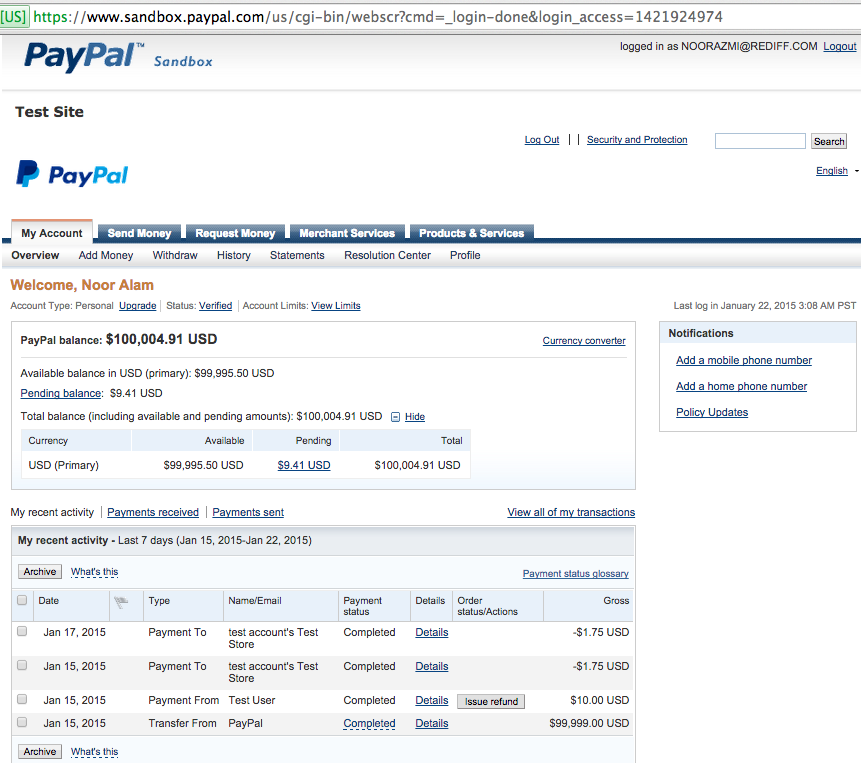
During your testing phase, create and manage your set of test accounts from the Sandbox Accounts page. Use the Sandbox test site to review the transactions associated with the calls you make using your test accounts. Log in to the Sandbox test site with the credentials from any of your test accounts to review the status of the mock transactions associated with that account.
PayPal Sandbox Account page:
For testing purpose we create Personal accounts to simulate payment from this Personal account.
To create read about the personal account and how to create one for you follow the links below:
1. What are Personal and Business accounts 2. How to create a Personal account
PayPal Sandbox test site:
Log into PayPal Sandbox test site using one of your Personal accounts. For example I have created a personal account “develope@gmail.com” and after login using this account I was landed on the following account details page.
Going Live:
Once you’ve finished coding and debugging your application (including testing all your PayPal API calls in the Sandbox), go live by moving your application to PayPal’s production environment.
Just follow the procedure of going live with your application and you are finished with integrating PayPal SDK in your Android application.
Cheers!!!


Can you please tell me which paypal method to use to transfer money from one paypal id to other paypal id
very good!
How can I verify the payment using the “payment id” and “status” that we get from the payment confirmation object?
I followed this link: “https://developer.paypal.com/webapps/developer/docs/integration/mobile/verify-mobile-payment/#sthash.AZWTOYnk.dpuf”
but I found it really hard to follow. Please help
After searching…
To install:
– go to Github using the link in the article
– clic on th README.md file
– In this file, clic on the “Add the SDK to Your Project link”
– In this chapter, copy the line with the “compile” command and copy it in your build.gradle file in Android Studio, like this:
dependencies {
compile fileTree(dir: ‘libs’, include: [‘*.jar’])
compile ‘com.paypal.sdk:paypal-android-sdk:2.14.4’
}
– From GitHub/README.md chapter “”Add the SDK to Your Project link”, clic on the link “Maven Repository.”. Get the url and copy it also inside you build.gradle, in a repository zone, like:
repositories {
maven { url ‘https://repo1.maven.org/maven2/com/paypal/sdk/paypal-android-sdk/’ }
}
Then build the project. Depend on the SDK Version you want to use, you can get an error. In fact, the Paypal doc says the devkit is for SDK version =>15 but seems to be indicated inside >15. So you can get a message like ” uses-sdk:minSdkVersion 15 cannot be smaller than version 16 declared in library”.
In this case, you must override the lib. For that, add the line suggested in the error message, in yur manifest.xml file. Like this:
If tools is in red, this means you must include the xml file with such a line.
xmlns:tools=”http://schemas.android.com/tools”
After that, it will compile and you can follow Noor Alam’s instruction!
Seems on Github there is no more “lob” but only a “aar” file. When we unzip the aar file, there is no lib inside… So the part “Unzip PayPal-Android-SDK-master.zip file and from the lib folder copy all the contents and paste it in your Android project’s lib folder” don’t work anymore and so, it’s hard to understand.
Can you please explain how to use the “aar” ?
Thanks very much
Can i get full source code of this blog ?
This is very good blog.
Thanks for your help.
Good luck.
This was all helpful as obviously it did solve the problems that I and many other people faced in their original tutorial.
After creating developer Account it needs to be Verified by real bank account or credit card number.so what can i do ?