
Installing latest Puppet master and agent setup on ubuntu14.04
This blog post focuses on installation and configuration of two node Puppet setup, i.e. a Puppetmaster (or master) and an agent.
Puppet is an open source configuration management tool used for automation of administration jobs across big server farms. It is written in ruby and uses DSL (Domain specific language) to write codes known as Manifests to perform various administration tasks at thousands of nodes according to their requirement.
For this test environment, two ubuntu 14.04 machines are required, one of them has to be configured as master and the other one as agent. AWS EC2 instances have been used for this setup. Stepwise setup of master and agent is given below:
1) First of all, set hostname as puppet.example.com for puppet master and puppetagent.example.com for puppet agent (prefer to use FQDN). Hostnames are required for SSL authentication that we will discuss further.
# hostname puppet.example.com
# hostname puppetagent.example.com
2) Edit /etc/hostname, delete previous entry and add new hostname to this file (on both master and agent).
3) Edit /etc/hosts and add entries of both master and agent ip addresses corresponding to their hostnames. The /etc/hosts file should look similar to one below,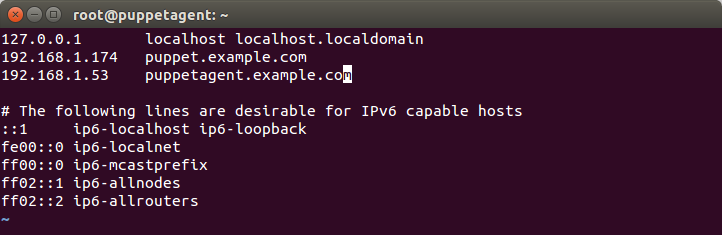
At master node:
# sudo apt-get update -y
# sudo wget http://apt.puppetlabs.com/puppetlabs-release-trusty.deb
# sudo dpkg -i puppetlabs-release-trusty.deb
# sudo apt-get update -y
# sudo apt-get -y install puppetmaster
After installing master, we need to make some configuration changes in /etc/puppet/puppet.conf file. The file is in INI format. We will add following line in [master] block of configuration file,
certname = puppet.example.com
Create an empty file with the name site.pp at location /etc/puppet/manifests/ because it is the default manifest file that is applied on agents.
# sudo touch /etc/puppet/manifests/site.pp
At agent node:
# sudo apt-get update -y
# sudo wget http://apt.puppetlabs.com/puppetlabs-release-trusty.deb
# sudo dpkg -i puppetlabs-release-trusty.deb
# sudo apt-get update -y
# sudo apt-get -y install puppet
After agent is installed, it must be informed about its master. For this purpose, edit /etc/puppet/puppet.conf and add the following line under [main] section,
server = puppet.example.com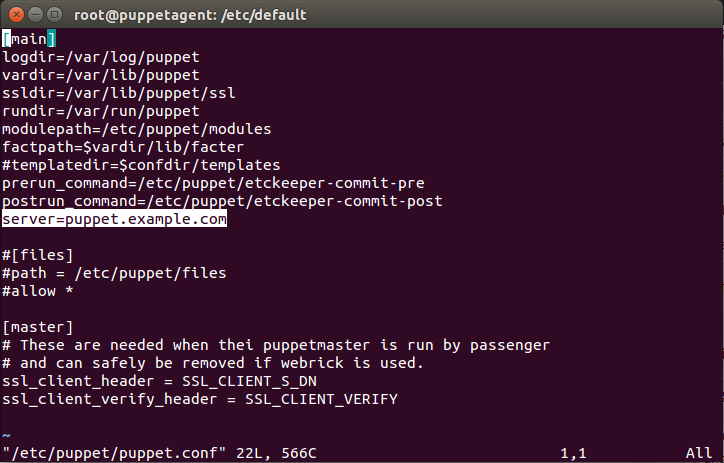
By default puppet agent is not configured to start, So, At puppet agent, also edit /etc/default/puppet and set start = yes.
After successful configuration of master and agent, we need to perform SSL authentication for master and agent. The default certificate directory for both puppet master and puppet agent is /var/lib/puppet/ssl. Master will work as CA (Certificate Authority) server (if standalone CA server does not exist in the network) and it will generate self signed certificate using which all the agents will be authenticated.
Steps involved in signing an agent’s request by Puppet master are as listed below,
1) Start the puppet master service. When service is started, it will generate a self signed certificate inside /var/lib/puppet/ssl/ using which it will authenticate all the agents. The certificate will be generated with the certname defined in puppet.conf.
# service puppetmaster restart
2) At agent node, start the puppet service. It will generate a CSR (certificate signing request) in /var/lib/pupet/ssl/ and send it to master.
# service puppet restart
3) At master node, check if request from the agent is received or not using following command. The request initially shows without + symbol in the beginning representing that the request has been received but not yet signed,
# puppet cert list -all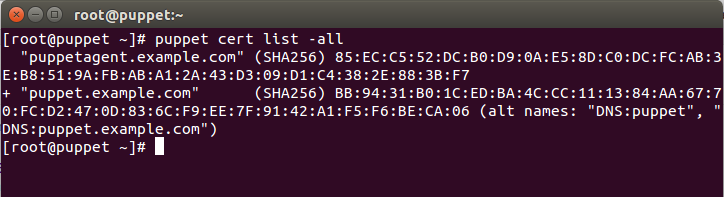
3.a) If the request is received, we need to sign the request using following command,
# puppet cert sign <certname>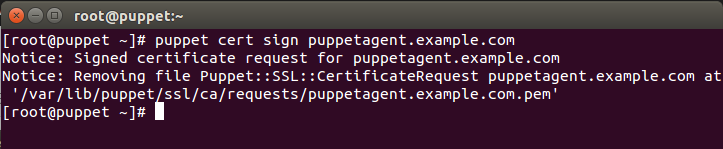
3.b) If request is not visible on the master, then go to agent and check all the configurations from the beginning, correct the errors (if any) and then again run following command,
# rm -rf /var/lib/puppet/ssl (This command will delete previously generated requests)
# service puppet restart (This will generate new CSR and send it to the master)
After successful signing of request, there should appear a + symbol as shown below. If symbol has not appeared, that means request is not signed yet,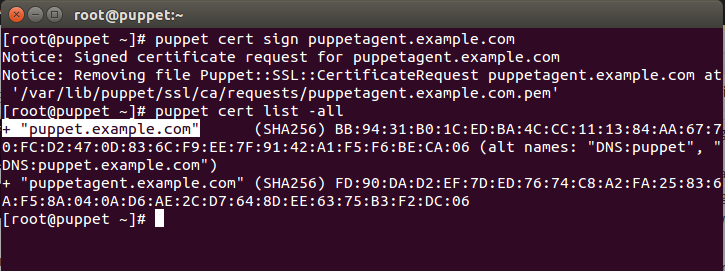
After successful completion of master and agent installation, configuration and authentication, it’s time to test the setup by running a small manifest.
Steps to test the setup,
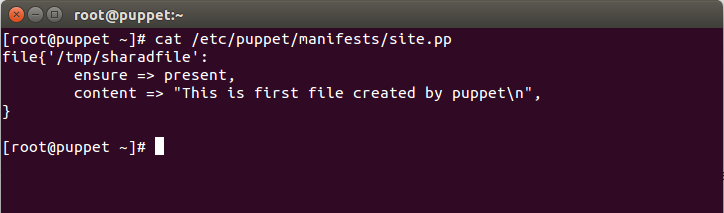
1) At master, edit /etc/puppet/manifests/site.pp file and copy and paste below code, save and exit.
file{‘/tmp/sharadfile’:
ensure => present,
content => “This is first file created by puppet\n”
}
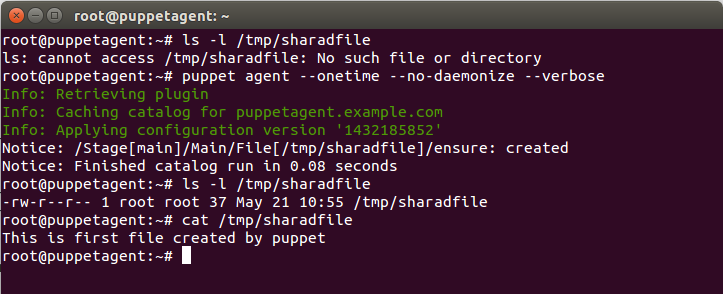
2) Go to agent and run below command. Above manifest, if applied successfully, will create a file at /tmp/sharadfile with file content as “This is first file created by puppet”.
# puppet agent –onetime –no-daemonize –verbose
Regards
Sharad Aggarwal


