This blog is in continuation to our previous blog. The focus of this blog is to enable AWS professionals to change pem of running servers or to add a new user with sudo privileges to an EC2 server farm using Puppet. Similar use case of performing the same task using CHEF has been discussed here.
So lets start. First of all, a test setup of Puppet master and agent is needed where we can apply and test our manifest. Setting up puppet master test and agent is out of scope of this blog, however, we have already discussed to setup a test environment of Puppet master and agent in a previous blog here.
By connecting an authorized key to a user, any login attempt for that user that presents the corresponding private key will be authenticated successfully, providing the ability to log in without a password using a private key. This is commonly used for automation, where no user is present to enter a password, or for a user with a private key to access systems without additional steps.
To achieve this, we have to enable file server in Puppet master. Fileserver is a feature of Puppet using which, a centralized file repository can be created in the master node and here we can keep files that we manipulate much often. Now we simply need to make changes at the file in puppet master and this manipulated file can be easily pulled by all the agents (or a group of agents). To do this, edit /etc/puppet/fileserver.conf and uncomment three lines as shown below.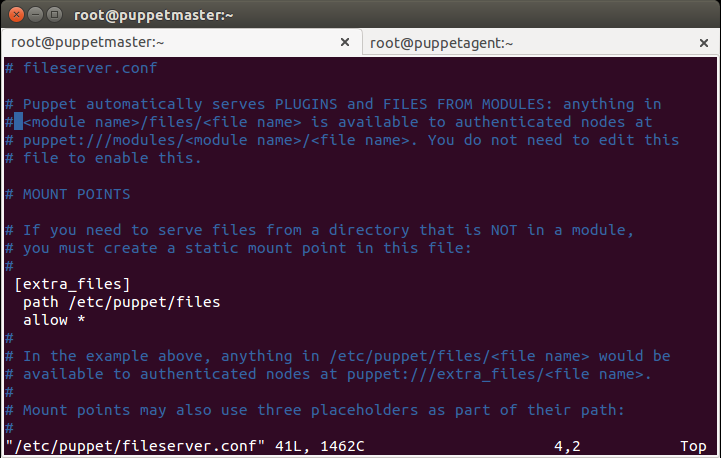
Create a new keypair using AWS console and download a new pem key from which further authentication should be carried out. The command will ask for the location of private key and will give the public key against that on stdout. Obtain a public key against this pem key using below command,
# ssh-keygen -y
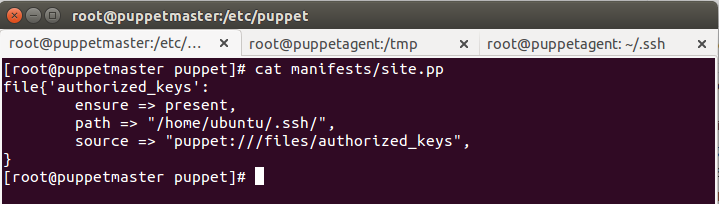
Copy and save that into a file named authorized_keys and save it in a file with name authorized_keys at location, /etc/puppet/files/authorized_keys. Now, to change the pem key of all the ec2 instances, ~/.ssh/authorized_keys file should be replaces with the new one created as above. This can be achieved using following manifest. So, we will go to /etc/puppet/manifests/site.pp file and copy and paste below code,
file{‘authorized_keys’:
ensure => present,
Path => ‘/home/ubuntu/.ssh/authorized_keys’,
source => puppet:///files/authorized_keys,
}
This is will either be fetched by the agent after 30mins by default or we can manually fetch it by going to the master and run command “puppet agent –onetime –no-daemnize –verbose” or “puppet agent -tv”. After running the command, old authorized_keys file will be overwritten with the new one and accordingly previous pem key authentication will also get replaced with the new new one.