A headless browser refers to a web browser that functions without a graphical user interface (GUI), making it suitable for activities like web scraping, automated testing, and other web-related tasks which you can automate. Headless browsers are typically used for tasks such as web scraping, automated testing, and other web-related activities requiring little or no human interaction. The advantage of using a headless browser is that it can perform tasks more efficiently and faster, as it does not have to render web pages visually. Headless browsers are commonly employed in web development, testing, and data scraping applications where automation is necessary.
What is puppeteer
Puppeteer is a versatile Node.js library that provides developers with a sophisticated API to efficiently manage headless browsers, such as Chromium, through the DevTools Protocol. Developers can configure it to use full (non-headless) Chrome or Chromium during development. Its capabilities include automating tasks like webpage interaction, form filling, and data scraping, as well as features for capturing screenshots, generating PDFs, and conducting tests within a headless browsing environment.
The appeal of Puppeteer lies in its developer-friendly APIs, making it a preferred choice among web developers and testers. With Puppeteer, users can replicate user interactions on webpages, conduct automated testing, submit forms, and perform data scraping with ease.
Puppeteer is actively maintained by the Chrome team at Google, positioning it as the go-to choice for browser automation in the Node.js ecosystem. It simplifies the complexities of interacting with headless browsers, expanding the possibilities for web automation and testing, thus serving as an essential tool for many web development projects.
Some use cases of Puppeteer
Puppeteer is a powerful tool that allows for the automation of various tasks in a web browser, mirroring human actions. Here are a few examples to get you started utilizing Puppeteer for automation.
- Generate screenshots or PDFs of web pages.
- Data scraping.
- Take a screenshot of websites daily or save HTML to create a history of website UI.
- Automate form submissions like feedback forms and contact us forms.
- UI testing or screenshots testing.
- Emulate keyboard and mouse interactions. Though not recommended, some YouTubers use headless browsers to increase their views.
- Performance testing of web pages.
- Monitor uptime/downtime.
- Test Chrome Extensions.
- Sitemap generation.
- A/B Testing using multiple versions of chromium.
Growth
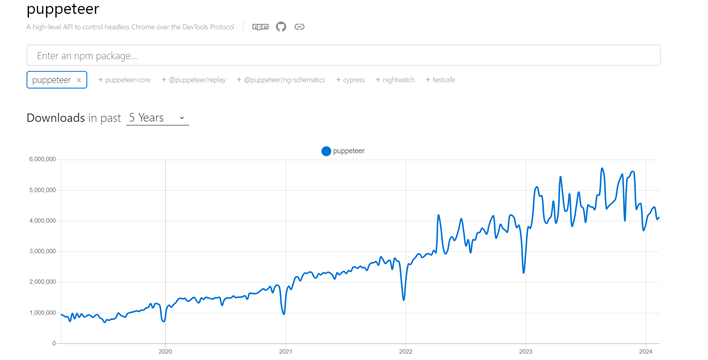
Puppeteer 5 years growth
Over the past five years, the demand for Puppeteer appears to be on an upward trajectory. With the power of AI, we can expect a further increase in puppeteer and headless browsers.
Competitors
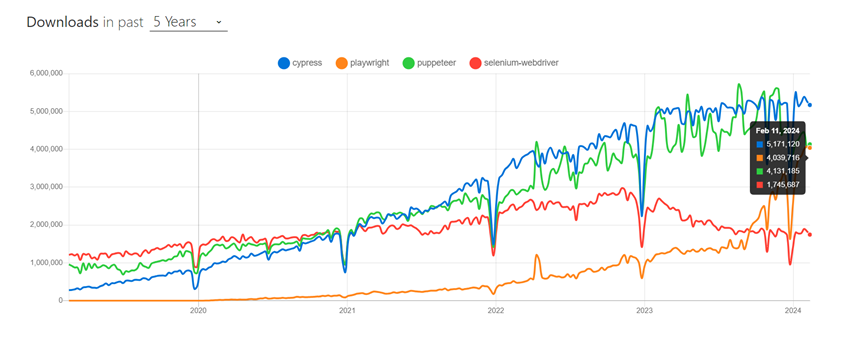
From nearly 1 million downloads in 2019 to close to 5 million downloads, it’s quite evident that the use of browser automation is in high demand. Meanwhile, the demand for selenium seems to be on a downward trend.
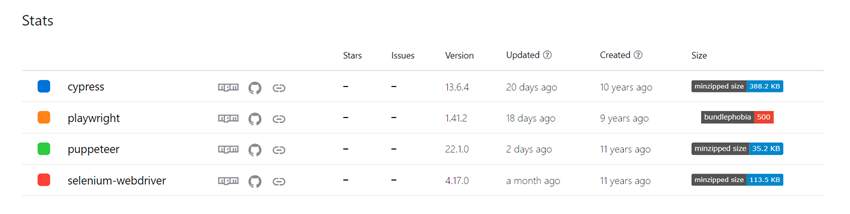
Let’s compare some of the puppeteer’s competitors using the below table.
| Feature | Puppeteer | Cypress | Playwright | Selenium |
| Type | Node.js library for controlling headless browsers | End-to-end testing framework for web applications | Node.js library for cross-browser testing | Open-source automation testing framework |
| Browser Support | Primarily supports Chromium | Mainly supports Chromium | Supports Chromium, WebKit, and Firefox | Supports multiple browsers including Firefox, Chrome, IE, Safari |
| Automation Type | Ideal for web scraping and automation tasks | Focuses on end-to-end testing of web applications | Designed for cross-browser testing | General-purpose automation testing |
| Testing | Does not have built-in testing features | Includes a built-in testing framework | Provides built-in testing capabilities | Offers extensive testing capabilities |
| Performance | Fast and efficient | Fast and efficient | Fast and efficient | May have slower performance due to overhead |
| Community | Active community support | Backed by a strong community | Active community support | Established community support |
Puppeteer architecture
The Puppeteer architecture can be categorized as a pyramid, symbolizing its hierarchical organization and components. Here’s how the Puppeteer architecture aligns with a pyramid model:
Base Layer – Node.js Environment
Node.js makes the foundation at the pyramid’s base, serving as the fundamental framework for Puppeteer. Node.js provides the runtime environment that is required to execute Puppeteer scripts and facilitate communication with the browser.
Middle Layer – DevTools Protocol and Headless Browser
The middle layer consists of the DevTools Protocol and the headless browser (basically the Chromium driver), which Puppeteer controls. Puppeteer communicates with the browser using DevTools protocol to enable automated interactions with web pages.
Upper Layer – Page and Browser Instances
At the top, The Puppeteer creates an instance of the browser and returns a page. Using the browser instance, developers can manipulate web page elements, emulate mouse/keyboard operations, navigate websites, and manage browser actions using Puppeteer’s intuitive API.
Puppeteer Deep dive
Enough of basics for now; it’s time to delve deeper into development using Puppeteer. Let’s learn how to install Puppeteer, initialize it, create a PDF, capture a screenshot, and explore some basic optimizations, tips, and tricks.
- Install puppeteer.
npm install puppeteer- Launch puppeteer.
const puppeteer = require('puppeteer');
(async () => {

const browser = await puppeteer.launch();

const page = await browser.newPage();
await page.goto('https://www.tothenew.com/about-us');

})();
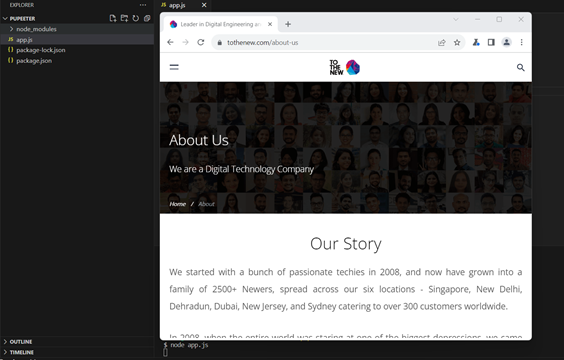
This is the minimum code required to open a webpage using Puppeteer. However, do not worry if you cannot see anything after trying the above code. This is because Puppeteer will open Chromium in headless mode. Let’s try again with headful mode.
 const browser = await puppeteer.launch({
        headless: false, // Headful mode
    });
If you see the below output, congratulations, you have won half the battle. If not, ensure that the installation was successful. If you face issues downloading Chromium drivers, you can pass the executablePath in the launch options.
Refer to https://pptr.dev/api/puppeteer.launchoptions for more information.
Do not forget to close the browser after completing your automation tasks. To do so, ensure that you include the following line at the end of your script:
await browser.close();
Create a PDF of a webpage
To generate a webpage PDF, simply add the code line below, and Puppeteer will save it to the path you provide. Optionally, you can omit the path if you prefer to work with buffers.
await page.pdf({ path: 'firstPdf.pdf' }) Take Screenshots of the webpage
You can capture a screenshot of the entire webpage by including fullPage in the screenshot options. In this tutorial, we will take a screenshot of a specific webpage section. To achieve this, you can either scroll through the document or utilize the native HTML scrollIntoView method with the element.
(async () => {
    const browser = await puppeteer.launch({
        headless: false
    });

    const page = await browser.newPage();
    await page.goto('https://www.tothenew.com');

    await page.waitForNetworkIdle(0)
    await page.evaluate(async () => {
        document.querySelector('#block-homepage address').scrollIntoView();
    });
    await new Promise((resolve) => setTimeout(resolve, 1500))
    await page.screenshot({ path: 'screenshot.png' })

    await browser.close()

})();
In the above code, with page.waitForNetworkIdle(0), we are waiting for the network to become idle, ensuring that the webpage has finished loading all files, including images.
The page.evaluate function evaluates a function in the page’s context and returns the result. Essentially, it allows running JavaScript scripts within the browser console. In this case, we are using the scrollIntoView method to scroll our webpage to the provided selector.
Additionally, a deliberate 1500 ms delay has been added to ensure that the webpage scrolling is completed before taking the screenshot.
Conclusion
There is a lot you can do with Puppeteer. You can emulate a mouse and keyboard, which will help you fill out forms, click on buttons, and interact with web pages. You can refer to Puppeteer for prebuilt methods at https://pptr.dev/, or you can write your custom methods.
Puppeteer is a powerful Node.js library that offers a wide range of high-level APIs for controlling headless browsers. By leveraging Puppeteer, you can automate tasks such as capturing webpage screenshots, web scraping, creating PDF documents effortlessly, interacting with web pages, and testing your application. The ability to run Puppeteer in headful mode allows you to visually observe browser interactions, making it a versatile tool for web development, testing, and automation. Additionally, Puppeteer’s strong community support and efficient handling of asynchronous operations through events and promises enhance its programming capabilities to interact with web pages.
Overall, Puppeteer seems to be the go-to solution for a broad range of web-related tasks. While there may be potential drawbacks to using Puppeteer, and in some cases, its competitors may offer better solutions, I believe there is still much to explore and achieve with Puppeteer.
Stay tuned for more upcoming blogs on similar topics.