Introduction
SPM – Swift Package Manager is a tool for managing the distribution of Reusable Swift code. With the term ‘Distribution’ there comes a question of how to distribute. The answer is Package.
It’s nothing new as we are already using some third-party, open-source code or writing our reusable, distributable code with the help of some Dependency managers like CocoaPods, and Carthage. But with SPM it is very easy to do that.
SPM has come a long way since it was introduced with Swift 3.0 but was restricted to server-side applications. Since the release of Xcode 11 and Swift 5, it’s available for iOS development. Using it in your project is highly recommended as it has many benefits.
Why should I use SPM?
- Easy to adapt, in-built with Xcode.
- Improve build time.
- Easy to add third-party/open-source dependencies.
- Help to easily modularise your app code.
- Easy distribution of reusable components/modules.
- Independent of CPU architecture of Open Libraries (Overcome the issue seen for cocoa pods library built with intel processor were not working on M1 machine).
There are more reasons to adopt SPM but the above should be enough to motivate us to use SPM in our code.
Every developer cares about writing clean code and tries to modularise code with folder structure, some developers use advanced techniques like local Cocoa pods, Carthage, and XCFramework. These are good techniques but are third-party dependency managers with some cumbersome steps to maintain the module/library except XCFramework. With SPM it is very easy to create modules as library type in Packages.
Lets us see how we may apply microapp architecture to modularise our application code using SPM.
What we will learn in this blog:
- Modularise app code using SPM local package.
- How to publish our package.
- Add Dependency to a package.
- Add remote packages.
- Use the cocoa pods library and SPM package in the same project.
The first step of modularization is identifying the candidate module, it may be UI-related, Networking module, App Navigation module, or any Utility module. To reduce the complexity and to adhere to our topic I identify simple dummy MyAppColorKit, MyAppFontKit, and the Networking layer as possible modules.
MyAppColorKit and MyAppFontKit are just UI Utility modules required to maintain the design style of the app. Mostly we keep such classes bundled with app and app extension. But by modularising it we can share it among many targets in our project or across many projects.
Though these are not the best example of modularisation but will justify the concept.
Steps:
- Create Swift Package.
- Configure Package.swift manifest
- Add code files to the source folder.
- Use of appropriate access specifiers.
- Add Package to the main project.
Create Swift Package:
Start Xcode and create a new package by selecting File>>New>>Package.
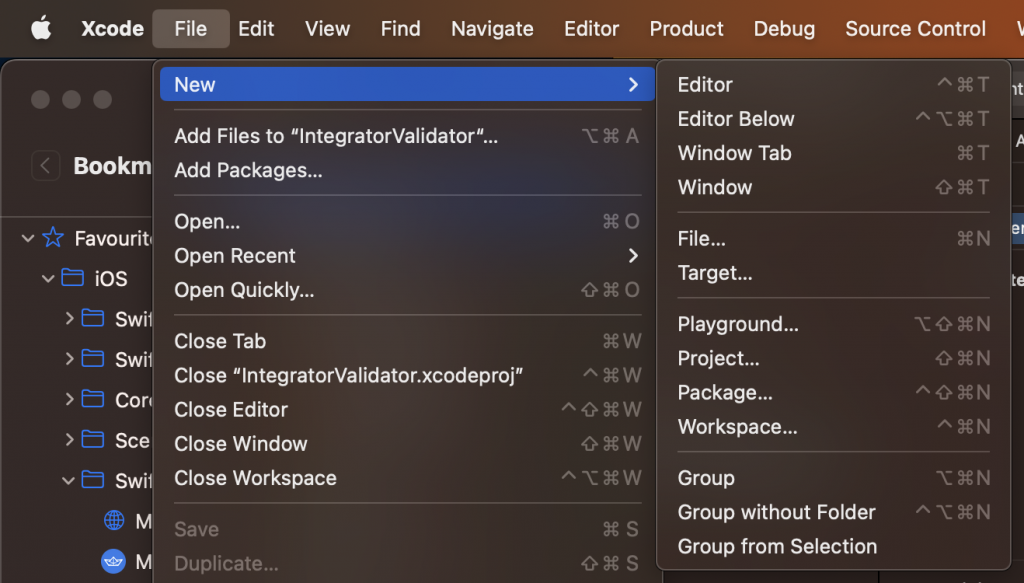
Create Package using Xcode
Name your package, I have used MyAppKit to resonate with Apple’s other SDK naming standard.
Keep the source control checked to keep our package under version control as SPM has version requirements following semantic versioning.

That is all we do to create a minimal local swift package named MyAppKit.
Now check the folder and files Xcode created by default for us.
- README – Provide a possible description of the package.
- Package.swift – Describes the configuration of the swift package.
- Source Folder – Contains the source file in a sub-folder scoped per target.
- Tests Folder – Contains XCTest test cases in [TargetName]Tests subfolder scoped per target.
Of these, the most important is the Package.swift. It declares the complete structure of our Package.
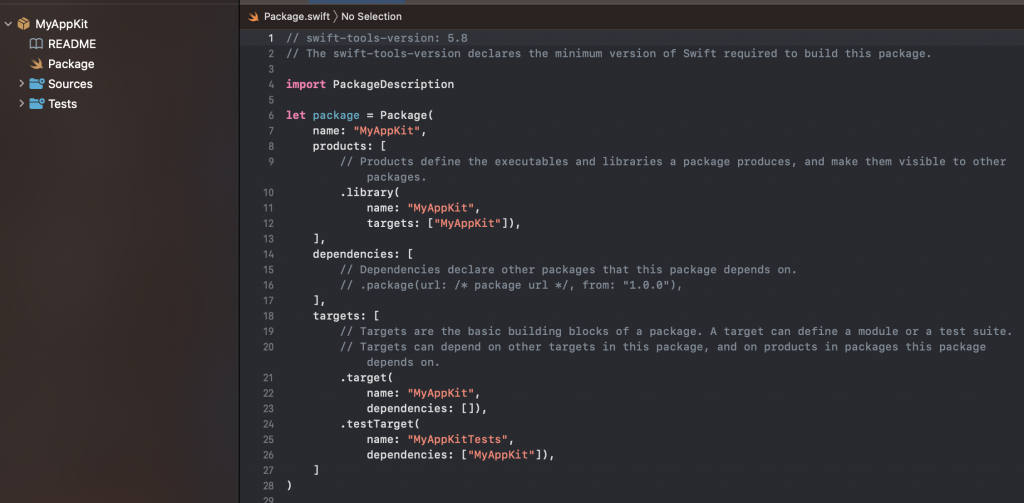
Package.swift
Let us break down and understand the Package.swift file.
- The first line,// swift-tools-version: 5.8 states the minimum version of Swift required for this package to be built.
- import PackageDescription imports the PackageDescription framework required to define the package.
- Next, Pass a name to the Package class the name of your Package.
- Products are the targets this package will build and produce. These can be either a library, code which can be imported into other Swift projects, or an executable code that can be run by the operating system.
- Next, we define the dependencies this package requires.
- Finally, the targets, it is an array of targets and test targets. There are many versions of the target declaration available. We may opt as per use.
- All the source codes are kept in Sources >> TargetNamed_Subfolder (Same name as target).
For more information on Package.swift please check out Swift.org – Package Manager.
Configure Swift Package.swift Manifest:
Next, We’ll configure the Package.swift to create two products MyAppColorKit and MyAppFontKit vending them as libraries.
This means we will be able to import MyAppColorKit and MyAppFontKit as libraries in our project. As described above all the source code files reside in the subfolder of the Sources directory having the same name as the target they belong to, and test cases to the respective subfolder in the Tests directory.
We add source code files and end up as shown in this figure.
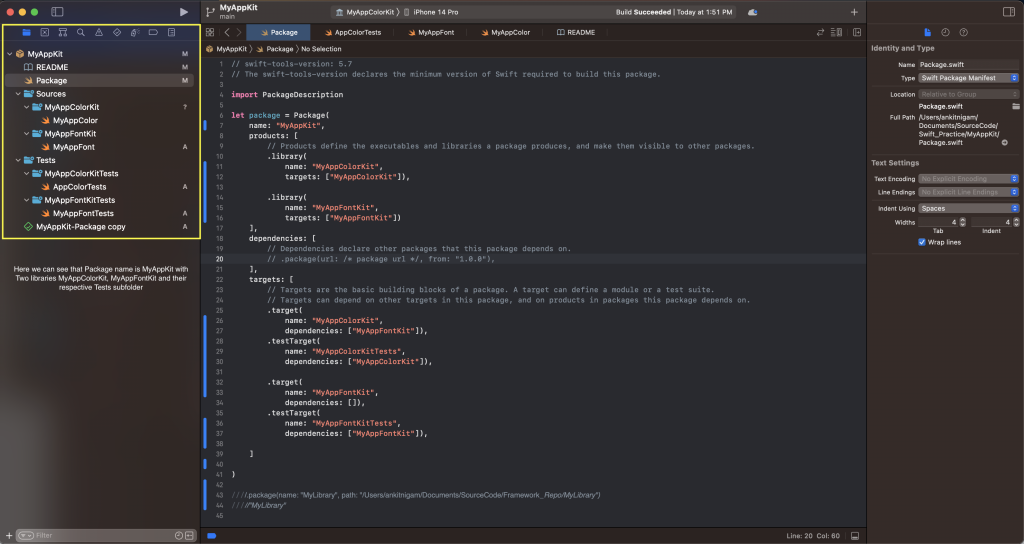
Configure Package
The configured Package.swift should have been well understood by earlier explained steps except for the dependency declared on the MyAppColorKit target of MyAppFontKit.
It just makes sure that MyAppFontKit is accessible in MyAppColorKit but not the other way around. Feel free to check out the code in MyAppFontKit and MyAppColorKit. (They are just dummy code to explain the modularity approach don’t forget to check on the access specifier)
At this point, if you check the schemes in your Package project you will find that Xcode has created schemes for each product and an additional scheme with the name [PackageName]-Package to build all targets and run all unit test cases.
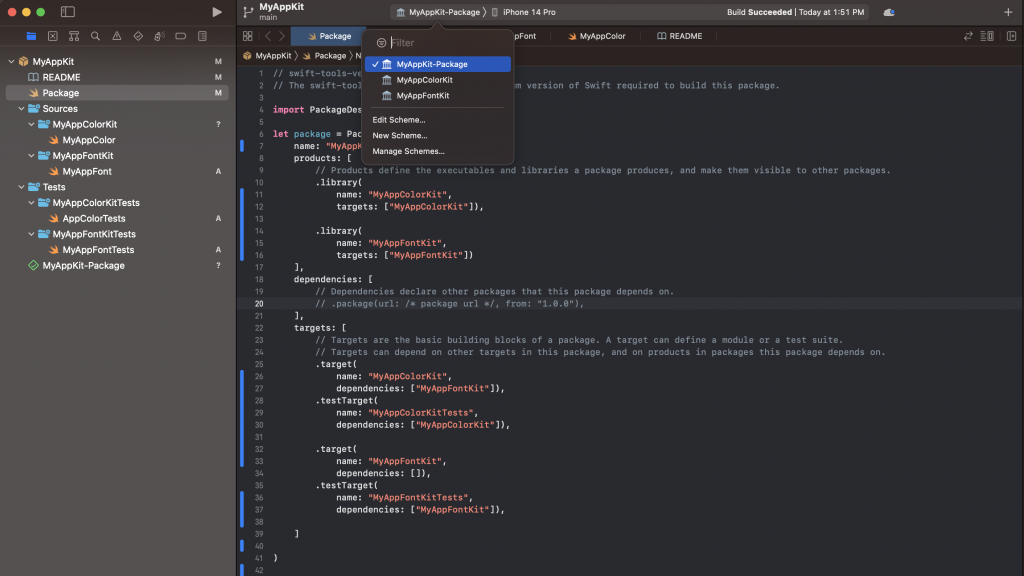
[PackageName]-Package scheme
Now we will add MyAppKit package to our project.
Go to Xcode >> File >> AddPackages >> Add Local >> AddPackage to select the Package directory locally. For AddToProject, select your Project, not the Pod project if we have Pods dependency also in our project.

1. Add local package
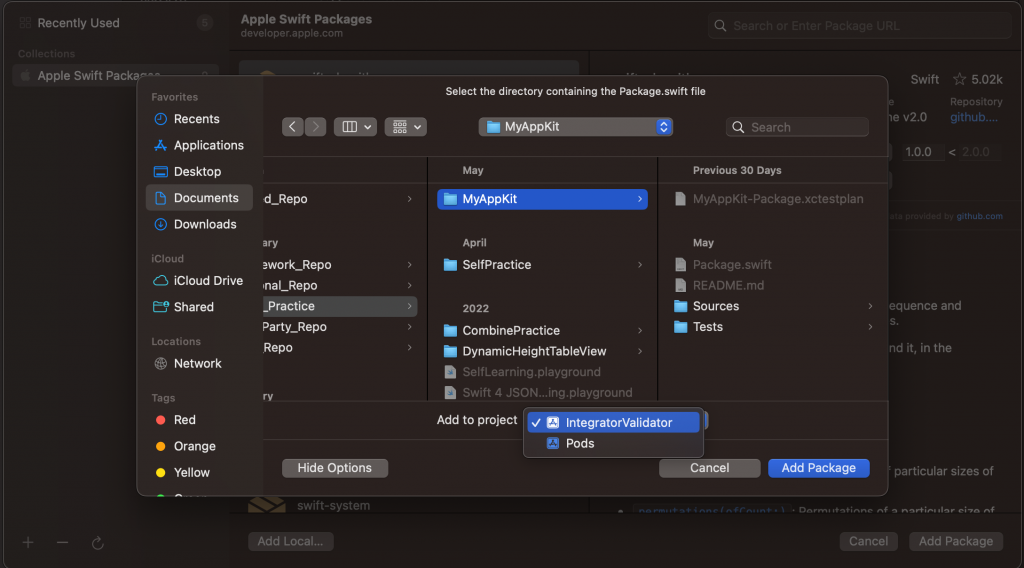
2. Add local package
The final step before importing and implementing the MyAppColorKit and MyAppFontKit is to add libraries to your app target from the target’s setting in the General tab under Frameworks, Libraries, and Embedded Content.
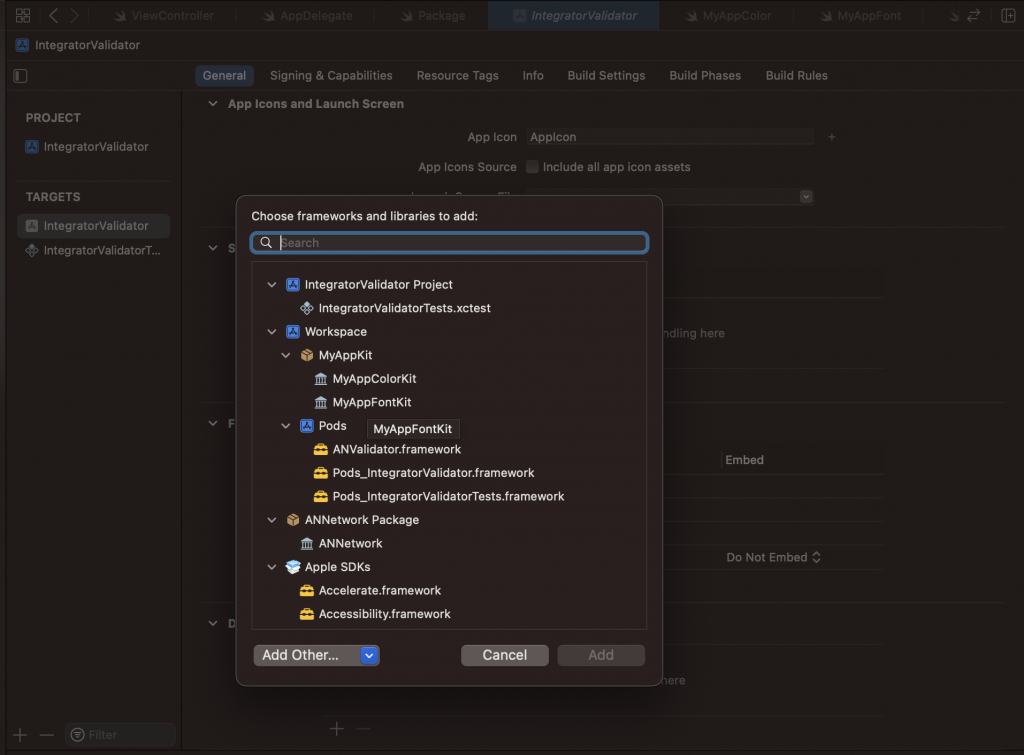
Embed framework
Just import the libraries in your implementation.
![]()
We saw how easily, with SPM’s local package we were able to modularize our project code. Using this technique, we may want to segregate our code into micro apps modules that can stand alone.
Benefits of modularising code with SPM:
- Easy to implement and maintain modularity compared to local cocoa pods.
- The local library can be edited in the project itself.
- Improved build time as only changed modules will build again.
- Different team members can work on their modules without interfering with each other.
Publishing Package :
We saw how we used the local package in our project. Following the same approach, I created a new networking package ANNetwork locally while in development.
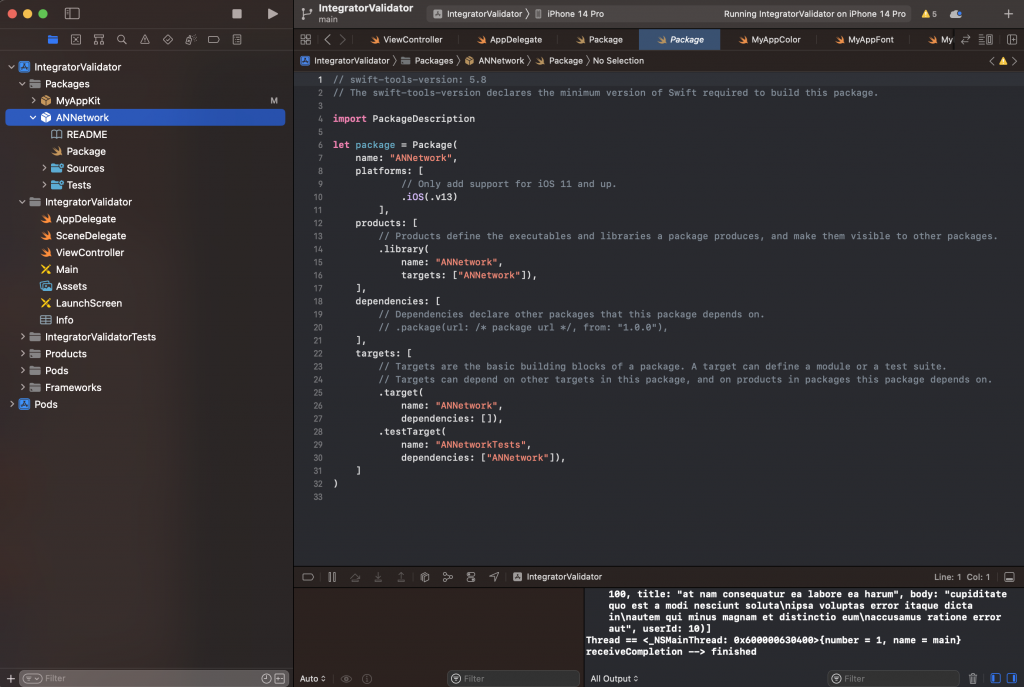
ANNetwork Package in development
Now, let us publish ANNetwork as an open-source remote Swift Package. Remote packages are easily made available as dependencies using SPM.
Publishing your package is just like creating and hosting a remote repository and tagging it following semantic versioning.
Feel free to use Xcode, command line, or any other tool to create a remote repository on any git-based code hosting repository services like GitHub, GitLab, or BitBucket. I prefer to use Sourcetree to manage Git Repository, but for better reach showing the steps using Xcode to create the remote repository and tag it once the stable usable library version is complete for publishing.

Publish Remote Package
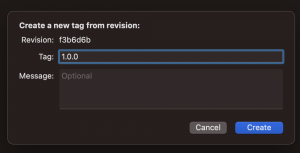
Tag Remote Package
That’s it, ANNetwork Swift Package is live and available to use as Remote Dependency.
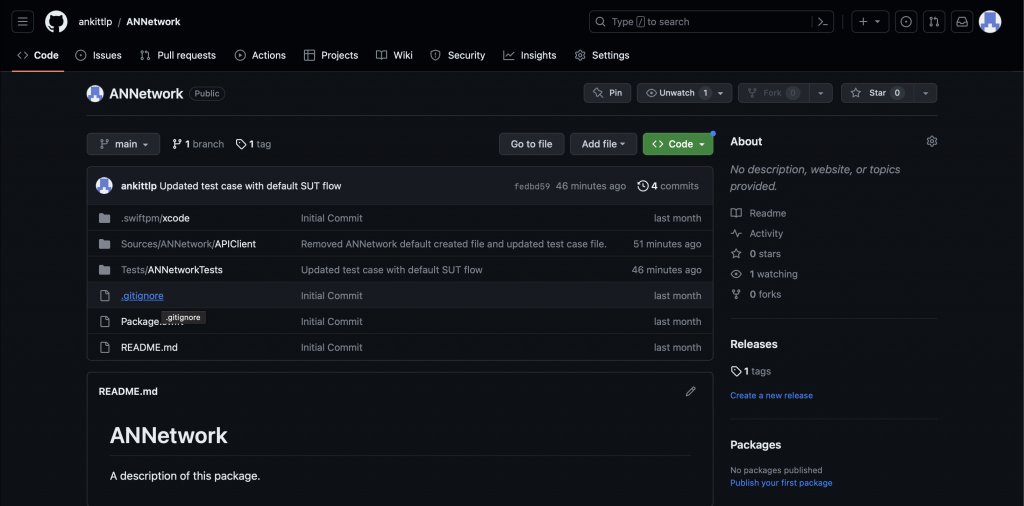
Published Remote ANNetwork Package
Now we can remove the ANNetwork local package.
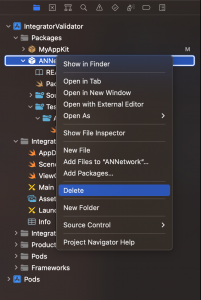
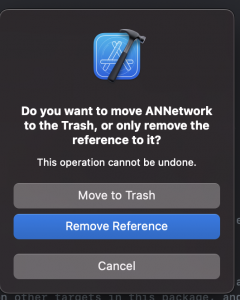
Removing the local package is as easy as removing any other file. Just make sure to Remove Reference, not Move to Trash.
Add Remote Package:
Adding a Remote package is the same as adding a local package, but the only difference is we need the Git url of the Remote package.

Add Remote Package.
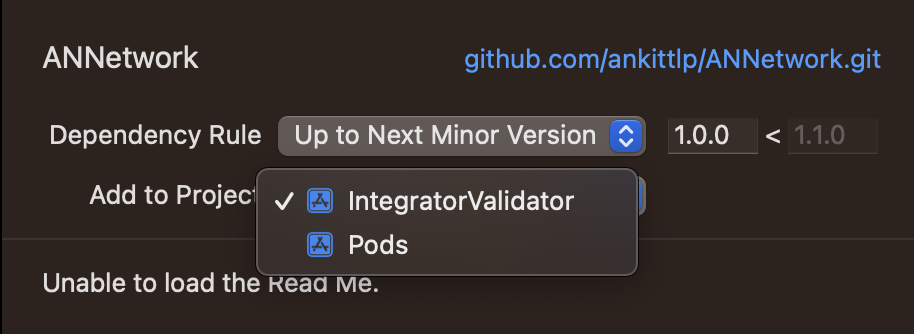
Set the dependency rule specified “Up to Next Major Version”. That means it will add the available version between 1.0.0 to Next Major Version, and Update Package will migrate the library to Up to Next Major. Compile the project now, It will run as earlier with no difference.
Publish Private Package:
We saw how easy it is to publish and distribute a public package. In some projects, we may have a private package only to be used at the organization level or project level. A package with these restrictions can be published with Private Git Repository and used with proper SSH keys setup or repository-level shared Personal Access Token.
SPM in CocoaPods-based Project:
There are still a few dependencies that are only available on cocoa pods. For similar cases where we need to use SPM in a cocoa pods-based project. Please check this sample project.
It has a dependency named ANValidator which is available on cocoa pods. So, to add SPM dependencies, I selected the IntegratorValidator Project, not the Pods project.
SPM with Cocoa pods
I’ll end up here with the motivation to write more on Swift and iOS technology.
Do try SPM in your next project. Subscribe to our blogs for more insights.