Android unit testing is an essential part of the software development process for Android applications. It is a way of verifying that individual units or components of the code are working as expected, in isolation from other parts of the application. In this blog, we will explore the basics of Android unit testing, including its benefits, best practices, and some popular testing frameworks.
Benefits of Android Unit Testing
- Improved code quality: Unit tests help to catch bugs early in the development cycle, making it easier to fix them before they become more complex and harder to solve.
- Faster development: Unit tests can reduce the time it takes to develop features by helping to identify and isolate issues early, reducing the need for manual testing and debugging.
- Reduced risk: By catching bugs early and ensuring that each unit of code is working correctly, the overall stability of the application is improved, reducing the risk of crashes and other errors.
- Better collaboration: Unit tests help to create a shared understanding of the code between developers, making it easier to collaborate on complex projects and reducing the likelihood of miscommunication.
Best Practices for Android Unit Testing
- Test only one thing at a time: Each test should focus on a single unit or component of the code, to ensure that it is working as expected in isolation.
- Test both positive and negative scenarios: It’s important to test both scenarios where the code is expected to work as well as where it is expected to fail, to ensure that it is robust and resilient.
- Use mocking and stubbing: Mocking and stubbing allow developers to create fake objects and data that simulate real-world scenarios, helping to test code that depends on external dependencies.
- Keep tests simple and readable: Tests should be easy to read and understand, with clear and concise assertions that are easy to interpret.
- Use a testing framework: Testing frameworks provide a range of tools and functionality to help with unit testing, including setup and teardown methods, assertions, and test runners.
Popular Android Unit Testing Frameworks
- JUnit: JUnit is a widely used testing framework for Java applications, and it is also supported by Android. It provides a range of tools and features for writing and running unit tests, including assertions, test fixtures, and test runners.
- Mockito: Mockito is a popular mocking framework for Java applications, and it is widely used in Android unit testing. It allows developers to create fake objects and data to simulate real-world scenarios, helping to test code that depends on external dependencies.
- Espresso: Espresso is a testing framework specifically designed for Android UI testing. It provides a range of tools and functionality to help with UI testing, including UI interaction testing, screenshot comparisons, and performance testing.
- Robolectric: Robolectric is a popular testing framework for Android applications, which allows developers to run tests on a simulated Android device. This can help to speed up the testing process and reduce the need for manual testing on physical devices.
Examples
-
Testing a simple calculation function
public class CalculationTest {
    @Test
    public void testAddition() {
        int result = Calculation.addition(2, 3);
        assertEquals(5, result);
    }
}
In this example, we are testing a simple addition function addition() in a class called Calculation. We create a unit test case that calls this function with two arguments, and then we use the assertEquals() method to check if the result is equal to the expected value (5).
-
Testing a function that throws an exception
public class ExceptionTest {
    @Test(expected = IllegalArgumentException.class)
    public void testException() {
        User user = new User(null, "password");
    }
}
In this example, we are testing a function that throws an exception if an argument is null. We use the @Test(expected = ...) annotation to specify that we expect an IllegalArgumentException to be thrown when we create a new User object with a null username. If the exception is not thrown, the test case will fail.
-
Testing a function that depends on external data
public class DatabaseTest {
    private DatabaseHelper dbHelper;

    @Before
    public void setUp() throws Exception {
        Context context = ApplicationProvider.getApplicationContext();
        dbHelper = new DatabaseHelper(context);
    }

    @Test
    public void testGetUser() {
        User user = dbHelper.getUser(1);
        assertNotNull(user);
        assertEquals("John Doe", user.getName());
    }
}
In this example, we are testing a function that throws an exception if an argument is null. We use the @Test(expected = ...) annotation to specify that we expect an IllegalArgumentException to be thrown when we create a new User object with a null username. If the exception is not thrown, the test case will fail Testing a function that depends on external data
-
Testing a ViewModel with a mocked Repository
@RunWith(MockitoJUnitRunner.class)
public class MyViewModelTest {

    @Mock
    private MyRepository myRepository;

    private MyViewModel myViewModel;

    @Before
    public void setUp() {
        myViewModel = new MyViewModel(myRepository);
    }

    @Test
    public void testGetItems() {
        List<MyItem> items = Arrays.asList(
                new MyItem(1, "Item 1"),
                new MyItem(2, "Item 2")
        );

        when(myRepository.getItems()).thenReturn(items);

        LiveData<List<MyItem>> liveData = myViewModel.getItems();
        List<MyItem> result = liveData.getValue();

        assertEquals(items.size(), result.size());
        assertEquals(items.get(0).getName(), result.get(0).getName());
        assertEquals(items.get(1).getName(), result.get(1).getName());
    }
}
In this example, we are testing a ViewModel MyViewModel that depends on a Repository MyRepository. We use the Mockito library to mock the Repository and set it up in the setUp() method. Then, we use the when() method to define the behavior of the Repository’s getItems() method and return a list of test items. Finally, we call the ViewModel’s getItems() method and use assertions to verify that the returned list of items matches the expected values.
-
Testing a LiveData transformation function
@RunWith(MockitoJUnitRunner.class)
public class MyViewModelTest {

    @Mock
    private MyRepository myRepository;

    private MyViewModel myViewModel;

    @Before
    public void setUp() {
        myViewModel = new MyViewModel(myRepository);
    }

    @Test
    public void testGetItemNames() {
        List<MyItem> items = Arrays.asList(
                new MyItem(1, "Item 1"),
                new MyItem(2, "Item 2")
        );

        MutableLiveData<List<MyItem>> liveData = new MutableLiveData<>();
        liveData.setValue(items);

        LiveData<List<String>> result = myViewModel.getItemNames(liveData);
        List<String> expected = Arrays.asList("Item 1", "Item 2");

        assertEquals(expected.size(), result.getValue().size());
        assertEquals(expected.get(0), result.getValue().get(0));
        assertEquals(expected.get(1), result.getValue().get(1));
    }
}
In this example, we are testing a transformation function in a ViewModel MyViewModel that converts a list of MyItem objects to a list of their names. We set up a test list of items, create a LiveData object with this list, and pass it to the ViewModel’s getItemNames() method. We use assertions to verify that the returned list of names matches the expected values.
These are just a few examples of writing unit test cases in Android using the JUnit & Mockito framework. Unit tests can be written for any function or component in an Android application, and they are a valuable tool for ensuring code quality and catching bugs early in the development process.
Code Coverage using Kover in Android
Code coverage in Android refers to the measurement and analysis of how much of your application’s source code is executed by your tests. It provides insights into which your tests are exercising parts of your code and identifies areas that may lack sufficient test coverage. Code coverage is a metric that helps you assess the effectiveness of your test suite and can be used to improve the quality and reliability of your Android application.
Code coverage analysis can be performed at different levels, including:
- Line coverage: Measures the percentage of individual lines of code executed by the tests.
- Branch coverage: Measures the percentage of decision points (branches) in your code that have been taken by the tests. It determines whether both true and false branches of conditional statements have been executed.
- Method coverage: Measures the percentage of methods or functions that the tests have called.
To measure code coverage in Android using the Kover library, you can follow these steps:
- Add dependencies to your project. Include the Kover plugin and dependencies in your project’s build.gradle file:
buildscript {
    dependencies {
        // Other dependencies
        classpath 'com.vanniktech:gradle-android-kover:0.6.0'
    }
}

apply plugin: 'kover'
- Configure kover in your module’s build.gradle file. Inside the module’s build.gradle file, apply the kover plugin and configure it:
apply plugin: 'kover'kover { jacocoVersion = '0.8.7' reportDir = "${project.buildDir}/kover" enabled = true } android { // Other Android configuration testOptions { unitTests.all { jacoco { includeNoLocationClasses = true } } } }apply plugin: 'kover'
- Run your tests with code coverage. To run your tests with code coverage, execute the following command in the terminal. Below command runs your unit tests and generates a code coverage report.
./gradlew testDebugUnitTestCoverage
- View the code coverage report. After running the tests, you can find the generated code coverage report in the specified
reportDirfolder (e.g.,${project.buildDir}/kover). Open the HTML report in your web browser to view the code coverage metrics.The kover library uses the JaCoCo code coverage tool under the hood, and the generated report will show information about the percentage of code coverage for each class and method in your project.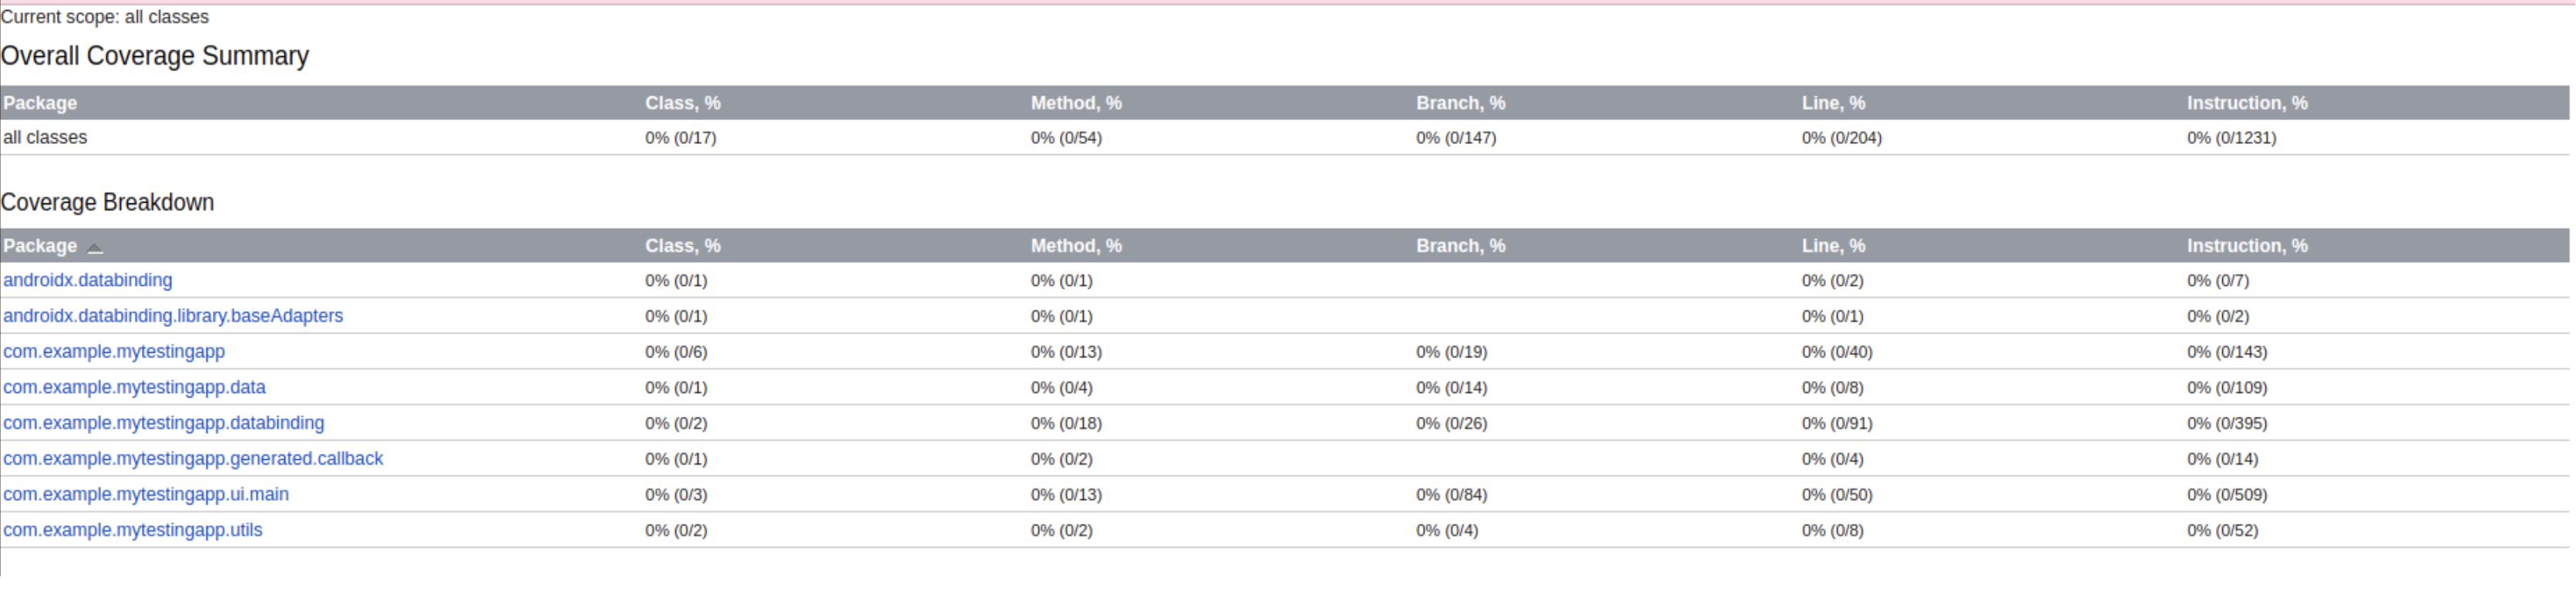
Feed your curiosity – read more of our insightful blogs.