
A Guide to Adobe Cloud Manager’s Content Copy Tool
Introduction
Adobe’s Cloud Manager Content Copy tool is an additional approach that aims to simplify the limitations of using CRX Package Manager / VLT RCP and handling huge volumes of content/DAM copy between AEM environments. The content copy tool in Cloud Manager helps AEM users to copy AMS-hosted AEM 6.x content from Production to Staging or from Production to Development environments. Content Copy Tool typically aims to create a replica of the content in the destination environment. This means the copied content, including assets and associated metadata, should be identical to the source environment.
Pre-requisites
- Access to the Cloud Manager Console with Deployment Manager role.
- Access to the AEM Author and Publisher instance to validate the AEM content pages/DAM assets post the sync process is completed.
What can be synced?
- /content/*
- /conf/*
- /etc/*
- /var/workflow/models/*
- /var/commerce/*
Availability of this tool:
Platform Model’s |
Availability of Content Copy Tool |
| AEM On-Prem | No |
| Adobe Managed Service (AMS) Platform | Author to Author
Publisher to Publisher |
| AEM as a Cloud Service | Author to Author ONLY |
Create a Content Set to update content paths:
Before the content sync operation can be performed, a content set must be specified. Once defined, content sets can be reused to copy content. Follow these steps to create a content set.
- Log in to Cloud Manager console at my.cloudmanager.adobe.com.
- Select the appropriate Organization and program.
- From the Service Main Menu, Click on Content Sets.
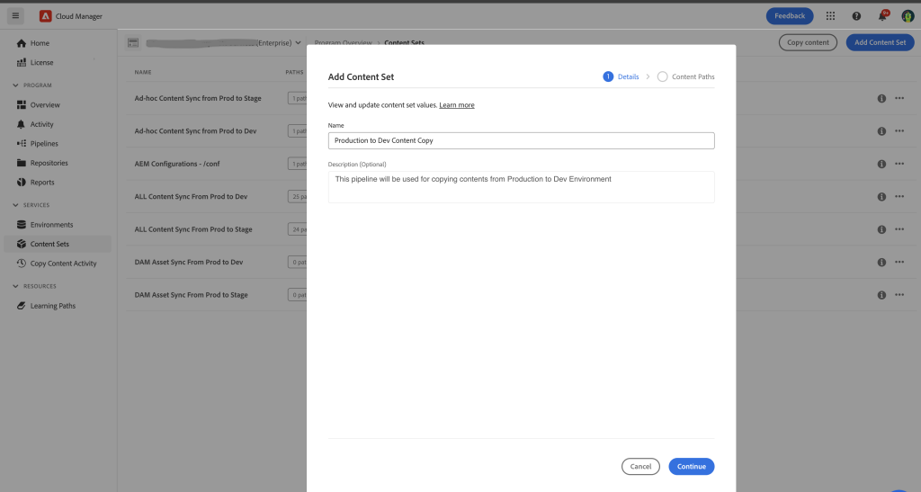
- Near the top-right of the screen, click Add Content Set.

- On the Details tab of the wizard, provide a name and description for the content set and click Continue.
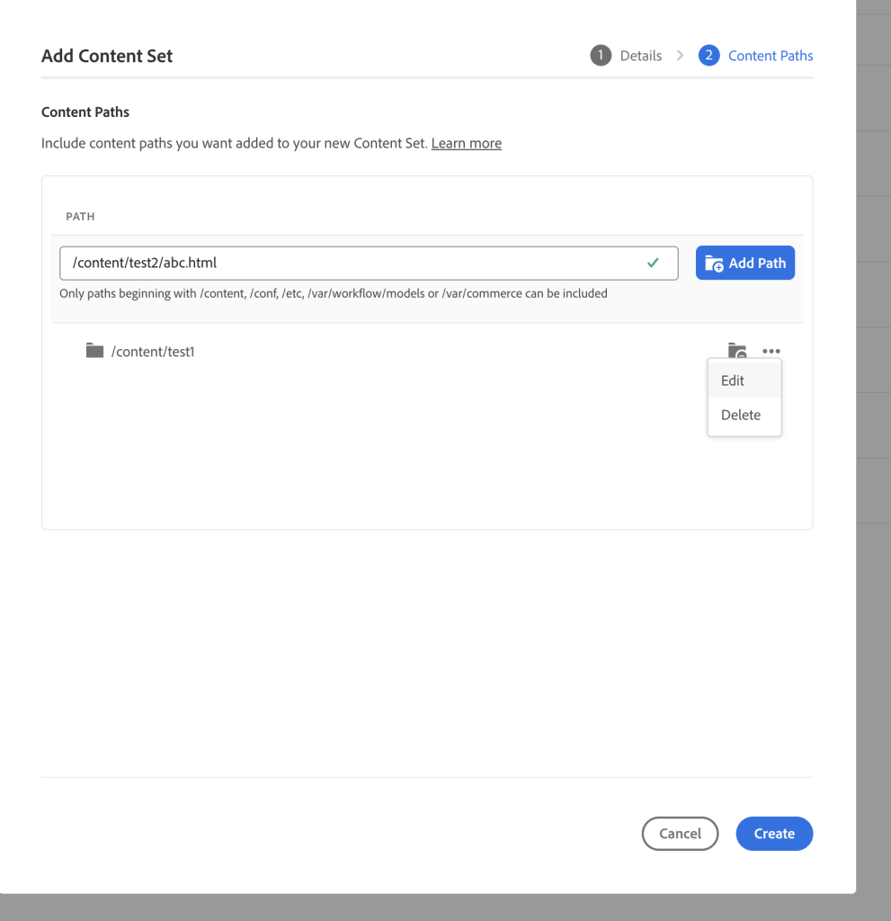
- On the Content Paths tab of the wizard, specify the paths of the content to be included in the content set.

- Enter the path in the Add Include Path field.
- Click Add Path to add the path to the content set.
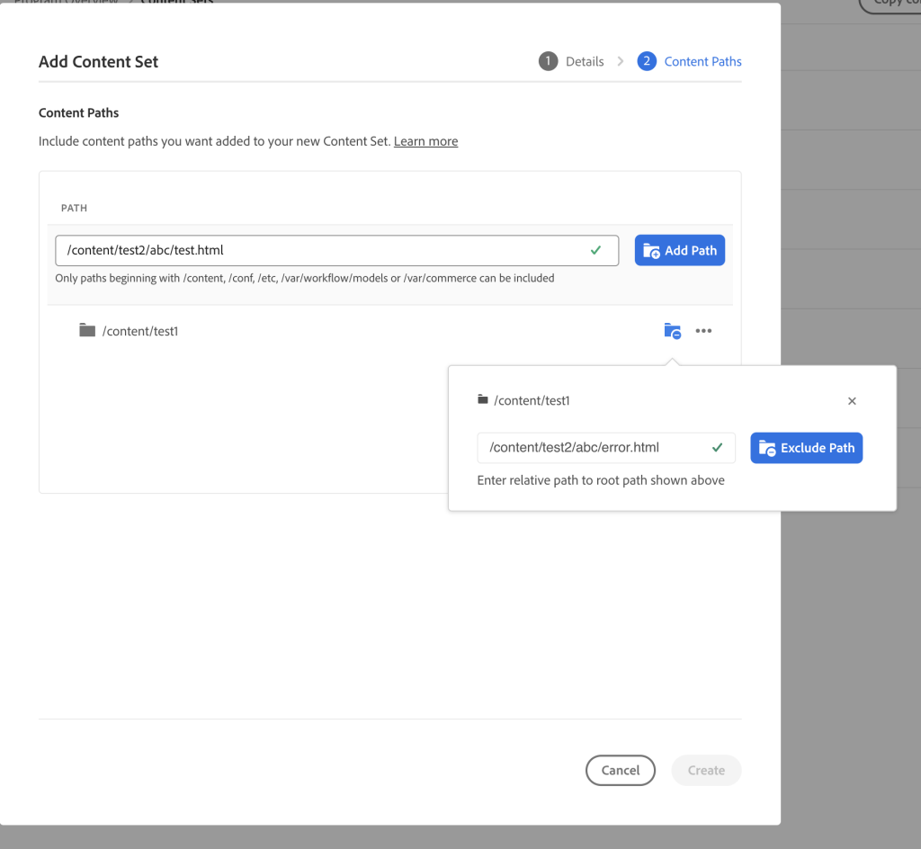
- In order to restrict content set, sub-paths can be excluded.
- In the list of included paths, click the Add exclude sub-paths icon next to the path that needs to be restricted.
- Enter the sub-path to exclude from the selected path.
- Click Exclude Path.
- Again, click Add exclude sub-paths to add additional paths to exclude as necessary. There are no limits to configure the exclude paths.
- Modify the specified paths if required.
- Click the X next to the excluded sub-paths to delete them.
- Click on three-dot button next to the paths to reveal the Edit and Delete options.
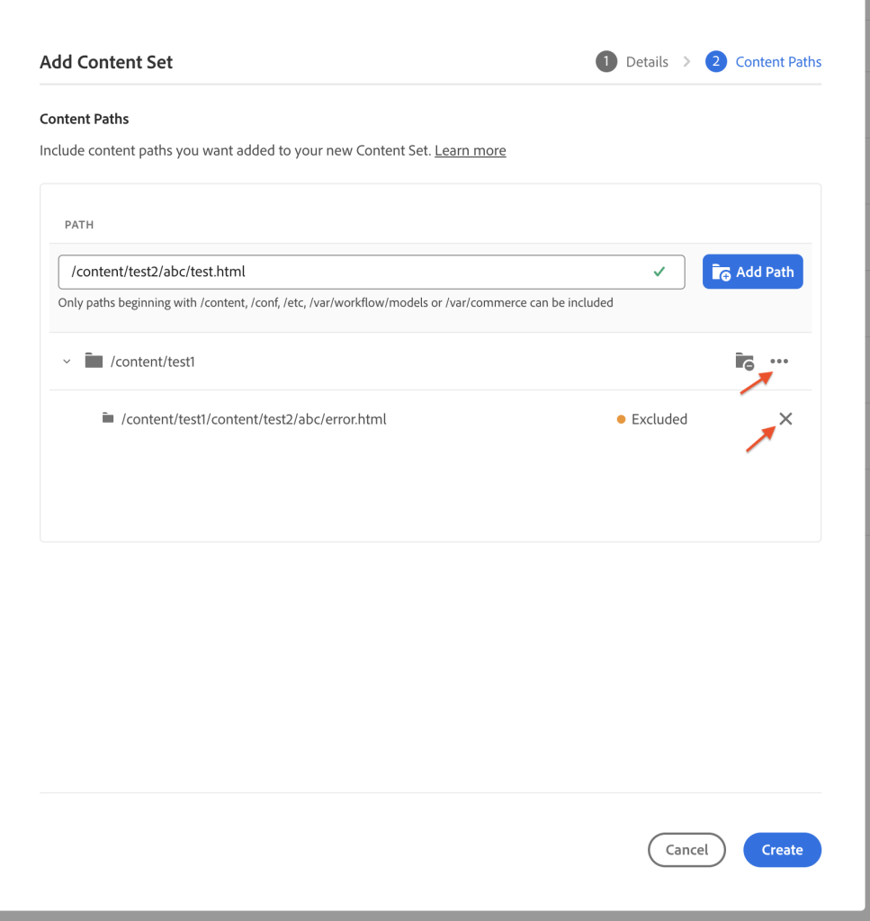
- Click Create to create the content set.
Perform the Content Copy Operation
Once a content set has been created, follow the below steps to copy content.
- From the Service Main Menu of the Cloud Manager console, navigate to the Content Sets page.
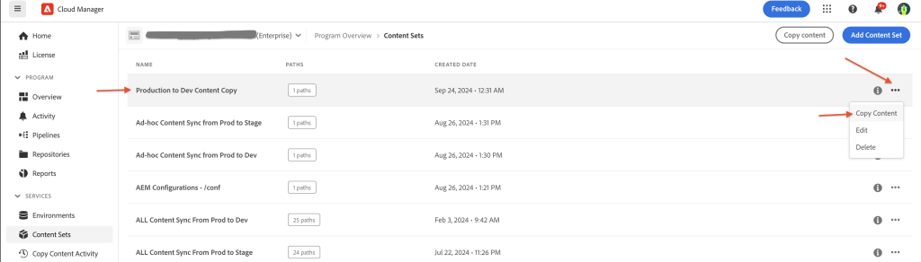
- Select a content set from the console and select the copy content option from three-dot menu.
- In case a warning message is displayed, this would mean pipeline is in progress and wait for the pipeline to complete.
- In the Copy content dialog box, specify the source and destination environments for content copy action.
- The regions of the target environment must be the same as or a subset of the source environment’s regions. Environment Options may not be selectable if the user does not have the appropriate permissions.
- Select the checkbox Do not delete exclude paths from destination to retain exclude paths that are specified in the content set. If the checkbox is unchecked, then exclude paths are deleted in the target environment.
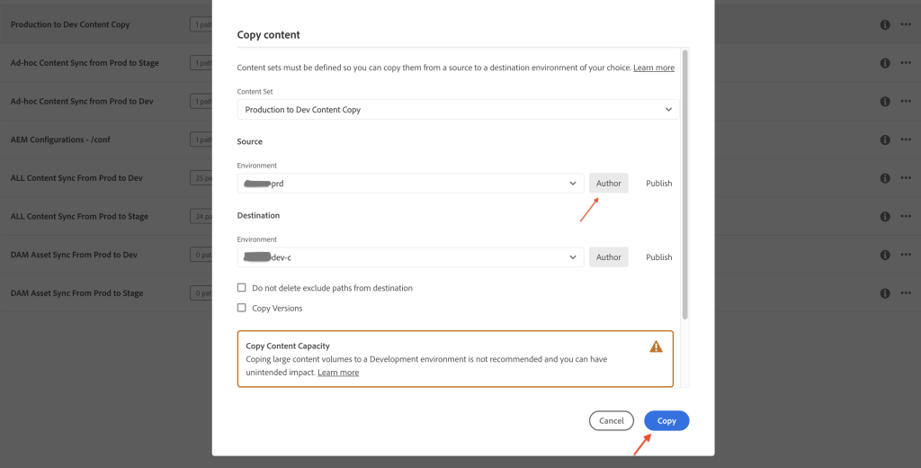
- Choose to copy the version history of paths being copied from source to destination environment. Select checkbox Copy Versions if all version histories need to be copied.
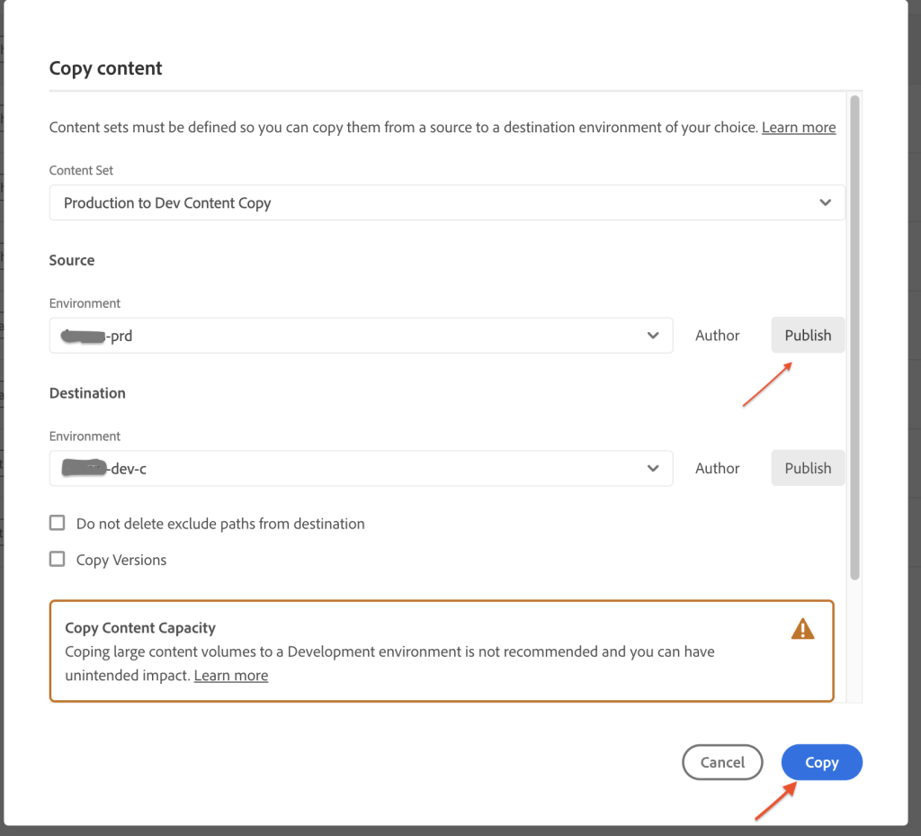
- Initiate the content copy from Author to Author and Publisher to Publisher as per above images.
- Click Copy.
The copy process starts. The status of the copy process is reflected in the console for the selected content set.
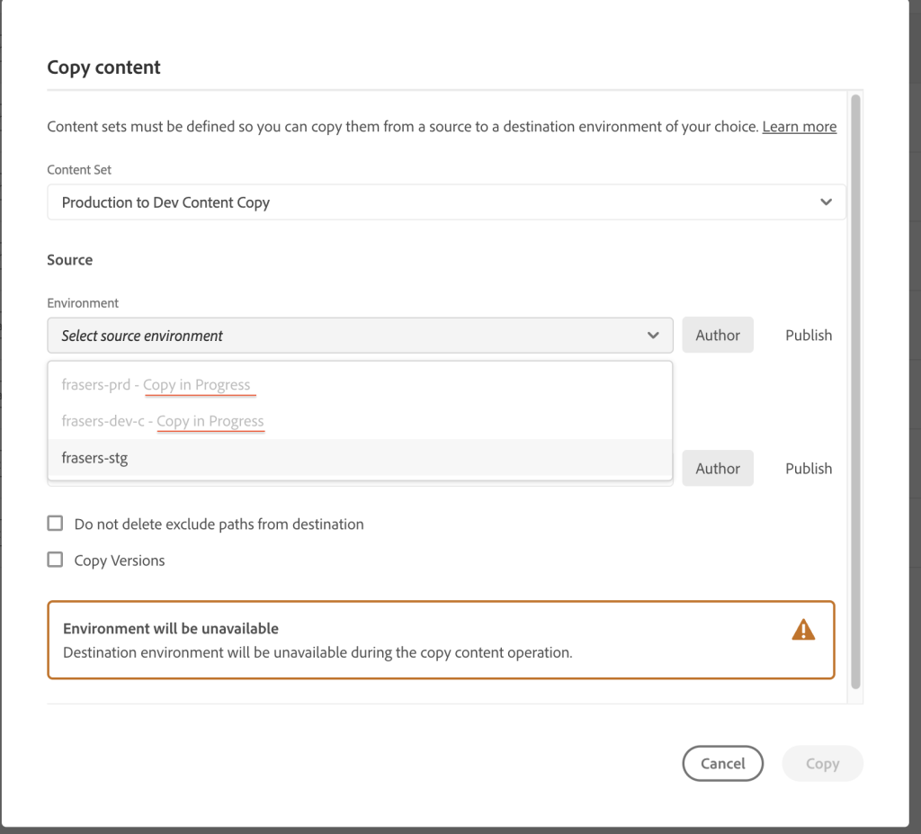
The Content Copy tool won’t allow us to initiate another content copy while the copy operation is already in process.
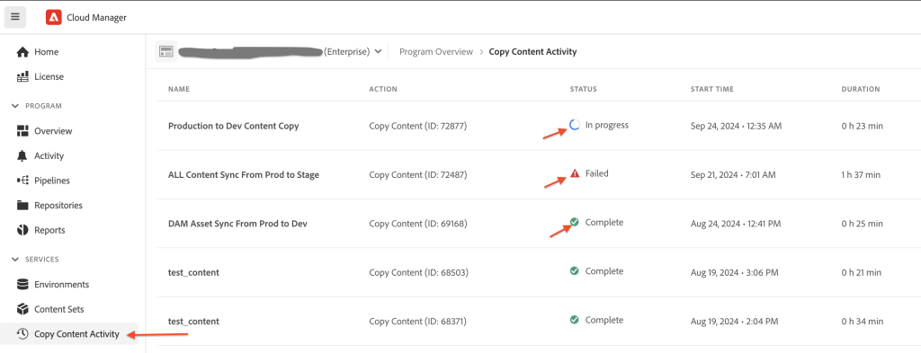
Monitor the Content Copy Activity
- Monitor the status of copy processes in the Copy Content Activity page.
- From the Service Main Menu, navigate to the Copy Content Activity page.
13
Different statuses in the Content Copy Tool
Once copying content starts, the process can have one of the following statuses.
Status |
Status Details |
| In-Progress | Content copy operation is ongoing |
| Completed | Content copy operation failed |
| Failed | Content copy operation completed |
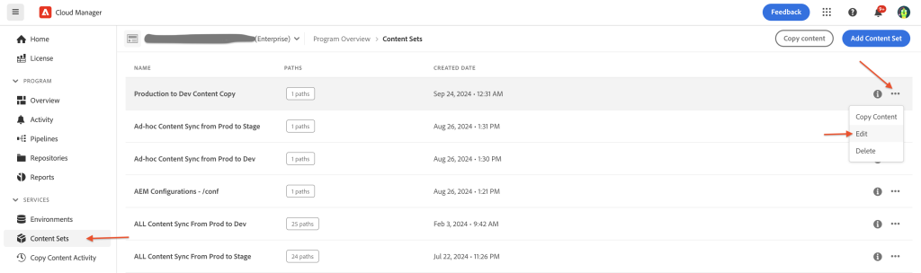
Editing a content set
- Select an existing content set from the console.
- Select Edit from the three dot menu as shown in below image.
- Update the content path in the existing pipeline and then trigger the content copy operation.
12
How to Copy DAM assets to Non-Production
Please make sure to disable the Workflow “DAM Update Asset” from Workflow Launchers in the Target instance.
- Please follow the same steps mentioned in the above section “Create a Content Set to update the content paths” to create the consent set for the DAM assets pipeline and “Perform the Content Copy Operation” to copy the DAM assets from Production to Non-Production.
- Better to create a separate pipeline for syncing the DAM assets.

- Enter the DAM asset path in the Add Include Path field.

- Click Create.
- Please note that the DAM asset copy will take more time than the content copy process.
Major points to be noted
- Both topologies have the same Data Store implementations, i.e. both are File Data Store or shared blob store. It is not possible to sync a shared blob store to a file data store or file data store to shared blob store.
- The target environment must have enough disk space to accept the transferred content. If not, then there is a possibility that the process will consume all available disk space.
- Content copy can only be performed within the same tier (i.e. author-author or publish-publish).
- Instances in both topologies have only one data disk. (except for S3/Azure BlobStore topologies where cache is kept in a separate disk).
- Target topology can never be Production.
- While the content sync is occurring, no other Cloud Manager actions can be run on the topology. This means that if a sync is being run from Production to stage, a CI/CD pipeline will not be able to be run.
- Content copy can not be performed if there is any active operation running on either the destination or source environment, such as a CI/CD pipeline.
- Both Topologies should be in same AWS account or Azure subscription.
- Up to 50 paths can be specified per content set. There is no limitation on excluded paths in the filter section.
- The Cloud Content Copy Tool is primarily focused on copying content nodes and associated metadata.
- Cancelling the pipeline and download logs options are not enabled in the AMS version, and it’s available in the AEM as Cloud version.
- If content is edited in the destination environment, the source content overwrites it if the paths match.
- If the paths are different, content from the source is merged with the content in the destination.
Benefits of using this tool
- AEM users can utilise this content copy tool to perform content sync from Production to Non-Production.
- The content sync process will not cause any space issues.
- Content Copy UI is simple to use.
- Another copy operation cannot be initiated while the content sync is in progress.
- Simply update the content or DAM paths using Path Include/Exclude options, much like in the CRX Package Manager console.
- Once the environment details have been updated, the content copy operation is instantly executed.
Need Improvements
- Syncing one page path from Source to Destination takes around 30 minutes.
- If the content sync fails, and reason can’t be figured out in the Cloud Manager UI, because of unavailability of logger to triage the issue, then Adobe CSE need to be contacted to get the detailed log details.
- There is no error message displayed in the UI console, making it impossible to identify the cause of failure.
- There is no distinct button to initiate or start the content copying process, as the Content Copy will start immediately once the environment configurations are changed.
- There is no way to terminate or pause the content sync process once it has initiated.
- User/Group nodes cannot be synced through this process.
- Copy of Version History takes more time than the usual duration.
- Even if incorrect content path is entered in the filter section, the content copy process is shown as completed. Ideally, if the path does not exist in the AEM repository, the copy operation should fail.
- Scheduling the sync process is not supported in this tool, initiation of content copy pipeline has to be initiated.
- Once the sync process is complete, there is no way to revert or roll back the contents.
- Similar to the Cloud Manager Deployment UI progress screen, the Content Copy UI could show the operation’s phases and progress.
Reference Link – https://experienceleague.adobe.com/en/docs/experience-manager-cloud-service/content/implementing/developer-tools/content-copy
