Introduction
GitHub Actions has become an integral part of modern software development, streamlining continuous integration and delivery processes. However, users have longed for a straightforward approval flow, similar to Azure Pipelines. It offers a simplified way to incorporate approval steps into CI/CD pipelines. This update opens doors for users to enhance workflow control.
Objective
The objective is to inform and guide GitHub Actions to users through the newly introduced “reviewers” feature, which enables the creation of approval flows within their CI/CD pipelines.
The focus is on providing a practical and accessible guide for users to quickly adopt and implement this feature in their workflows.
The aim is to empower users with the knowledge and tools to enhance their continuous integration and delivery practices using GitHub Actions.
Setting things up
- An Azure Account — You can get a free Azure account as well and do exactly this without any obligation.
- Set up an Azure App Service resource — I’m using App Service Linux and just created it using basically all the defaults.
- Download the publish profile and save those somewhere for now as we’ll refer back to them in the next step.
- In your App Service go to the Deployment Centre and select github action. Then select the options accordingly.
That’s it! With those basics set up I can get started with the next steps of building out the workflow. I should note that the steps I outlined here are free for GitHub public repositories. For private repositories you need to be a GitHub Enterprise Server customer. Since my sample is public I’m ready to go!
Environments
The first concept is Environments. These are basically a separate segmented definition of your repo that you can associate secrets and protection rules with. This is the key to the approval workflow as one of the protection rules is reviewers required (aka approvers). The first thing we’ll do is set up two environments: staging and production. Go to your repository settings and you’ll see a new section called Environments in the navigation.
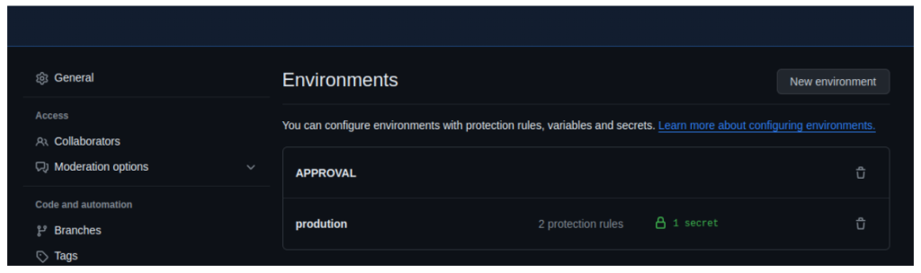
To create an environment, click the New Environment button and give it a name. I created one called production and one called APPROVAL. In each of these you can do things independently like secrets and reviewers. Either way click the Required reviewers checkbox and add yourself at least and save protection rules.
Add Required reviewers. You can add the users for reviewers and these users are those who are collaborators.
Now we’ll add some secrets. With Environments, you can have independent secrets for each environment. Remember those profiles you downloaded earlier, now you’ll need them. In the production environment create a new secret named PUBLISH_PROFILE and paste in the contents of the publish profile. This allows our workflow to use environment-specific secret settings when they are called naming as we’ll be marking the environment in the workflow and it will pick up secrets from that environment only (or the repo if not found there – you can have a hierarchy of secrets effectively).
Send a Google Chat Notification from a GitHub Action
To receive notifications when you want to build and deploy on prod to approve it.
- Configure WebHook in a Google Chat Room to receive notifications → Direct message or spaces (select any one) → App & Integrations → Add webhooks. Then copy the webhook link.
- Select the Github Repository.
- Configure secrets needed for the GitHub action. We maintain the webhook URL (created in step 1)as a repository secret.
- Navigate to Settings → Secrets and click on New repository secret .
- Add a name to the secret (I have used it as PROAPPROVAL) and paste the webhook URL in that value section.
- NOTE: If you need to receive notifications into the same thread of the chat add the query param threadKey=<some-value> at the end of the URL.
Configure the GitHub Action
Create a yaml file in <repository>/.github/workflows path.
NOTE : .yml extension is mandatory
name: Deploy to Azure App Service
on:
 push:
   branches:
     - app-service-deployment
jobs:
#for DEV environment
 build-and-deploy-dev:
  if: github.event.ref == 'refs/heads/main'
  runs-on: ubuntu-latest
  steps:
    - name: Checkout Source
      uses: actions/checkout@v3
    - name: Setup Node.js version
      uses: actions/setup-node@v4
      with:
        node-version: '18.x'
    - name: Install Dependencies
      run: npm install
    - name: Deploy to Azure App Service (Dev)
      uses: azure/webapps-deploy@v2
      with:
        app-name: githubaction-dev
        publish-profile: ${{ secrets.DEV }}
        package: .
#for non-prod environment
 build-and-deploy-non-prod:
  if: github.event.ref == 'refs/heads/main'
  runs-on: ubuntu-latest
  steps:
    - name: Checkout Source
      uses: actions/checkout@v3
    - name: Setup Node.js version
      uses: actions/setup-node@v4
      with:
        node-version: '18.x'
    - name: Install Dependencies
      run: npm install
    - name: Deploy to Azure App Service (NON-PROD)
      uses: azure/webapps-deploy@v2
      with:
        app-name: githubaction-testing
        publish-profile: ${{ secrets.NONPROD }}
        package: .
#for prod environment
 build-and-deploy-prod:
   runs-on: ubuntu-latest
   needs: notification
   environment:
     name: prodution
     url: 'githubaction-testing.azurewebsites.net'
   outputs:
     time: ${{ steps.set-time.outputs.time }}
   steps:
     - name: Checkout Source
       uses: actions/checkout@v3
     - name: Setup Node.js version
       uses: actions/setup-node@v4
       with:
         node-version: '18.x'
     - name: Install Dependencies
       run: npm install
     - name: Deploy to Azure App Service (Prod)
       uses: azure/webapps-deploy@v2
       with:
         app-name: githubaction-testing
         publish-profile: ${{ secrets.TEST }}
         package: .
 notification:
   runs-on: ubuntu-latest
   steps:
     - name: Notify on Google Chat
       run: |
        GOOGLE_CHAT_ROOM="xYO8qkAAAAE"
        MESSAGE="Deployment approval request. Click [here](https://github.com/${{ github.repository }}/actions/runs/${{ github.run_id }}) to approve."

        curl -X POST -H 'Content-Type: application/json' \
        -d '{
          "text": "'"$MESSAGE"'"
        }' "${{ secrets.PROAPPROVAL }}"
 notify-after-deploy:
   runs-on: ubuntu-latest
   needs: build-and-deploy-prod
   steps:
     - name: Notify on Google Chat after deploy
       if: success()
       run: |
        GOOGLE_CHAT_ROOM="xYO8qkAAAAE"
        MESSAGE="Deployment and approval request is done."
        curl -X POST -H 'Content-Type: application/json' \
         -d '{
          "text": "'"$MESSAGE"'"
        }' "${{ secrets.PROAPPROVAL }}"
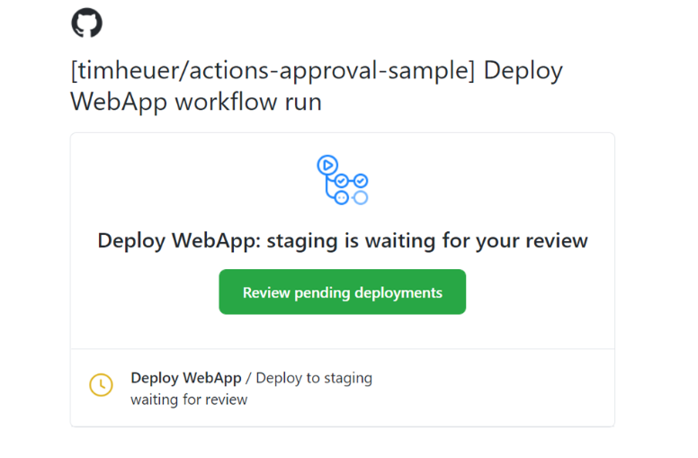
When the protection rules are hit, a few things happen. Namely the run stops and waits, but the reviewers are notified. The notification happens in standard GitHub notification means. I have email notifications and so I got an email like this:
I can then click through and approve the workflow step and add comments:
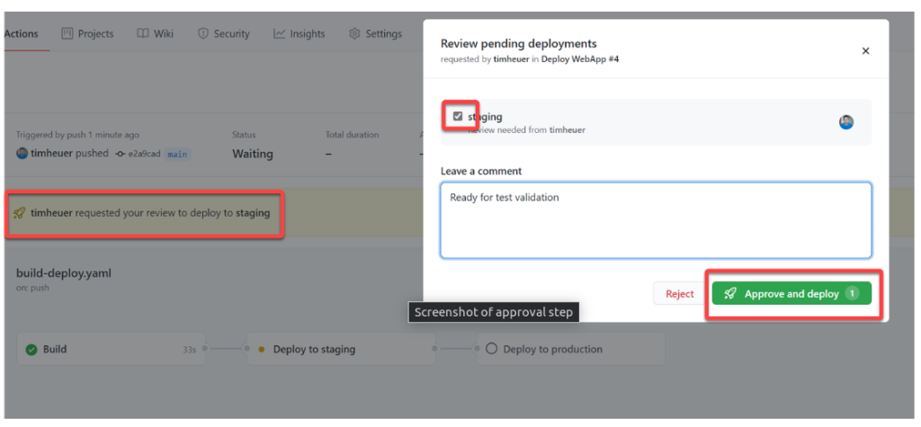
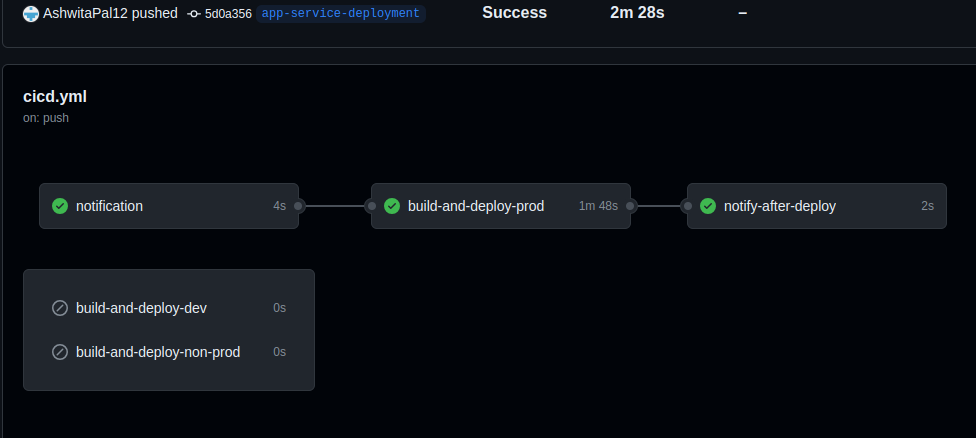
Once that step is approved, the job runs.
Conclusion
In conclusion, the addition of new features of approval workflows in GitHub Actions is a significant enhancement, simplifying the integration of approval steps into CI/CD pipelines. This feature empowers users to enhance workflow control, ensuring smoother and more secure deployments. With streamlined notification and approval processes, GitHub Actions further strengthens continuous integration and delivery practices.
Reference
- https://docs.github.com/en/actions/using-workflows/workflow-syntax-for-github-actions#run-name
- https://docs.github.com/en/actions/managing-workflow-runs/reviewing-deployments#bypassing-environment-protection-rules
- https://github.com/marketplace/actions/google-chat-notification
- https://docs.github.com/en/actions/using-workflows/events-that-trigger-workflows#issues