Introduction
For many organizations, the journey to the cloud begins with an important decision: migrating from their traditional on-premises data centers to Amazon Web Services (AWS). This transition demands courage, dedication, and extensive planning, as it involves moving their already operational infrastructure to the cloud without downtime.

One such great journey is the story of one Global Advertising Management Platform client, a powerhouse in the world of advertising and connected TVs. With a state-of-the-art Connected TV Advertising Management Platform, they needed a trusted partner to migrate and manage their critical AWS applications. And that’s where our journey with them began.
The key highlights of the proposed solution were:
1. Re-platform and Re-architect: To ensure compatibility with AWS, our team re-platformed and re-architected the solution, paving the way for a seamless transition.
2. Petabyte Data Migration: Moving petabytes of data from on-premises infrastructure to AWS requires a skilled hand.
3. Active-Standby Setup: We designed an active-standby setup for uninterrupted service, ready to take the reins as the primary system after the cutover.
4. Enhanced Monitoring and CI/CD Setup: We modified their infrastructure with enhanced monitoring and a robust Continuous Integration and Continuous Deployment (CI/CD) pipeline, ensuring performance and stability.
5. Post-Go-Live Support: Our commitment extended beyond the migration. We provided steadfast post-Go-Live support to ensure their operations ran smoothly on AWS.
Whether you’re an expert IT professional or just beginning to explore the world of cloud computing, this blog is designed to be your compass as you embark on the exciting journey from on-premises data centers to the boundless skies of AWS. Welcome aboard, and let’s explore the world of AWS migration together.
Why migrate from DC to AWS?
Migrating to a cloud platform like Amazon Web Services (AWS) from a traditional data center can offer numerous benefits. Still, it’s essential to understand the limitations of data centers and the reasons why we choose to migrate to the cloud. Our client was dealing with the problems mentioned below, and in general, here are some limitations of traditional data centers that drive the need for migration to AWS:-
1. Scalability: Challenges in data centers due to the need for upfront investments and limited physical space for expansion. AWS provides unmatched scalability. You can easily adjust your resources up or down to handle changing workloads.
2. Cross Availability Zones (AZs) for High Availability: AWS offers multiple AZs within regions. This means we can run applications with high availability and negligible downtime, even if one AZ faces issues. This becomes difficult in data centers because achieving geographic redundancy often involves high costs & complex setups.
3. OS and Software Upgrades: AWS handles the underlying infrastructure, including OS and software updates. This reduces the operational burden on your IT team, allowing them to focus on higher-value tasks. This is complex in data centers as it requires manual updates, leading to downtime and operational overhead.
4. Monolithic to Microservices-based Architecture: Breaking applications into smaller, modular components enables greater flexibility, faster development, agility, and easier maintenance. It is pretty tough in data centers due to hardware constraints and legacy architecture limitations.
5. Enhanced Observability: Real-time monitoring is crucial for quickly finding and addressing issues, which is challenging in a data center. On the other hand, AWS has a wide variety of observability tools, like Amazon CloudWatch and AWS X-Ray, that provide deep insights into the performance of your applications and infrastructure.
6. Security: AWS prioritizes security. It offers robust security features and compliance certifications, making it easier for organizations to meet regulatory requirements and safeguard their data.
7. Reduced Maintenance: Maintaining and operating a data center requires a skilled and dedicated Infrastructure team, which may be difficult to recruit and retain. AWS handles much of the underlying infrastructure’s maintenance and updates, freeing IT staff to focus on higher-value tasks.
8. Backups & Disaster Recovery: AWS provides comprehensive backup and disaster recovery solutions. Services like Amazon S3, Amazon Data Lifecycle Manager, and AWS Backup ensure that data is safe and recoverable during a disaster. Often complex in data centers, with manual backup processes and limited storage.
What were we dealing with?
Before starting the actual migration, we need to understand the existing infrastructure & application stack. So that things can be planned accordingly. This also helps us identify the right services we must choose in AWS.
Highlights of the Existing Data Center Setup:
- Advertisement Application Volume (Peak Time): 35 billion requests per day
- ETL Data Size:
- 2 Petabytes of historical data
- A 40-node Hadoop cluster
- Web/CDN
- Haproxy
- Nginx & Apache2
- Fastly
- NSONE (DNS Management)
- Database/Storage
- MySQL (Percona XtraDB)
- Approximately 30 mission-critical applications written in different languages such as Java, Python, NodeJs, etc.
- Aerospike Cluster
- Druid Cluster
- Messaging/Queue: Kafka
This big infrastructure reflects the challenges and complexities faced by organizations with substantial workloads.
Navigating the AWS Migration Journey: From Discovery to Setup
In this step, we started by collecting information about servers, applications, and data along with their inter-dependencies. Choose the right discovery tool, like AWS Migration Hub, to get more insights into the applications & servers running in DC. A discovery tool helps you gather information about the inter-dependence of the workloads by collecting server utilization data like configuration, usage, and behavior on your on-premise data center. Plan your data and application migration based on these dependencies.
Step A: Discovery: The journey begins with a thorough discovery phase, where you collect essential information about your existing infrastructure. Key activities include:
- AWS Migration Hub: We utilized AWS Migration Hub for inventory scanning, ensuring we have a complete view of on-premises resources.
- Ansible Scripts: Executed Ansible scripts to collect information about operating systems, running services, and open ports.
- Application Portfolio Analysis: Identification of application portfolio and their dependencies. Understanding the communication between different applications was necessary for this transition.
- Knowledge Transfer Calls: Engage in detailed knowledge transfer calls with the customer to ensure alignment and clarity about the migration plan.
Step B: Migration Planning
- Migration Document: Begin working on a comprehensive migration document that outlines your strategy and objectives.
- Customer Signoff: Collaborate closely with the customer and obtain their signoff on the migration plan.
Step C: Resource Mapping and Estimation: As we advanced in the migration plan, it was crucial to map existing resources to their AWS counterparts:
- Resource Mapping: Finalize the mapping of your existing infrastructure to AWS components, ensuring a smooth transition.
- Storage Requirements: Calculate your storage needs, considering data volumes and growth projections.
- AWS Calculator: Utilize AWS’s calculator tools to estimate the costs associated with your AWS infrastructure.
Step D: Creating Infrastructure on AWS:
1. In this phase, we utilized Terraform as our Infrastructure as Code (IaC) tool to launch the infrastructure on Amazon Web Services (AWS). Our objective was to replicate the existing Data Center (DC) environment on AWS, encompassing all applications, data components, Terraform server, Jenkins server, and various monitoring tools.
2. The deployment process was synchronized with our DC releases. For each release on the DC, a corresponding release was executed on AWS. This parallel setup allowed us to maintain consistency and ensure a seamless transition between environments.
3. As part of the migration strategy, we transferred data from different data components in the DC to their corresponding counterparts in AWS. This ensured that our applications could seamlessly consume data from AWS sources. Thorough testing was conducted to validate the integrity and performance of the migrated data.
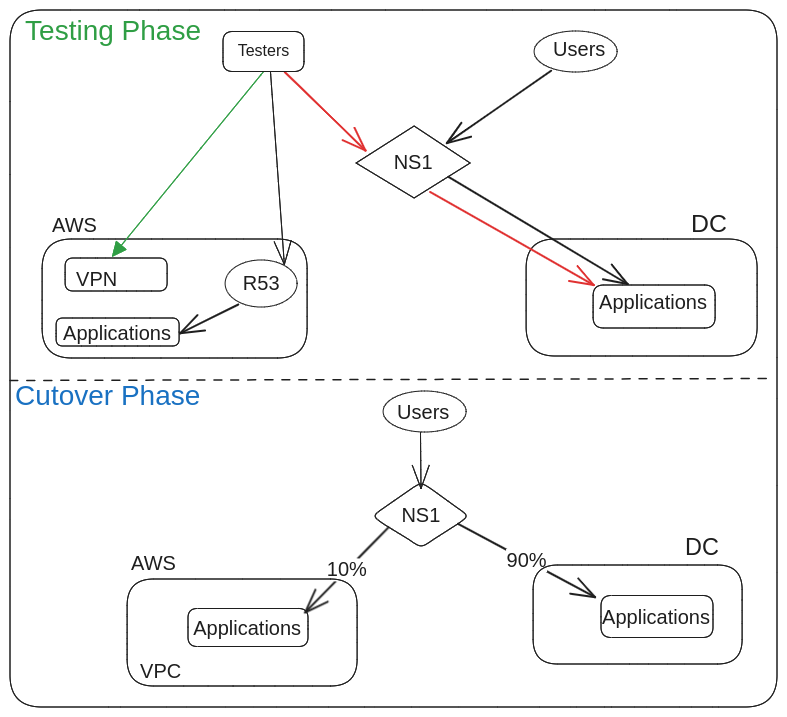
4. The pivotal moment in this migration was the DNS cutover, which marked the traffic transition from the DC to AWS. This cutover was executed gradually, employing the weighted routing feature provided by NS1, our domain hosting partner. Initially, we directed only 1% of the traffic to AWS. This cautious approach allowed us to monitor for any issues and provided the flexibility to roll back to the DC instantly if any anomalies were detected.
5. Upon successful validation and confidence in the AWS environment, we incrementally increased the traffic allocation until reaching 100%. At this point, having confirmed the stability and reliability of our AWS infrastructure, we proceeded to shut down the data center entirely.
6. This comprehensive migration strategy, encompassing infrastructure replication, data transfer, synchronized releases, and a gradual DNS cutover, ensured a smooth transition to AWS without disruptions to our services. The use of Terraform for infrastructure provisioning and NS1’s weighted routing for controlled traffic redirection played key roles in the success of this migration.
DC TO AWS Architecture Diagram

Direct Connect
In the journey from data center to AWS migration, one important aspect is to maintain reliable connectivity between DC and the AWS cloud. AWS Direct Connect is the bridge that makes this seamless connection possible. Without this keeping sync of data between both DC & AWS was next to impossible.
What is AWS Direct Connect?
AWS Direct Connect is a network service that provides dedicated and private network connections from your on-premises DC to AWS. It bypasses the public internet, ensuring a secure, low-latency, and high-bandwidth connection. We needed Direct Connect for the secure transfer of data from DC to AWS. Also, there was a requirement to do a cutover without any downtime. We had to keep real-time sync between the DC & AWS environments. A few Considerations before setting up Direct Connect:-
- Select a Direct Connect Location: Choose a Direct Connect location based on your geographical location and AWS region to establish the connection.
- Choose a Direct Connect Partner: AWS Direct Connect Delivery Partners help you establish network connectivity between AWS Direct Connect locations and their data center, office, or colocation environment via the following models: Dedicated Connections, Hosted Connections, and Hosted Virtual Interfaces. These partners offer a range of services, including port connections and equipment setup.
- Determine Connection Capacity: Decide on the connection capacity, which can range from 1 Gbps to 100 Gbps, depending on your requirements.
- Testing and Validation: It’s important to test the connection’s performance, security, and reliability to ensure that it meets your requirements
Setup:- https://docs.aws.amazon.com/directconnect/latest/UserGuide/getting_started.html
Major Activities
Performance Testing
One critical phase that can’t be overlooked is performance testing. It’s the assurance that your web applications can handle the expected traffic with reliability and scalability. AWS’s autoscaling options are impressive, but performing performance testing based on real production traffic is necessary.
Selecting the Right Performance Testing Tool: There are various performance testing tools available, each with its strengths. Tools like Performance Runner, Locust, Webperformance, and Apache JMeter offer versatile solutions. In our case, we opted for Apache JMeter, a powerful and open-source tool known for its flexibility and scalability.
Why Apache JMeter?
JMeter is a great choice for performance testing due to its flexibility and adaptability. It can simulate heavy performances, analyze performance, and pinpoint issues with precision. Plus, it’s open-source, making it cost-effective and accessible.
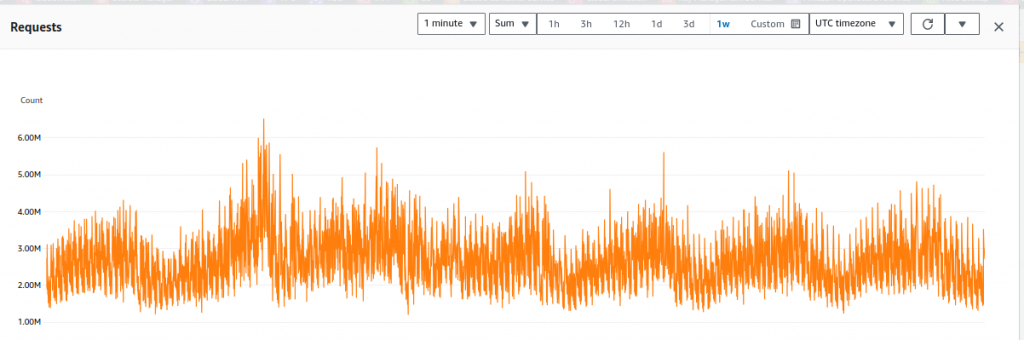
Preparing for Performance Testing: We took a data-driven approach to prepare for performance testing. Using data center numbers, we calculated the expected production traffic, which, in our case, is approximately 2.5 million requests per minute. However, we didn’t stop there. To ensure our infrastructure’s robustness, we subjected it to performance testing at 3.5 million requests per minute, allowing for a comfortable margin.
Our performance Testing Setup: We set up a JMeter cluster that consisted of one master and ten slave nodes, each equipped with c5.18xlarge capacity. This configuration allowed us to generate a staggering performance of 3.5 million requests per minute. Adjusting the throughput value within the JMeter test scripts was critical, as it directly influenced the number of requests sent.
Here’s a code snippet illustrating how to adjust the throughput value in JMeter test scripts to match the required performance :

Our performance testing with Apache JMeter proved invaluable. It allowed us to simulate real-world traffic conditions, uncover bottlenecks, and fine-tune our AWS infrastructure for peak performance.
Application Migration & DNS Cutover
Application migration and DNS cutover are important steps in the process of moving an application or service from one environment to another or migrating from an on-premises data center to the cloud. The DNS cutover is a critical step in the application migration process. It involves updating Domain Name System (DNS) records to direct traffic to the new environment hosted by the migrated application. This ensures that users and clients are properly routed to the new location. Doing that with zero downtime is challenging and involves lots of preparation before the cutover. Let’s dive deeper into each of these concepts:
- Data Migration: Move the application’s data to the new environment while ensuring data integrity, consistency, and minimal downtime. Various data migration tools and techniques can be employed.
- Application Replication or Reconfiguration: Set up the application in the new environment, either by replicating its configurations or by reconfiguring it to adapt to the new infrastructure. This may involve adjusting settings, database connections, and other configurations.
- Testing: Rigorously test the migrated application in the new environment to ensure it functions correctly. This includes functional testing, performance testing, and security testing.
- Validation: Verify that all data, configurations, and dependencies have been successfully migrated and that the application is performing optimally in the new environment.
- Cutover Planning: Plan for the DNS cutover, which is a crucial step to ensure that users are directed to the application in the new environment.
- Monitoring and Optimization: After the cutover, continuously monitor the application’s performance in the new environment and make any necessary optimizations to ensure it operates efficiently.
With the above steps, you now now have two parallel setups running at the same time. One in the Data Center and one in AWS. But still, the traffic is being served from the data center. Here is when DNS cutover comes into the picture to so a smooth transition of the traffic to AWS.
- TTL (Time to Live) Settings: Before performing the DNS cutover, adjust the TTL settings for your DNS records. Reducing the TTL allows for a shorter propagation time when DNS records are updated.
- Testing: Thoroughly test the new environment to ensure that the migrated application functions correctly. Confirm that all configurations and data have been successfully transferred.
- DNS Record Updates: Update the DNS records, such as A records, CNAME records, or other relevant records, to point to the IP addresses or domain names of the new environment.
- Propagation Time: Understand that DNS changes may take some time to propagate across the internet. The propagation duration depends on the TTL settings and can vary from minutes to hours.
- Rollback Plan: Always have a rollback plan if issues arise during the cutover. This plan should enable you to switch back to the old environment while addressing any problems that may arise.
- Monitoring: Continuously monitor DNS propagation and the application’s performance after the cutover to ensure everything functions as expected.
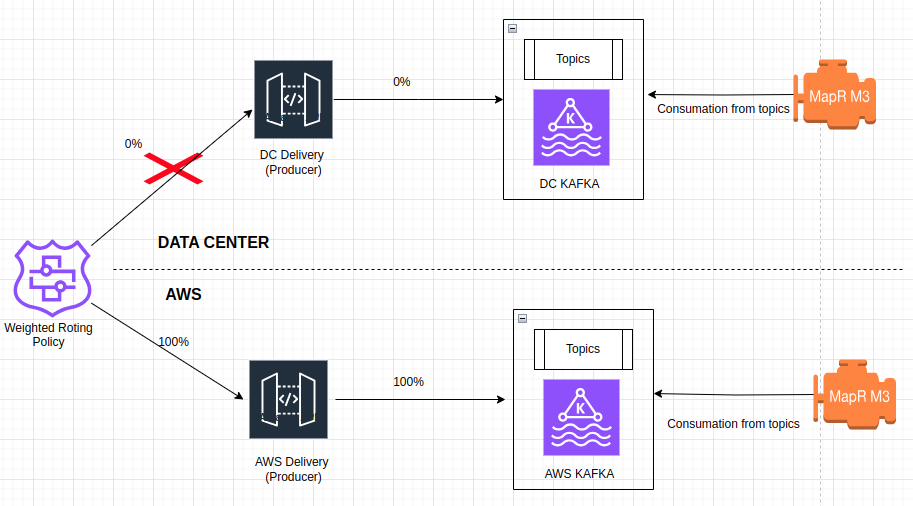
Kafka Migration
For most of the data, we used the LIFT & SHIFT (Rehost) mechanism. However, Kafka was one of the things for which we had to keep active-active sync. In this portion of the blog, We would like to discuss that.
What is MirrorMaker?
MirrorMaker is a tool in Apache Kafka for replicating data between Kafka clusters. It’s useful for maintaining a replica of an existing Kafka cluster in another data center.
How do we use MirrorMaker for Migration?
For a seamless migration, we used MirrorMaker to copy data from the on-premises Kafka to AWS Kafka. Here are the steps we followed:
- Create a list of topics in the source cluster to copy.
- Replicate those topics on the target cluster.
- Set up a MirrorMaker cluster based on data load.
- Optimize mirroring with different configuration parameters.
During Kafka Migration

After Migration
Monitoring Kafka migration
Use the consumer offset checker tool to ensure your mirror keeps up with the source cluster.
For more information on this, check this blog → https://www.tothenew.com/blog/mirror-maker-for-kafka-migration/
Benefits after Moving To AWS
- Enhanced Visibility:- Better understanding of traffic patterns and peak load
- Scalability and Elasticity:– One of the most notable advantages of AWS is its ability to scale resources up or down based on demand. Your organization can easily adjust its computing capacity to handle traffic spikes, reducing the risk of over-provisioning and savings on infrastructure costs.
- Visibility For Cost Management: Visibility is not limited to applications and infrastructure but also extends to spending. AWS provides comprehensive cost management tools that allow us to monitor expenses granularly. We now have insights into per-environment costs and even per-resource costs.
- Efficient Secrets Management:- Secrets management is a critical aspect of security and compliance. SSM simplifies this task by centralizing secret storage and access. We can use AWS Secrets Manager to inject secrets and sensitive environment variables into applications.
- Scalability Of Components:– AWS’s scalability is one of its standout features. Regarding data components, such as EMR Cluster & Autoscaling, the ability to scale is a game-changer. Adding nodes or increasing capacity can be a task that takes as little as a few minutes. This quick scalability ensures that your data infrastructure can effortlessly adapt to changing workloads and handle increased demands without interruptions.
- Effective Monitoring with CloudWatch:- Monitoring is essential for maintaining the health and performance of applications and infrastructure. AWS Cloudwatch is one go-to solution for this.
Learnings
- Fail Fast When You Don’t Have Visibility:- One of the most crucial lessons learned is the importance of identifying and addressing issues. When migrating to AWS, it’s essential to have visibility into your environment. This means real-time insights into resource utilization, application performance, and security. It’s difficult to detect issues early and take the right actions without visibility.
- Checklists Work:- Migrating to AWS is a comprehensive process involving numerous tasks, spanning from resource provisioning to security configurations. The key lesson learned is the importance of utilizing checklists. Brief checklists ensure that every critical step is noticed during the migration process. To streamline the procedure, we’ve created two distinct checklists—one for production and another for non-production environments.
The checklist for the production environment encompasses essential steps such as:
-
- Prepare detailed steps involved in the cutover process to minimize downtime and ensure a smooth transition.
- Identification of stakeholders involved in different stages of the migration, ensuring clear communication and collaboration.
- Thorough documentation of each step to provide a detailed record for future reference or auditing.
- Inclusion of prerequisite steps such as ensuring that AWS Service quotas are sufficient for the migration. This might involve steps such as raising an AWS Support Case to warm up load balancers or increasing soft limits for the number of targets in a target group.
- Identifying the Data Generators is Crucial:- Understanding your data landscape is important for making better decisions.
In this context, data generators refer to applications, tools, or software that process static data residing on storage platforms such as S3 or file systems. They play a crucial role in seeding data into other data sources like databases or queuing systems such as Kafka in our case. In scenarios involving these data generators, there is no need for direct migration of the data, as the data generators themselves autonomously generate it.
Conclusion
Partnering with a managed cloud services provider who can help you choose the right migration path is one of the surefire ways to overcome this cloud migration challenge.
We at TO THE NEW provide simplified migration to the AWS cloud by following the above activities to deploy the solution for you. A cloud-managed services provider can also help you manage the solution and provide backup and disaster recovery for your business. Outsourcing AWS migration to TO THE NEW’s AWS Certified Architects & DevOps Engineers can help you save time and resources and increase business efficiency.