
Deploying a simple php Application using Capistrano on AWS EC2
Introduction :
In this article we will see how we can automate the deployment using Capistrano,
and how we can roll back to previous version if needed.
Also in order to connect to deployment server we’ll use the key based authentication .
What is Capistrano ?
Capistrano is a remote server automation tool.
It supports the scripting and execution of arbitrary tasks, and includes a set of sane-default deployment workflows.
Advantages :
- Reliably deploy web application to any number of machines simultaneously, in sequence or as a rolling set.
- Rollback in case of previous version needed .
Lets have a quick overview of how our setup will look like.
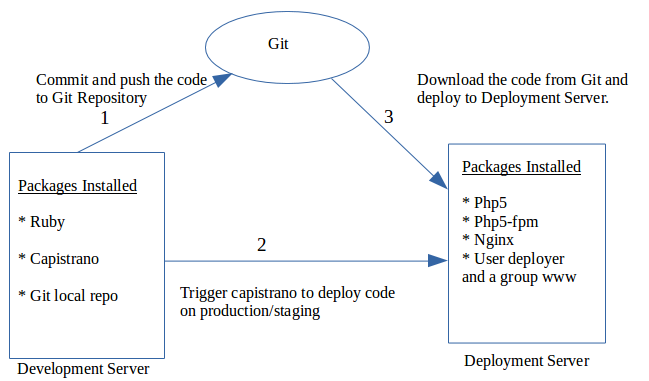
We’ll be having one development server, one deployment server and one Git Repo .
(Signup to Github and create one repository if you don’t have the Git Account.)
We’ll be installing packages in development as well as in Deployment server as mentioned in diagram below.
Lets do these step by step :
- Provision an EC2 instance for development server or use an existing in case if you have setup already.(in our case its t2.micro instance and Ubuntu 14.04 ).
- Login to machine and install following necessary packages for setting up Capistrano.
# Install build essential packages necessary for Ruby.
aptitude install -y build-essential
# Some additional, commonly used tools for github and subversion etc.:
aptitude install -y cvs subversion git-core libyaml-dev mercurial
# Setup Ruby Version Manager
curl -L get.rvm.io | bash -s stable
# Using RVM create System Environment variable:
source /etc/profile.d/rvm.sh
# Download and install Ruby using RVM:
rvm reload

rvm install 2.1.0
- Now Install Capistrano :
gem install capistrano --no-ri --no-rdoc
- Provision an EC2 instance for Configure the deployment server.
- Create one user and add it to group:
sudo addgroup www
Create a new user and add it to this group.
sudo adduser deployer
# Add the user to an already existing group:
sudo adduser deployer www
- Append the following right after root ALL=(ALL) ALL in /etc/sudoers file.
deployer ALL=(ALL:ALL) NOPASSWD:ALL
Install and configure php5, php5-fpm and nginx

sudo apt-get install nginx

sudo apt-get install php5

sudo apt-get install php5-fpm
- Set the directory permissions to make it access for the Nginx.
# Set the ownership of the folder to members of `www` group
sudo chown -R :www /usr/share/nginx/html
# Set folder permissions recursively
sudo chmod -R g+rwX /usr/share/nginx/html
# Ensure permissions will affect future sub-directories etc.
sudo chmod g+s /usr/share/nginx/html
- nginx configuration :
server {

listen 80 default_server;

listen [::]:80 default_server ipv6only=on;

root /usr/share/nginx/html/current;

index index.html index.php index.htm;

# Make site accessible from http://localhost/

server_name localhost;
location / {
# First attempt to serve request as file, then
# as directory, then fall back to displaying a 404.
try_files $uri $uri/ =404;
# Uncomment to enable naxsi on this location
# include /etc/nginx/naxsi.rules
}
location ~ \.php$ {
fastcgi_split_path_info ^(.+\.php)(/.+)$;
fastcgi_pass unix:/var/run/php5-fpm.sock;
fastcgi_index index.php;
include fastcgi_params;
}
- Set fix_path_info=0 in php.ini
- Now move back to Development Server.
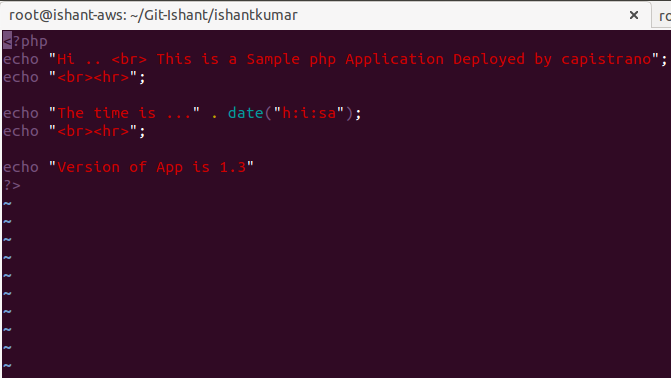
GoTo the directory where your application source code is located.
cd Git-Ishant/ishantkumar/
create a file index.php (remove old index.html)
- Initiate Git
# Initiate the repository
git init
# Add the files to the repository and Commit the changes
git commit -m "first commit"
# Add your Github repository link
# Example: git remote add origin git@github.com:[user name]/[repo-name].git
git remote add origin git@github.com:user1/my_app.git
# Create an RSA/SSH key.
ssh-keygen -t rsa
View the contents of the key and add it to your Github
by copy-and-pasting from the current remote session by
visiting: https://github.com/settings/ssh
cat /root/.ssh/id_rsa.pub
View the contents of the key and add it to your Github
by copy-and-pasting from the current remote session by
visiting: https://github.com/settings/ssh
Also Copy the contents of it to authorized_keys of user deployer.
git push -u origin master
- Initiating Capistrano
cap install
# mkdir -p config/deploy
# create config/deploy.rb
# create config/deploy/staging.rb
# create config/deploy/production.rb
# mkdir -p lib/capistrano/tasks
# Capified
Configure Capistrano :
edit config/deploy.rb and add the following content
lock '3.2.1'

set :log_level, :debug

set :application, 'app'

set :scm, :git

set :repo_url, 'https://github.com//.git'

set :branch, "master"
set :deploy_to, “/usr/share/nginx/html”
set :pty, true
set :format, :pretty
set :stages, [:staging, :production]
set :default_stage, :production
Edit config/deploy/production.rb and add the following content :
set :stage, :production

role :app, %w{deployer@}

server '', user: 'deployer', roles: %w{app}

set :ssh_options, {

forward_agent: false,

user: 'deployer',

keys: %w(/root/.ssh/id_rsa),

auth_methods: %w(publickey password),

}
Create a rake file for php5-fpm restart :
cat lib/capistrano/tasks/php_restart.rake
desc "php5-fpm"

task :php5fpm_restart do

on roles(:app) do |h|

if test("sudo service php5-fpm stop && sudo service php5-fpm start")

info "restarted #{h}"

else

error "not restarted #{h}"

end

end

end
- Deployment on Production :
cap production deploy php5fpm_restart
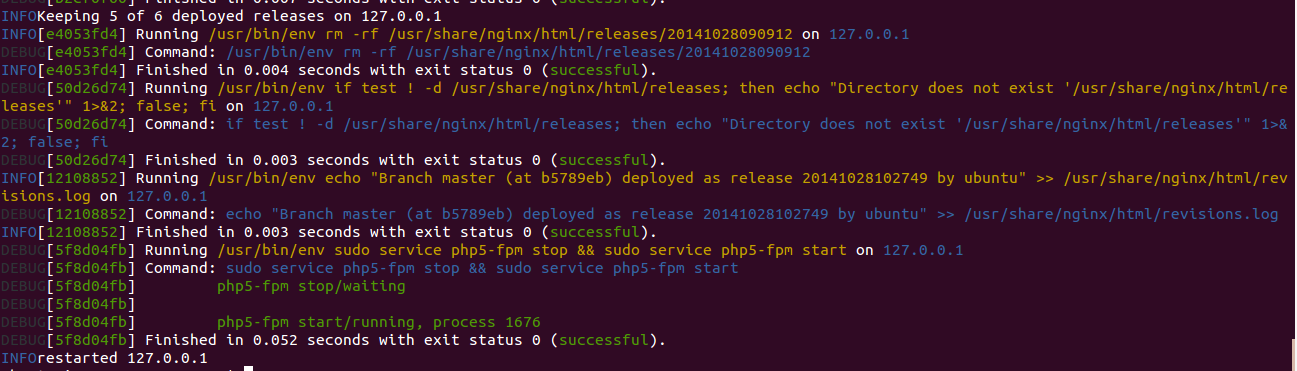
We can see the output on browser by typing public ip of EC2 instance.

- Now we want to deploy a new version of php app (say version 1.4)
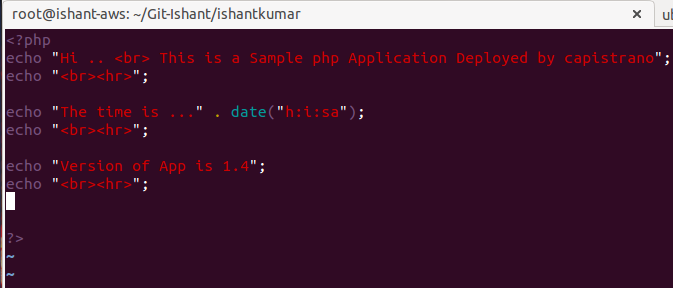
- commit the changes and push it to Git.

- From Development Server , run this command in the directory where you have installed Capistrano.
cap production deploy php5fpm_restart
Copy EC2 instance public ip in browser’s address bar.
Check the output on the browser.

- If you want to rollback the deployment to its previous version
cap production deploy:rollback php5fpm_restart
You will be rolled back to previous version that is Version 1.3.

References :
http://capistranorb.com/
https://github.com/
Thanks
————————————–
Ishant Kumar
AWS Certified Solution Architect – Associate
AWS Administrator @ Intelligrape


Thanks , save a lot of time.