What is SonarQube?
SonarQube is the code inspection tool that analyses and covers the code and generates reports for the areas that need to be improved to keep the code as clean as possible. Some of the advantages of it’s usage includes:
- Catch tricky bugs to prevent undefined behaviour from impacting end-users
- Fix vulnerabilities that compromise your app, and learn AppSec along the way with Security Hotspots
- Make sure your codebase is clean and maintainable, to increase developer velocity
- Covers various languages
Pre-requisites to using SonarQube
Setting up SonarQube
-
-
- Install sonarqube using docker (create a new directory with sonarqube name and copy below docker-compose.yml into it)
version: "3"
services:  sonarqube:    image: sonarqube
    expose:
      - 9000
    ports:
      - "9000:9000"
    networks:
      - sonarnetwork
    environment:
      - SONARQUBE_JDBC_URL=jdbc:postgresql://db:5432/sonar
      - SONARQUBE_JDBC_USERNAME=sonar
      - SONARQUBE_JDBC_PASSWORD=sonar
    volumes:
      - sonarqube_conf:/opt/sonarqube/conf
      - sonarqube_data:/opt/sonarqube/data
      - sonarqube_extensions:/opt/sonarqube/extensions
      - sonarqube_bundled-plugins:/opt/sonarqube/lib/bundled-plugins
  db:
    image: postgres
    networks:
      - sonarnetwork
    environment:
      - POSTGRES_USER=sonar
      - POSTGRES_PASSWORD=sonar
    volumes:
      - postgresql:/var/lib/postgresql
      - postgresql_data:/var/lib/postgresql/data
networks:
  sonarnetwork:
volumes:
  sonarqube_conf:
  sonarqube_data:
  sonarqube_extensions:
  sonarqube_bundled-plugins:
  postgresql:
  postgresql_data:
- Install sonarqube using docker (create a new directory with sonarqube name and copy below docker-compose.yml into it)
-
- Now run sudo docker-compose up command (this command will turn up sonarqube)
- Now install sonar-scanner
wget https://binaries.sonarsource.com/Distribution/sonar-scanner-cli/sonar-scanner-cli-4.2.0.1873-linux.zip
unzip sonar-scanner-cli-4.2.0.1873-linux.zipsudo mv sonar-scanner-4.2.0.1873-linux /opt/sonar-scanner - Edit the sonar-scanner.properties file.
sudo vi /opt/sonar-scanner/conf/sonar-scanner.properties - Configure the SonarQube scanner to connect to your SonarQube server.
sonar.host.url=http://localhost:9000sonar.sourceEncoding=UTF-8 - We need to add the sonar-scanner command to the PATH variable. Let’s create a file to automate the required environment variables configuration.
sudo nano /etc/profile.d/sonar-scanner.shHere is the sonar-scanner.sh file content.#/bin/bashexport PATH=”$PATH:/opt/sonar-scanner/bin” - Reboot your computer or use the source command to add the sonar scanner command to the PATH variable.
rebootsource /etc/profile.d/sonar-scanner.sh - Use the following command to verify if the PATH variable was changed as expected.
env | grep PATHHere is the command output:PATH=/usr/local/sbin:/usr/local/bin:/usr/sbin:/usr/bin:/sbin:/bin:/usr/games:/usr/local/games:/snap/bin:/opt/sonar-scanner/binIn our example, the /opt/sonar-scanner/bin directory was added to the PATH variable. - Use the following to verify the SonarQube scanner version installed
sonar-scanner -vHere is the command output.INFO: Scanner configuration file: /opt/sonar-scanner/conf/sonar-scanner.propertiesINFO: Project root configuration file: NONEINFO: SonarQube Scanner 4.2.0.1873INFO: Java 11.0.3 AdoptOpenJDK (64-bit)INFO: Linux 5.3.0-18-generic amd64
SonarQube – How to Scan project Code
First, you need to access the SonarQube web interface and create a new project. Open your browser and enter the IP address of your web server plus: 9000. In our example, the following URL was entered in the Browser:
- http://localhost:9000/(in case if you are facing memory problem then need to increase it – see – https://stackoverflow.com/questions/51445846/elasticsearch-max-virtual-memory-areas-vm-max-map-co)
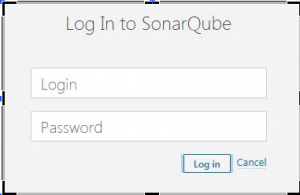
Click on the Login button and use the SonarQube default username and password.
- Default Username: admin
- Default Password: admin
After a successful login, you will be sent to the SonarQube Dashboard.
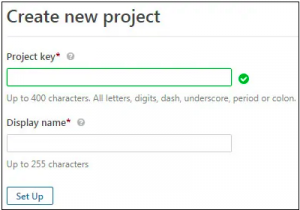
Create a new project.(e.g. GIH)
Project Key – GIH
Display name – GIH
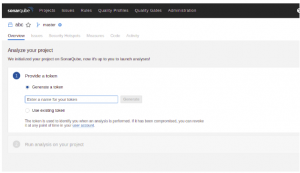
Enter a string for the project token name and click on the Generate button. The token is used to identify you when an analysis is performed. Click on the Continue button.
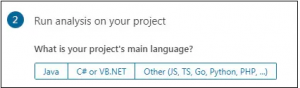
On the Next screen, select your project language. In our example, we selected the option: Other (JS, TS, Go, Python, PHP, …)
Select the Linux operating system. The system will show you the command-line that you should use to scan the GIH project.
sonar-scanner \
-Dsonar.projectKey=GIH \
-Dsonar.sources=. \
-Dsonar.host.url=http://192.168.15.15:9000 \
-Dsonar.login=9ecdeb28268d24f0b08da716ae67f72a8a530392
In adobe command you can add an exclusion param as some directory like vendor or node_modules generate automatically when we run composer or npm so we can exclude these directory for scan. After add exclusion param above command will look like this
sonar-scanner -Dsonar.projectKey=GIH -Dsonar.sources=. -Dsonar.host.url=http://localhost:9000 -Dsonar.login=9ecdeb28268d24f0b08da716ae67f72a8a530392 -Dsonar.exclusions=**/vendor/**,**/node_modules/**,**/core/**,**/sites/**,**/contrib/**,**/drush/**,**/files/**,**/default* ,**/libraries/**
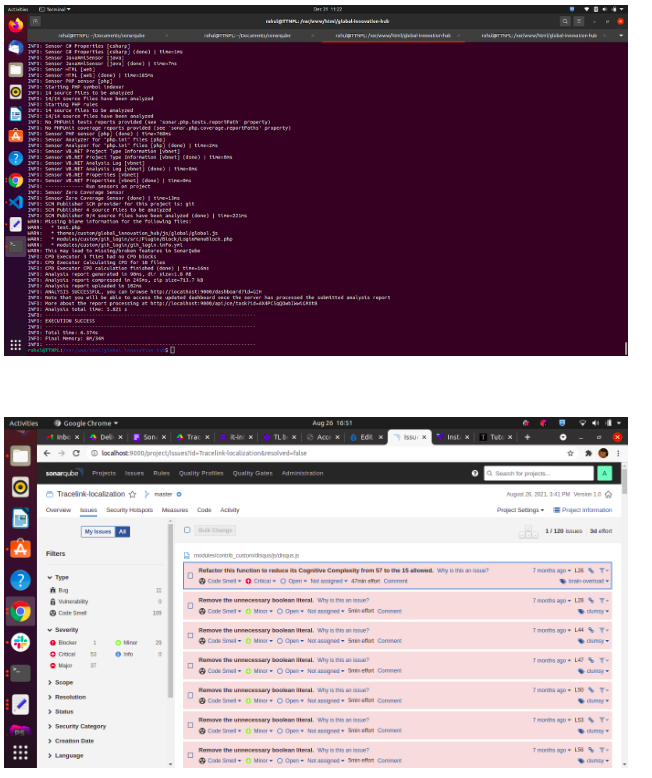
Note – every time you have to run the above command inside your project root to see SonarQube dashboard. Once you run above command by terminal you will get a url of sonarqube dashboard
E.g ANALYSIS SUCCESSFUL, you can browse http://localhost:9000/dashboard?id=GIH