I have always wondered what set of code to run in the background to make my app powerful and responsive but I don’t really know how. Some time back I got to know about isolates and I tried implementing it. And I should tell you, it was painful. But I recently discovered how easy it has become. So here it is.
You might have heard about isolates but never really understood. Or maybe you might have implemented isolates but the code has always been messy and tedious to write. In any case, this blog will guide you through the ups and downs of the Isolate history and the current and better implementation. You might want to use the latest method or you might want to use the old method after all, all up to your use case.
The basics
This is how Flutter Documentation defines Isolates:
An isolated Dart execution context.
Did you understand anything? At least I did not. So let’s begin understanding Isolates and then we’ll write our own definition. So what all do we need for Isolates Recipe?
- What are Isolates?
- Why do we need them?
- What is Event Handling?
- How to implement Isolates?
- And finally, what are Isolate Groups?
We’ll start with the bigger picture of Isolates and see what does it really mean and go deep down and piece all the parts together to see how each part of it works together so that we can understand what Isolates really do and why do we need them.
What are Isolates?
To really understand isolates, first we need to go further back and make sure we know the answer to these 2 questions:
- What is the difference between Processor Cores and Threads?
Core is a physical hardware component, whereas thread is the virtual component that manages the tasks of the core. Cores enable completion of more work simultaneously, while threads enhance computational speed and throughput. Cores use content switching, but threads use multiple processors for executing different processes. - What is the difference between concurrent and parallel processing?
Concurrency is when two or more tasks can start, run, and complete in overlapping time periods. It doesn’t necessarily mean they’ll ever both be running at the same instant. For example, multitasking on a single-core machine. Parallelism is when tasks literally run at the same time, e.g., on a multicore processor.
Let’s get back to Isolates.
Dart uses Isolate model for concurrency. Isolate is nothing but a wrapper around thread. But threads, by definition, can share memory which might be easy for the developer but makes code prone to race conditions and locks. Isolates on the other hand cannot share memory and instead rely on message passing mechanism to talk with each other. If anything is difficult to comprehend, keep reading. I am sure, you’ll get it.
Using isolates, Dart code can perform multiple independent tasks at once, using additional cores if they’re available. Each Isolate has its own memory and a single thread running an event loop. We’ll get to event loop in a minute.
Why do we need Isolates?
Before we get into more detail, we first need to understand how async-await really works.

We want to read some data from a file and then decode that JSON and print the JSON Keys length. We don’t need to go into the implementation details here but can take the help of the image below to understand how it works.
When we click on this button, Place Bid, it sends a request to _readFileAsync, all of which is dart code that we wrote. But this function _readFileAsync, executes code using Dart Virtual Machine/OS to perform the I/O operation, which in itself is a different thread, the I/O thread. This means, the code in the main function runs inside the main isolate. When the code reaches the _readFileAsync, it transfers the code execution to I/O thread, and the Main Isolate waits until the code is completely executed or an error occurs. This is what await keyword does.
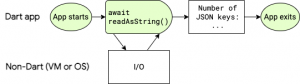
Now, once the contents of the files are read, the control returns to the primary isolate, and we start parsing the String data as JSON and print the number of keys. This is pretty straight forward. But let’s suppose, the JSON parsing was a very big operation, considering a very huge JSON and we start manipulating the data to conform to our needs. Then this work is happening on the Main Isolate. At this point of time, the UI could hang, making our users fustrated.
What is Event Handling?
As we discussed, Isolate is a wrapper around thread, and each Isolate has an event loop executing events. These events are nothing but what happens when we use the application. These events are added in a queue which then the Event loop takes in and processes. These events are processed in the first-in-first-out fashion. This image below is just an example.

Let’s use this code again for understanding event handlers. We already know what is happening in this block.

Our apps start and it draws the UI (Paint Event) is pushed on to the queue. We click on the Place Bid button and and file handling code starts. So the Tap Event is pushed in the queue. After it is complete, let’s suppose the UI is updated, so again the Paint Event is pushed in the queue.
Now because the our logic for handling the file and JSON was very small, the UI doesn’t stutter or jank. But let’s, for a while, imagine again that out code for handling file was huge and it takes a lot of time. Now the event queue and the event loop looks similar to this image below.
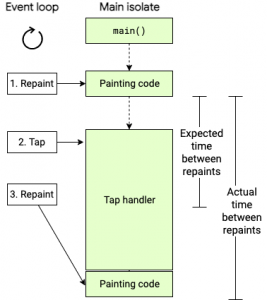
Now that the main isolate takes a lot of time to actually process that event, our animation or UI might hang and irritate your users, causing huge dropoffs. This is where spawning a new isolate or a worker Isolate comes in.
How to implement Isolates?
All our dart code in the flutter app runs in isolate. Whether it is main isolate or a worker isolate is up to you. The main isolate is created for you and you don’t have to do anything else here. The main function starts on the Main Isolate. Once we have our main function running, we can start spawning new isolates.
So there’s 2 ways of implementing Isolates, the short and new method or the long and old method. We can use either depending upon the use case.
Let’s start with the already existing method.
As we had already discussed, Isolates, unlike threads, don’t share memory. This is done so as to prevent race conditions and locks. But the communication between Isolates is done using message passing. These messages are primitives and you can check out the whole list of objects that can be passed between isolates here.
To pass messages, Dart provides us with Ports. SendPort and ReceivePort.
Since we’re discussing the old method for spawning Isolates, we need to know that isolate methods need to be top-level or static functions.
Here is the link to the code if you want to follow along.

What does this code do:
- Here we create an instance of RecievePort to receive data. Remember this is the old method for spawning Isolates. It can be a little long but it is necessary to know the details.
- We create a Worker Isolate on the Main Isolate using Isolate.spawn and pass down a top-level function that runs the blocking code. We also pass down a list of arguments, the first one, SendPort which will be used to send the data from the worker Isolate, and the second is the download link. We wait till the new Isolate has been spawned.
- We then wait for the result, which is some form of a String and use it however we want. This data can be anything from this list of object.
- ResultPort.first uses a stream subscription behind the screen and waits for the data from the worker isolate to be pushed onto it. As soon as the first item arrives, we return the result.
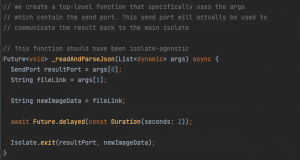
This is the _readAndParseJson function that receives the argument and runs the worker isolate code. This is a dummy function that does nothing but delays the control for 2 seconds and then exits. The exit function terminates the current isolate synchronously. Certain checks are performed before sending the data back to the calling isolate and the data is sent back using the SendPort.
Although this functions correctly but we have not handled any errors which can be thrown from the worker isolate or any error which can occur while spawning a new isolate.
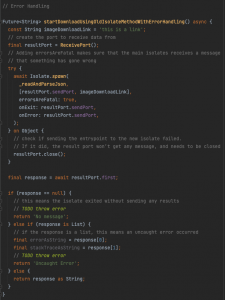
Everything is pretty same here, we just have added error handling here.
What this code does is:
- We add errorsAreFatal to true while spawning a new isolate to make sure that the Main Isolate is aware of any errors. We assign the SendPort for onExit and onError handlers to make sure that if any errors that occur during exiting or spawning.
- We also add a try-catch block while spawning a new isolate to make sure that if any error occurs during spawning, we catch that and stop this operation, altogether.
- If the spawning is successful and some data do come from the worker isolate, we need to check if it’s error or not.
- If the message sent back is null, this means the isolate exited without any message, and an error has occurred. If the response is a list, this means the worker Isolate has sent back an error and a stacktrace. Else this is a successful transaction.
This does seem like an overkill if we wanted to do just one-off message passing. One message and close the Isolate. Everytime you wanted to spawn a new isolate you’ll have to write the same code again. Since the Isolate logic is pretty custom. Every time you might want to pass in some different arguments and it would be very tedious. This is why a new method was devised for one-off transactions.
The new method: Isolate.run
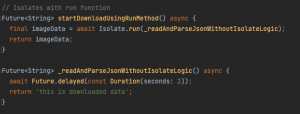
This is all there is for the new method.
We spawn a new Isolate using the run method which abstracts out all the granular details and the error handling and saving you a lot of time. This helps in spawning, error handling, message passing and terminating the Isolate all using these few little lines of code.
One thing to note here is that the function _readAndParseJsonWithoutIsolateLogic, does not contain any custom logic for the Isolate. No ports, no arguments.
When to use the new Run method and when to use the old spawn method?
These examples above shows message passing that happens only 1 time. So run method should be used. It greatly reduces the code lines and test cases.
But if you want to create something that needs multiple messages to be passed between the Isolates, we need to use the old Isolate.spawn() method. An example of this could be when you start downloading a file on a worker isolate and want to show the progress of the download on the UI. This means the progress count needs to be passed again and again.
With this, we need to implement the whole SendPort and ReceivePort for message passing and the custom logic for receiving the arguments and sending the progress back to the main Isolate.
What are Isolate Groups?
So, we already know how Isolates passes messages to each other. But let’s assume, the message we are passing is a huge JSON. Before Dart 2.15, this huge object passing, could involve stutter in UI. This is because, we already know that Isolate has some memory, and when one Isolate passes an object to the other, that object had to be deep copied. This meant, a lot of time for copying the object to the main Isolate which can cause a jank.
To avoid this circumstance, Isolates were reworked and Isolate Groups were invented. Isolate Groups, meaning a group of isolates, which share some common internal data structures representing the running application. This means each time a new Isolate is spawned, new internal data structures don’t need to be constructed again. Because they share them together.
Don’t confuse these internal data structures with the mutable objects. The Isolates still can’t share this memory with each other. Message passing is still needed. But, because Isolates in the same Isolate group, share the same heap, this means spawning a new Isolate is 100 times faster and consume 10–100 times less memory.
An example is a worker isolate that makes a network call to get data, parses that data into a large JSON object graph, and then returns that JSON graph to the main isolate. Before Dart 2.15, that result needed to be deep-copied, which could itself cause UI jank if the copy took longer than the frame budget. This means that the main Isolate can receive this JSON in almost constant time. And sending messages is now approximately 8 times faster.
The good news is that, if you’re using Flutter version greater than 2.8, you don’t need to do anything to use these advancements.
Hope you liked the understanding of Isolates. If you have any doubts, please comment.
Reference for code: https://github.com/DhruvamSharma/NFT-Material3