In the previous blog, we discussed the Best practices to be followed while Data loading into Snowflake from Stages.
Continuing the snowflake blog series lets us understand how to use Snowflake Warehouse and Tables optimally.
Snowflakes Virtual Warehouses
Virtual Warehouses is one of the critical components in Snowflake architecture and deciding the correct configurations for the same can save a lot of snowflake credits.
Below are some of the best practices you need to consider while selecting the configurations for the warehouse.
How to decide which Warehouse size is optimal?
- For simple queries, it’s preferable to use x-small or small warehouses.
- For complex queries or if large datasets need to be scanned, use Larger sized warehouses.
- Query performance improves linearly while increasing the warehouse size until optimal performance is reached. After that, there wouldn’t be any significant difference in performance.
- To determine the optimal warehouse for complex queries, it is recommended to test with different warehouses and note the query execution time for each.
- If you are running a single query on the warehouse, it is best to choose a warehouse that runs for at least a minute to optimize the cost.
Auto Suspension of warehouse
Auto Suspend allows warehouses to suspend automatically when they are not in use hence saving cost.
Auto Suspend property can be disabled when:
- If there are frequent, steady workloads on the Warehouse 24/7.
- If you need the virtual warehouse readily available all the time for faster query results from the cache.
Note that disabling auto suspend can lead to heavy billing, and hence choose wisely. General practice is to keep the auto suspension enabled so that you only pay for the active time and not for the ideal time.
By default Auto_Suspend time interval is 600 seconds. This cannot be optimal if, say, you run the queries once in 10 minutes and the query execution time is 1 minute.
In such cases, it’s always better to set the AUTO_SUSPEND time interval according to the needs.
The time interval for Auto Suspend can be decided on below factors:
- Time Interval between two subsequent queries executed in the warehouse.
- Average query execution time.
Cost vs. Performance while setting the AUTO_SUSPEND limit
Let’s assume that there is a recurring pattern of executing similar queries every 75 seconds, with an average query execution time of 10 seconds, and the warehouse has been set to AUTO_SUSPEND after 60 seconds.
In such cases, below is what would happen.
0th sec → Query is initiated and starts the warehouse
10th sec → Query is executed successfully
70th sec → Warehouse auto suspends
75th sec → Query is initiated and starts the warehouse
85th sec → Query is executed successfully
145th sec → Warehouse auto suspends
150th sec → Query is initiated and starts the warehouse
160th sec → Query is executed successfully
220th sec → Warehouse auto suspends
And so on…
Here if you notice the AUTO_SUSPEND of 60 sec is not benefiting us when we consider cost vs performance factor.
The total uptime of the warehouse in the above case is 210 sec. Total uptime, if AUTO_SUSPEND was disabled, would have been 220 sec.
However, the benefit of disabling AUTO_SUSPEND in this given scenario would have been faster query processing time. Every time the warehouse is restarted, the data would be fetched from the Remote disk to the local cache, and then the query would undergo processing.
But in the case of disabling AUTO_SUSPEND, since the queries were similar, it just had to process over the Local disk cache and would result in faster query performance. Maybe a couple of seconds instead of 10 seconds. And if the same query was reissued and if there was no data change, the output would have been in milliseconds directly from the Result cache.
So always consider the trade-off between saving credits by suspending a warehouse versus maintaining the cache of data from previous queries to help with performance. Now that we understand the costs associated with warehouses in Snowflake, let’s take a look at how data storage in Snowflake affects the overall billing.
Data Storage costs over Snowflake internal tables
Data storage costs are frequently overlooked in Snowflake as they are considered inexpensive. However, it is crucial to carefully consider the type of tables to create in Snowflake, taking into account the costs associated with time travel, fail safe, data sharing, and cloning strategies.
This understanding will aid in developing effective approaches for managing internal tables.
If you come from an RDBMS background, you may assume that executing “create table” in Snowflake will create a normal table. However, this is not the case. Instead, it will create a table with time travel enabled, which can lead to increased costs if such a table is not needed. Any inserts, updates, and deletes on these tables are accounted for data storage, and in case of frequent DML operations, the size of tables with Time travel data can grow within no time.
Hence, if you have not decided on which kind of table you need to create, then always use
CREATE TRANSIENT TABLE instead of CREATE TABLE
This has to be communicated to developers as the general habit is always to use Create Table.
For a normal table, if it is Large in size along with High Churn, the costs can grow exponentially. Note all tables don’t need to have Time travel features hence, use CREATE TABLE wisely.
For example
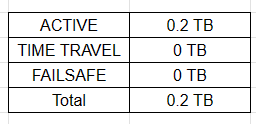
Suppose we have a table that is 200GB in size and receives frequent updates. This table is configured for time travel, specifically for 90 days, and it’s assumed that each record in the table undergoes an update at least 20 times during this period. After the 90-day period, the table will be moved to Fail Safe storage by Snowflake, where it will be stored for 7 days.
Hence, below will be the stats for storage for the table:

Although the table is of size 0.2TB, the cost incurred is 32.2 TB when Time travel is enabled.
Below is the case if the same table would have been a Transient Table with 0 days of Time travel:
Although you can enable time travel for up to 90 days, choose the number of days that suits your needs.
Eg: In production, if I know that if any data-related issues exist and can be figured out and fixed within 7 days, then I’d choose the Time travel days as 7 days. Even in the worst case, if the issue persists for more than 7 days, you can contact Snowflake support and get a copy of Fail Safe data.
If you are going with the Transient table approach for Critical tables, then the Best practice is always to keep a backup at periodical intervals.
Although the Backup table also costs the same as the actual table, the Total cost of both combined would always be much less than the table with Time Travel.
Use Cloning instead of CTAS in Snowflake
Cloning in Snowflake is a powerful concept and will save a lot of cost if used.
Use cases would be:
- Create a copy of the table. This could be for any bug debugging.
- Creating a backup copy of the existing table.
When a table is cloned, the micro partitions are shared between the current main table and the cloned table at that particular time of cloning.
CTAS queries, which are used in many databases, would duplicate the data, but in the case of cloning, the underlying data in the form of micro partitions will remain the same, hence saving the storage cost.
If any DML’s done on the main table and cloned table after cloning, the new micro partitions are not shared. Hence, the best practice is to clone the table wherever needed and not to use CTAS queries. Similarly, cloning can be done at Database and schema levels, also saving a lot of cost.
Data Sharing to share the data across accounts
Cloning an object is not possible across accounts, and we tend to opt for replication of objects between accounts.
Some use cases here could be:
The production database is in Snowflake Account A1 under Org O. The dev database is in Snowflake Account A2 under the same Org O.
You need to test the Dev data engineering pipeline with the same source tables as in the Production account. Now, since cloning across databases for source tables is not possible, in such cases, we can opt for data sharing between accounts.
Let’s see how this works:
In the Production account, let’s assume that we have a database PAYER_PROD and a schema PAYER_ANALYTICS_MASTER inside which we have a source table AWSCUR_MAIN which needs to be shared with the Development account.
Then follow the below steps:
In Production account:
– Use AccountAdmin role use role ACCOUNTADMIN; – Creates a Share object create share AWSCUR_MAIN_NON_PROD; – Grants necessary privileges to the share grant usage on database PAYER_PROD to share AWSCUR_MAIN_NON_PROD; grant usage on schema PAYER_PROD.PAYER_ANALYTICS_MASTER to share AWSCUR_MAIN_NON_PROD; grant select on table PAYER_PROD.PAYER_ANALYTICS_MASTER.AWSCUR_MAIN to share AWSCUR_MAIN_NON_PROD; – Add accountid of the Development snowflake to the share alter share AWSCUR_MAIN_NON_PROD add accounts=<dev_account_id>;
In Development account:
– Use AccountAdmin role

use role ACCOUNTADMIN;

– Create a database out of the shared object

CREATE DATABASE PAYER_PROD FROM SHARE <<orgid>>.<<accountid>>."AWSCUR_MAIN_NON_PROD";

– Grant the database to respective roles in development account

GRANT IMPORTED PRIVILEGES ON DATABASE PAYER_PROD TO ROLE "<<rolename>>";
Since data is shared between accounts and not replicated, there are no additional storage costs associated with it. Only metadata is shared.
Any updates on Production data will be reflected in the Dev Snowflake database at no additional cost. Cost is only for querying the data in the Dev environment, which is per Warehouse usage.