
Playwright AI Agents: Autonomous Planning, Scripting and Self-Healing Tests
Introduction
Test automation is a core part of software development. Tools like Playwright make end-to-end testing easier with reliable browser automation, smart waits, and strong support for modern web apps.
But even with these tools, a lot of work still feels repetitive. Engineers spend significant time on:
Planning what to test
Writing test scripts
Fixing broken tests
In my previous article, I discussed Playwright MCP (Model Context Protocol) and how it lets AI tools interact with Playwright.
Now, things get more interesting with Playwright AI Agents.
The Problem with Traditional Test Automation
Even with frameworks like Playwright, automation isn’t fully automated. A large part still depends on manual effort.
Planning: Understanding the application, exploring flows, and identifying edge cases takes time.
Writing Tests: Creating locators, page objects, and end-to-end flows becomes complex, especially for large applications with hundreds of test cases.
Maintenance: This is the most frustrating part. Small UI or locator changes break tests, leading to constant debugging and fixes.
In short, test automation still involves a lot of repetitive manual work — and that’s where AI agents can help.
What are Playwright AI Agents?
Playwright AI Agents are AI-powered helpers that assist across the entire testing lifecycle.
They can:
Plan test scenarios
Generate test scripts
Fix failing tests
Think of them as a smart assistant helping write and maintain tests.
How Playwright AI Agents Work
Playwright provides three built-in agents:
1. Planner Agent
Explores the app, understands flows, and creates structured test plans.
2. Generator Agent
Converts those plans into executable Playwright test scripts.
3. Healer Agent
Fixes failing tests by detecting UI changes and updating locators automatically.
Together, they follow a simple flow:
Planner → Generator → Healer
Getting Started with Playwright AI Agents (Using Copilot)
Let’s make this practical and see how you can use AI (with Copilot) in your Playwright project.
Playwright integrates AI agents into your workflow, helping with planning, generating, and fixing tests.
Adding Playwright AI Agents to Your Project
Once your basic Playwright project is set up, the next step is to enable Playwright’s built-in AI agents. To add these agents to your project, you just need to run:
npx playwright init-agents –loop=vscode
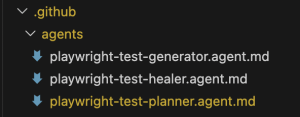
After running this command, you’ll notice a new .github/ folder added to your project. Inside it, there’s an agents/ folder that contains definitions for the three agents — planner, generator, and healer.
These files are essentially configuration + instructions that define how each agent works. They include:
Rules for how tasks should be performed
Guidelines the agent should follow
MCP tools that allow agents to interact with your application and code
For example:
The planner uses these tools to explore the application and understand flows
The generator uses them to write and update test files
The healer relies on them to debug and fix failing tests
AI Agents
At this point, it’s important to understand that these agent definition files are not fixed or read-only.
You can customize them based on your project needs. Think of them as guidelines that control how each agent behaves — and you’re free to tweak them.
For example:
If you’re working on an existing project, you can ask Copilot (in Agent mode) to analyze your current codebase and update these rules accordingly. This helps the agents align with your existing structure, patterns, and conventions.
If you’re starting a new project, you can define your own rules from the beginning.
For instance, you might want:
– Specific locator strategies (like preferring `data-testid`)
– A particular folder structure
– Custom coding standards for test files
By updating these rules, you ensure that the Planner, Generator, and Healer agents work exactly the way your project requires.
AI Agents in Copilot Chat
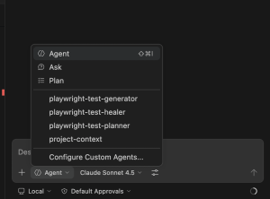
Once everything is set up, open the Copilot chat panel and check the Agent dropdown.
You’ll now see the Playwright agents listed there, such as:
playwright-test-planner
playwright-test-generator
playwright-test-healer
This is where you’ll interact with them — just select the agent and give your prompt.
AI Agents in Copilot Chat
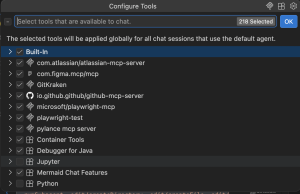
MCP Setup (Important)
Along with the agents, Playwright also sets up the playwright-test MCP, which is required for these agents to function properly.
Make sure of the following:
playwright-test MCP is enabled
This allows agents to interact with the browser and execute actions.
Built-in tools are enabled
These are needed for reading, writing, and updating files in your project.
Without these, agents won’t be able to fully perform tasks like generating tests or fixing failures.
playwright-test mcpNow that everything is in place, let’s see how these agents actually work in a real workflow.
Using Playwright AI Agents in Action
Now that everything is set up and the agents are available in the Copilot dropdown, let’s see how you can actually use them in your day-to-day workflow.
Instead of writing manually, you can interact with these agents and let them handle different parts of testing.
1. Planner Agent – Generating Test Scenarios
Start by selecting playwright-test-planner from the agent dropdown.
Now you can give it a simple prompt like:
Generate a comprehensive test plan for PROJECT-1001
In this case, PROJECT-1001 refers to a JIRA ticket. If you have Atlassian JIRA MCP configured in your IDE, the agent can directly read the ticket details from there.
If not, no problem — just copy the requirement from the JIRA ticket and paste it into the Copilot chat, then ask the planner to generate the test plan.
Once triggered, the planner basically does what a tester would normally do manually. It goes through the application, understands the flow, and breaks things down into meaningful test scenarios.
Behind the scenes, it will:
Explore the application
Identify key user journeys
Consider edge cases
Organize everything into a structured test plan
The output is saved as a Markdown (.md) file inside the specs/ folder.
What’s really helpful is that the plan is not just a list of points — it’s properly structured into steps, scenarios, and expected outcomes. So instead of starting from scratch, you already have a clear and organized test plan ready to use.
2. Generator Agent – Creating Test Scripts
Once your test plan is ready, the next step is to generate actual test scripts. For that, switch to playwright-test-generator from the agent dropdown.
You can give a prompt like:
Generate Playwright tests for Customer User Login
You’re not limited to one scenario — you can either:
Generate tests for the entire test plan
Or target a specific section (like we did above)
This gives flexibility depending on what to automate first.
Once triggered, the generator does most of the heavy lifting. It will:
Read the test plan from the specs/ folder
Execute the steps in a real browser
Identify stable and reliable locators
Generate Playwright test files
After this, you’ll see multiple .spec.ts (or .spec.js) files created inside the tests/ folder.
And the best part — these are not just sample templates. They are actual working tests that you can run immediately using Playwright.
3. Healer Agent – Fixing Failing Tests
Now let’s say some tests fail due to changes in the UI or updates in a flow
Select playwright-test-healer and run a prompt like:
Fix failing Playwright tests <test case name>
The healer agent will:
Detect failing tests
Re-run the failing steps
Inspect the current UI
Update broken locators or assertions
Re-run tests to verify the fix
Instead of manually debugging each failure, the agent handles most of it.
Putting It All Together
If you look at the overall workflow now, it becomes:
Planner → Generator → Healer
– Planner decides what to test
– Generator writes how to test
– Healer keeps tests stable
This is where Playwright AI Agents stand out. By handling repetitive tasks like planning, script generation, and test maintenance, they allow engineers to focus on what actually matters — building better test strategies and improving product quality.
1. Planner Output (Test Plan)
# Test Plan: Customer User Login
## Scenario 1: Valid Login
Steps:
1. Navigate to login page
2. Enter valid username and password
3. Click login
Expected Result:
– User is redirected to dashboard
## Scenario 2: Invalid Login
Steps:
1. Enter invalid credentials
2. Click login
Expected Result:
– Error message is displayed
2. Generator Output (Test Script)
import { test, expect } from ‘@playwright/test’;
test(‘valid login’, async ({ page }) => {
await page.goto(‘/login’);
await page.fill(‘#username’, ‘testuser’);
await page.fill(‘#password’, ‘password123’);
await page.click(‘button[type=”submit”]’);
await expect(page).toHaveURL(/dashboard/);
});
3. Healer Output (Fixing a Failing Locator)
// Before (failing)
await page.click(‘button.read-more’);
// After
await page.click(‘button[data-slot=”read-more”]’);
Practical Note
While working with Playwright AI Agents, one thing to keep in mind is that MCP-based interactions can consume a noticeable number of tokens, especially when agents are exploring applications or generating large test suites.
In real projects, this means you should be mindful of how often you run full flows, prefer targeted prompts, and use agents selectively.
That said, the productivity gains usually outweigh the cost, especially when dealing with complex or large-scale applications.
