Introduction
Roku Pay integration can be a daunting task for developers, but fear not! `ChannelStoreHelper` is here for the rescue. Included in the Roku starter kit, this script file is your ticket to hassle-free implementation of Roku Pay on the front-end of your Roku application. With a single function call, you can kickstart Roku Pay, provided you’ve already set up your channel on the Roku developer dashboard. Read on to get a simple and minimalistic Roku channel setup with Roku pay flow.
Dashboard Setup
Before diving into Roku Pay implementation, there are a few crucial steps to complete on the Roku developer dashboard:
- Register/Login: Access the [developer dashboard](https://developer.roku.com/dev/dashboard) and create an account.
- Add a Channel: Navigate to “My Channels” and click “Add Channel” [here](https://developer.roku.com/developer-channels/channels).
- Add Products: After adding your channel, visit “Products” [here](https://developer.roku.com/channel-products?tab=TAB_SINGLE_PRODUCT) to add the products you intend to offer.
Once you’ve successfully added your products, your dashboard setup is complete.
Note: Any monetization activities on the developer dashboard require your account to be enrolled in the Roku Partner Payouts Programme.
Front-end Setup
With the dashboard set up and products added, your Roku device must be logged in with the same root account used for the dashboard setup. Roku enforces this limitation for the initial implementation and testing of Roku Pay functionality.
To import the `ChannelStoreHelper` file into your project, follow these steps:
- Add the File: Drag and drop `ChannelStoreHelper.brs` or `ChannelStoreHelper.bs` into your project.
- Include/Import: Include or import the file in your `MainScene.xml` or `MainScene.bs` as follows:
- For BrightScript (brs):
`<script type="text/brightscript" uri="pkg:/components/MainScene/ChannelStoreHelper/ChannelStoreHelper.brs" />`
- For BrightScript (bs):
`import "pkg:/components/MainScene/ChannelStoreHelper/ChannelStoreHelper.bs"`
- Global Field: Add a global field for the channel store in your `main.brs`:
m.global.AddField("channelStore", "node", false)
- Initialize: Initialize and assign a value to the global node in `MainScene.brs` or `MainScene.bs`:
m.global.channelStore = CreateObject("roSGNode", "ChannelStore")
With these steps, the `ChannelStoreHelper` is now successfully integrated into your project, ready to process the inputs needed for Roku Pay functionality.
Roku Pay Overview
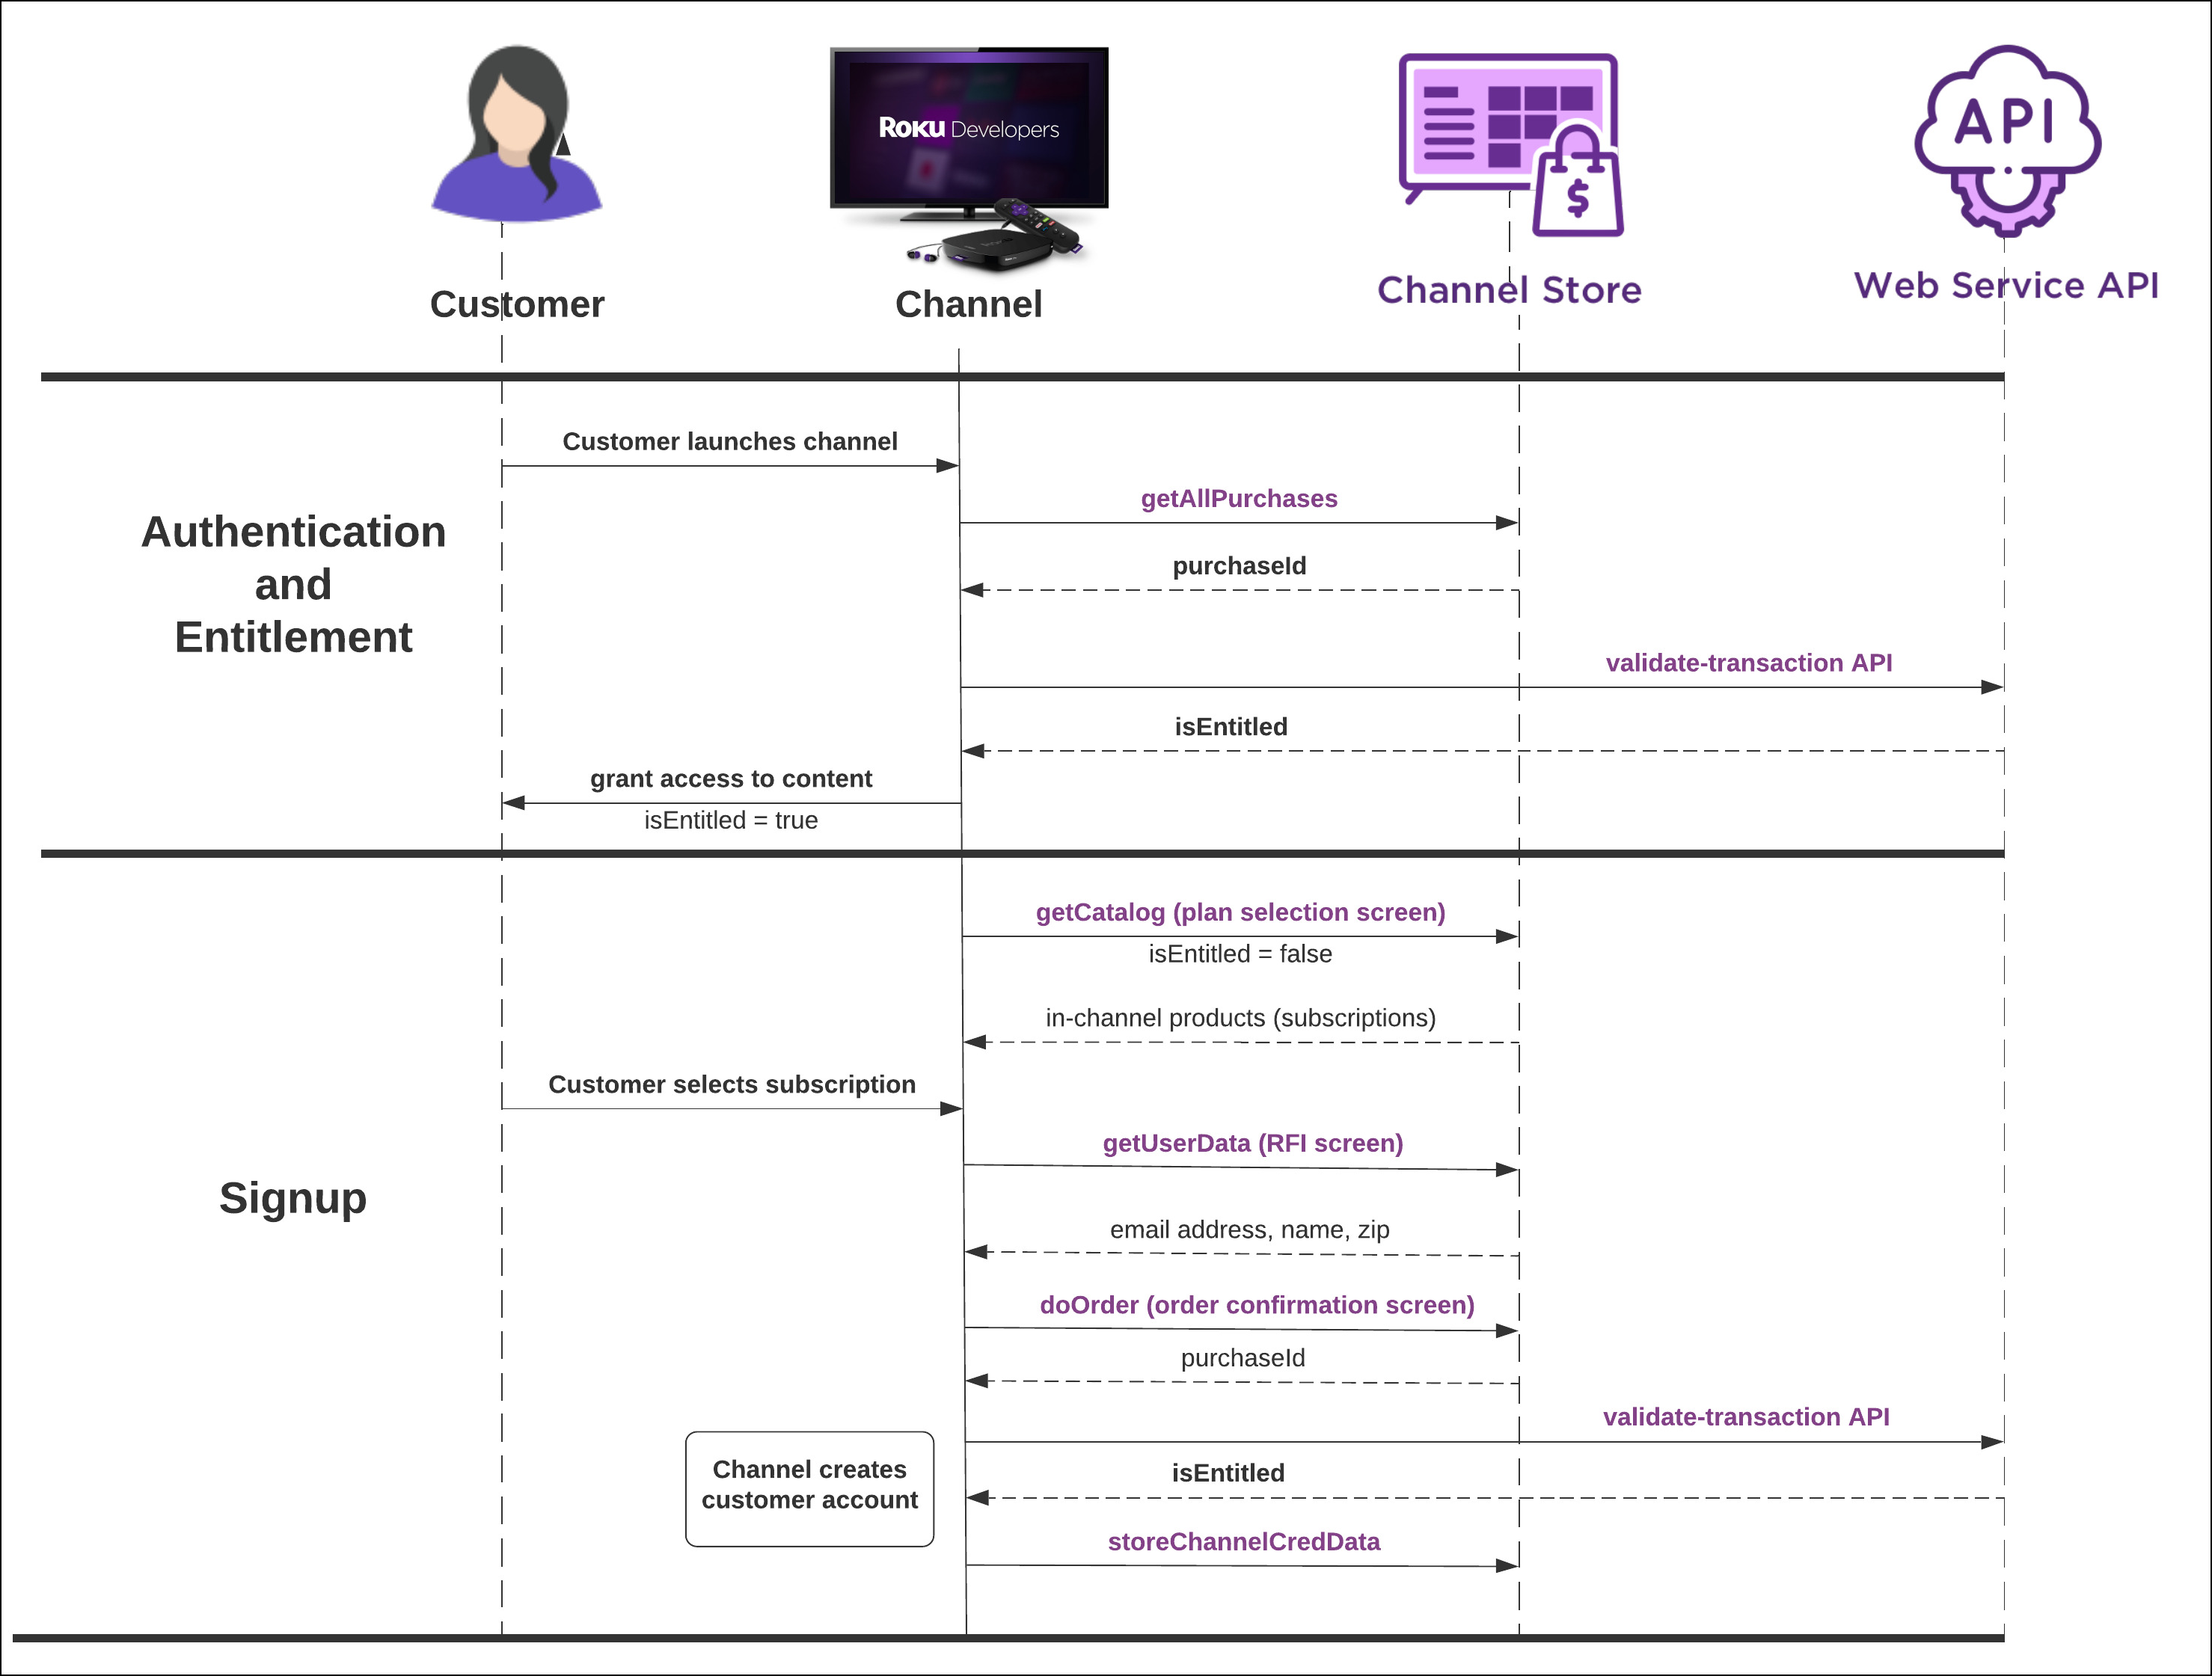
Roku Pay Flow Diagram
Roku Pay’s payment flow is based on the `ChannelStore` node, an essential component of Roku’s SceneGraph framework. This framework underpins modern Roku applications and offers simple call-and-observe functionality for executing actions like purchase orders. Key commands included in the `ChannelStore` node are:
Purchasing
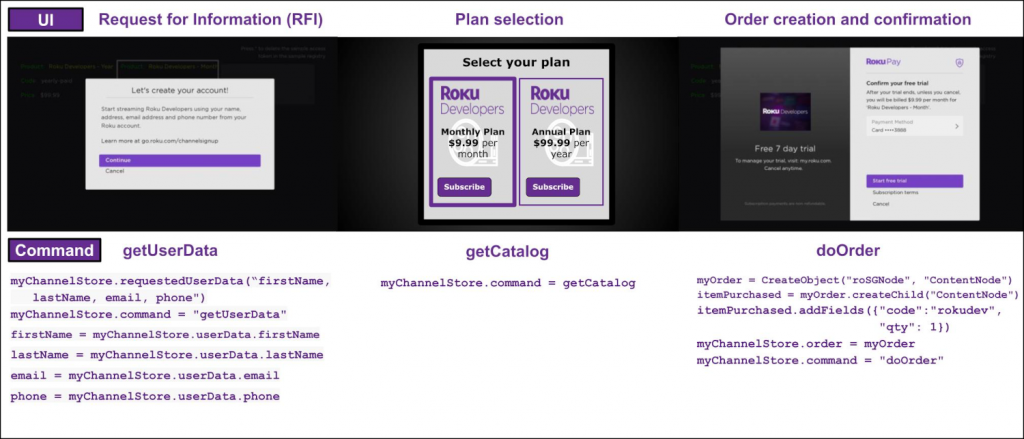
- `getCatalog`: Retrieves subscription and one-time purchase products’ metadata.
- `getUserData`: Fetches customer’s Roku account information.
- `doOrder`: Completes transactions for customer purchases.
Entitlements and Authentication
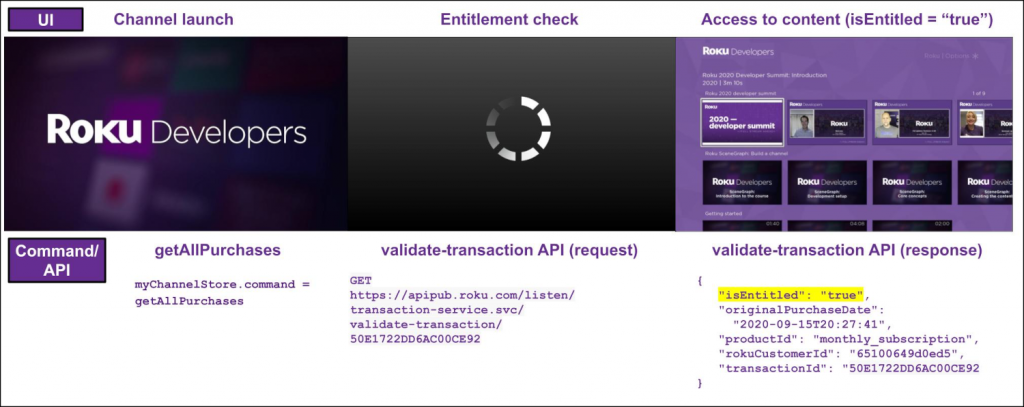
- `getPurchases`: Gets all active subscriptions for the customer.
- `getAllPurchases`: Similar to `getPurchases,` but includes expired and canceled subscriptions.
- `storeChannelCredData`: Stores the publisher’s access token for in-channel products in the Roku cloud.
- `getChannelCred`: Retrieves the publisher’s access token for in-channel products from the Roku cloud.
Functional Specification
Now, let’s delve into the functions implemented in the `ChannelStoreHelper` file:
- `sub CheckSubscriptionAndStartPlayback()`: Initiates the Roku Pay flow, ideal for checking subscriptions before allowing content playback.
- `function initiateRFIConsentForUserdata()`: Starts the RFI content screen, requesting the user’s permission to use their Roku-associated email address.
- `function onGetUserData()`: Observer function for `getUserData`, receiving the user’s email address and calling `RunSubscriptionFlow()` on successful output.
- `sub RunSubscriptionFlow()`: Displays a progress dialog while executing the `getPurchases` command.
- `sub OnGetPurchases(event as object)`: Observes the output of `getPurchases`, checking and validating active subscriptions. This function provides a resume point for the application flow.
- `sub OnGetCatalog(event as object)`: Observes the output of `getCatalog`, displaying product options set up in the dashboard.
- `sub DoSubscriptionOrder(event as object)`: Initiates purchase of selected products.
- `sub OnOrderStatus(event as object)`: Observer function for purchase output, marking the endpoint of the Roku Pay flow.
Code Snippets
Here are snippets from the main.brs and MainScene.xml files:
main.brs:
brightscript
sub showChannelSGScreen()
screen = CreateObject("roSGScreen")
m.port = CreateObject("roMessagePort")
screen.setMessagePort(m.port)
scene = screen.CreateScene("MainScene")
m.global = screen.getGlobalNode()

m.global.id = "GlobalNode"
m.global.addFields({ adID : "" })
m.global.addFields({ deviceName : "" })
m.global.addFields({ uid : "" })
m.global.addFields({ locale : "" })
m.global.addFields({ networkType : "" })
m.global.addFields({ memoryLevel : "" })
m.global.addFields({ deviceID : "" })
m.global.addFields({ osVersion : "" })
m.global.addFields({ appVersion : "" })
m.global.addFields({ buildNo : "" })
m.global.addFields({ uidValue : "" })
m.global.addFields({ modelName : "" })
m.global.addFields({ isPaidUser : false })
m.global.addField("channelStore", "node", false) ‘ add channelstore node
screen.show()

while(true)
msg = wait(0, m.port)
msgType = type(msg)
if msgType = "roSGScreenEvent"
if msg.isScreenClosed() then return
end if
end while
end sub
MainScene.xml:
xml
<!-- importing main handler -->
<script type="text/brightscript"
uri="pkg:/components/MainScene/MainScene.brs" />
<script type="text/brightscript"
uri="pkg:/components/MainScene/MainSceneExtension.brs" />
<!-- importing ChannelStoreHelper file -—>
<script type="text/brightscript"
uri="pkg:/components/MainScene/ChannelStoreHelper/ChannelStoreHelper.brs" />
MainScene.brs:
brightscript
function onKeyEvent(key as string, press as boolean) as boolean
result = false
if press
if key = "OK"
checkSubscription() ‘ call to initiate video playback code
result = true
end if
end if
return result
end function

sub checkSubscription()
#if is_Subscribed
goToPlayerScreen() ‘ goto player screen if user already a subscriber
#else
checkSubscriptionAndStartPlayback() ‘ call helper file starting point method to initiate subscriptions check
#end if
end sub
Conclusion
With the `ChannelStoreHelper` at your disposal and the Roku Pay setup on your developer dashboard, you’re well on your way to simplifying Roku Pay integration in your Roku application. All you need is to call the initiate function of the ChannelStore node at your convenience, and everything else will come into place on its own as all the logic related to presenting, selecting, and purchasing the plan is already implemented. Happy coding!
Find the ChannelStoreHelper.brs at the below GitHub repo:
https://github.com/tothenew/RokuStarterKit/blob/master/RokuStarterKit/components/MainScene/ChannelStoreHelper/ChannelStoreHelper.brs