Introduction
Managing user permissions on a busy Jenkins server can be a headache. With a bunch of teams needing different levels of access, it’s easy for someone to end up with too much power, and that’s a risk. One stray click can knock over a prod pipeline.
To fix this, you need a clear access control setup in Jenkins. The Role-Based Authorization Strategy plugin is a solid pick. It lets you define roles with specific permissions and then assign those roles to users or groups.
This guide walks through a real-world example of using that plugin to go from a messy setup to something clean, secure, and easier to manage.
Our use case / Problem statement
Here’s the use case: a multi-team setup. We’ve got jobs named by environment (-dev, -uat, -prod) and by purpose (-helper). We need to sort access for a few teams:
- Onshore developers: work directly for the client.
- Offshore developers: work for a partner company.
- DevOps team: manages the CI/CD process.
- Support team: handles monitoring and logs.
- Admins: need full control.
The goal is to lock this down so that:
- Onshore developers can work on all pipelines but can’t delete or create new ones.
- Offshore developers can only see and work on -dev and -uat pipelines.
- The DevOps Team can manage everything except jobs ending in -prod.
- The Support Team can only view and build jobs ending in -helper.
- Admins have unlimited power.
The Tool for the Job: Role-Based Strategy
Jenkins offers a few ways to manage security, but “Matrix-Based Security” can become a huge, unreadable table with many users.
The Role-Based Authorization Strategy plugin gives us more wiggle room. Its real strength is using name patterns to control who can touch which jobs, like a rule for everything ending in -dev.
Time to set it all up
1. Check and Install the plugin if not done already
If you don’t see the “Role-Based Authorization Strategy” under Authorization in Configure Global Security then,
- Go to Manage Jenkins > Plugins.
- Click the Available tab and search for “Role-Based Authorization Strategy”.
Install it and restart Jenkins if it asks.
2. Next, we enable it in security.
Go to Manage Jenkins > Global Security.
In the Authorization section, select Role-Based Strategy and save it
We are now able to see Manage and Assign Roles under Manage Jenkins.
Overview of Role management.
1. Manage Roles :
You create and manage roles here.
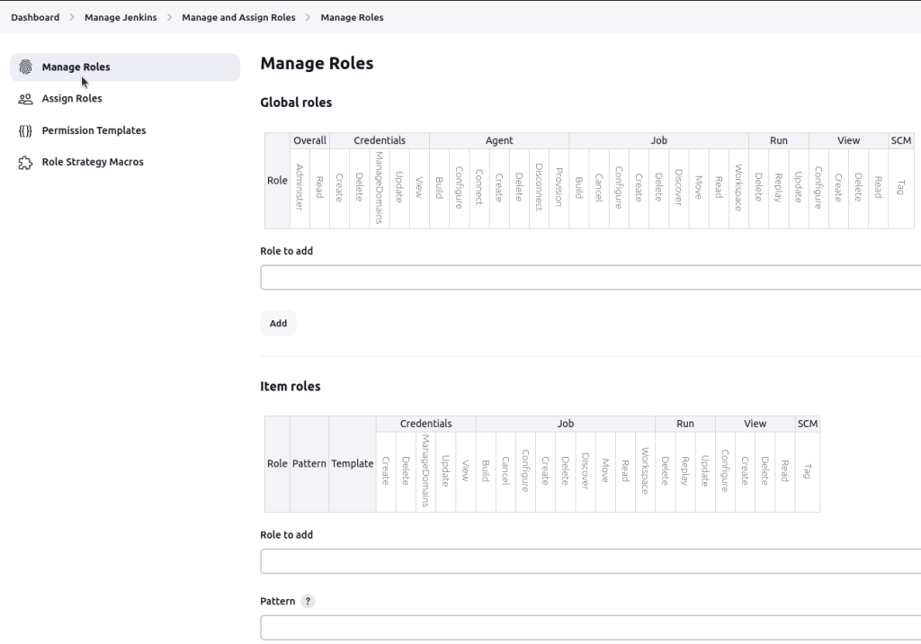
Manage Roles
2. Assign Roles
This section is used to assign predefined roles to specific users.
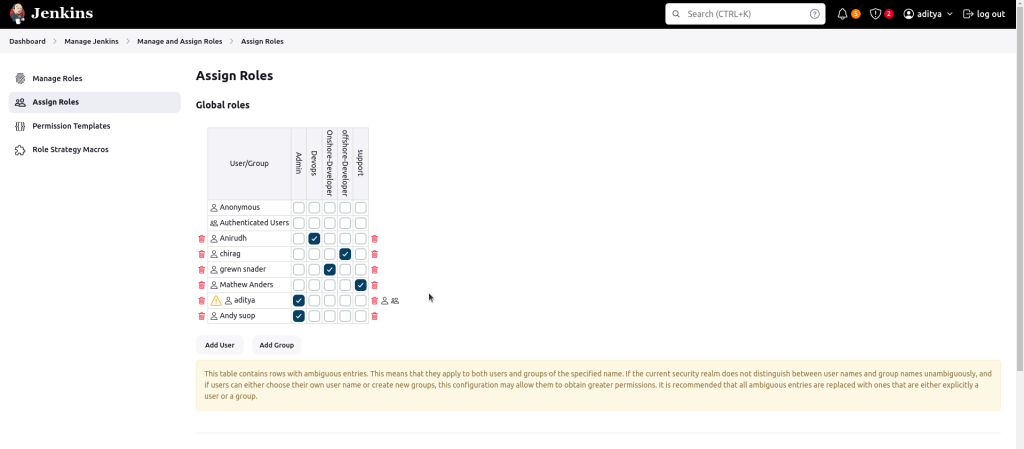
Assign role – global role
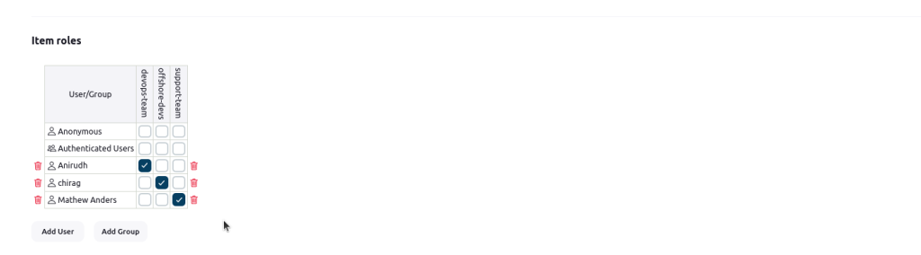
Assign role – Item role
Planning, Managing and Assigning Roles
1. Planning the Roles
Before we start actually doing it, a simple plan can save us a lot of time.
As you can see we need two kinds of roles:
- Global roles: More Broad things and control fall under it. We need to make sure that we only assign the least permission possible in the Global role for any user, then use item roles for the detailed permissions.
- Item roles: Control access to specific jobs using patterns that match job names, and more fine-tuned permission is assign using Item roles
2. Roles and Permissions for Users
Here’s what we are aiming for:
- User Category: Onshore Developers
- Global Role: onshore-developer
- Item Role: None
Key Permissions: Full access to the jobs, but no Create or Delete permission.
2. User Category: Offshore Developers
- Global Role: offshore-developer
- Item Role: offshore-devs
- Item Role Pattern: .*-(uat | dev)
Key Permissions: Scoped access to matching jobs, no admin stuff.
3. User Category: DevOps Team
- Global Role: devops
- Item Role: devops-team
- Item Role Pattern: ^(?!.*-prod$).+$
Key Permissions: Full access to everything except -prod jobs.
4. User Category: Support Team
- Global Role: support
- Item Role: support-team
- Item Role Pattern: .*-helper
Key Permissions: Can only view and build -helper jobs.
User Category: Admins
Global Role: admin
Item Role: (None)
Key Permissions: Full control over everything.
Personally, I like to start with the global roles first, then add item roles with a simple pattern, test, and tighten it up if needed. It’s little bit more tedious at first, but it saves time later when someone says, “Hey, I can’t see my UAT job,” and you can point to the pattern.
Overview Table
| User Category | Global Role | Item Role | Role Pattern | Permissions |
| Permissions Onshore Developers |
onshore-developer | No Item Role | – | Full access except delete/create |
| Offshore Developers | offshore-developer | offshore-devs | `.*-(uat|dev) | Can only see -uat and -dev pipelines |
| DevOps | devops | devops-team | ^(?!.*-Prod$).+$ | Full access except -Prod pipelines |
| Support Team | support | support-team | .*-helper | Can only view and build -helper pipelines |
| Admins | admin | No Item Role | – | Full access |
3: Creating the Roles
Navigate to Manage Jenkins > Manage and Assign Roles.
We will start in the Manage Roles section.
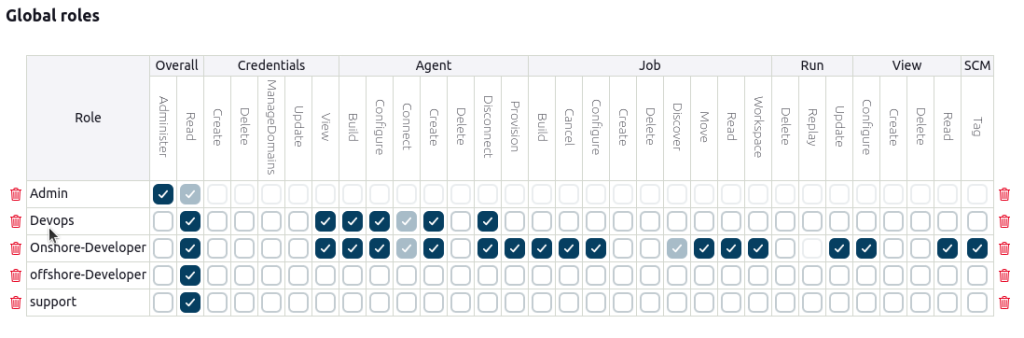
Create Global Roles
Under Global Roles, we will add a role for each team.
- In the “Role to add” box, type admin and click Add.
Check the box at the top of the admin column to give this role all permissions. - Add the other global roles: onshore-developer, offshore-developer, devops, and support.
For these new roles, grant only the Overall/Read permission. - For onshore-developer role, grant all Job permissions except for Create and Delete.
Starting with low permissions is a security best practice. It prevents accidentally giving someone too much power.
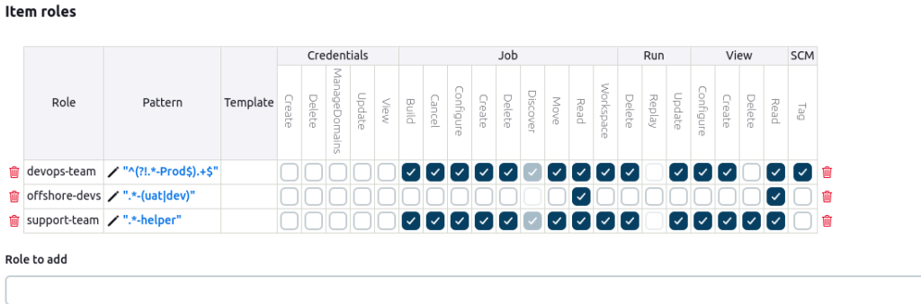
Creating Item Roles
Next, we’ll create item roles to control access to jobs by name.
Scroll down to the Item Roles section.
- In the “role to add” box, type offshore-devs and click Add.
a. In the “Pattern” box for this role, enter .*-(uat|dev).
b. Why this pattern? It matches any job name that ends with -uat or -dev.
c. Grant the Build, Configure, Read, and Workspace permissions. - Add the devops role with the pattern ^(?!.*-prod$).+$.
a. This one matches any job name that does not contain -prod.
b. Grant all Job permissions for this role. - At the end let’s add the support-helpers role with pattern .*-helper.
a. This matches with any job name that has suffix -helper.
b. Grant only the Job/Read and Job/Build permissions.
Our roles are set, with global roles for basic access and item roles for specific job control.
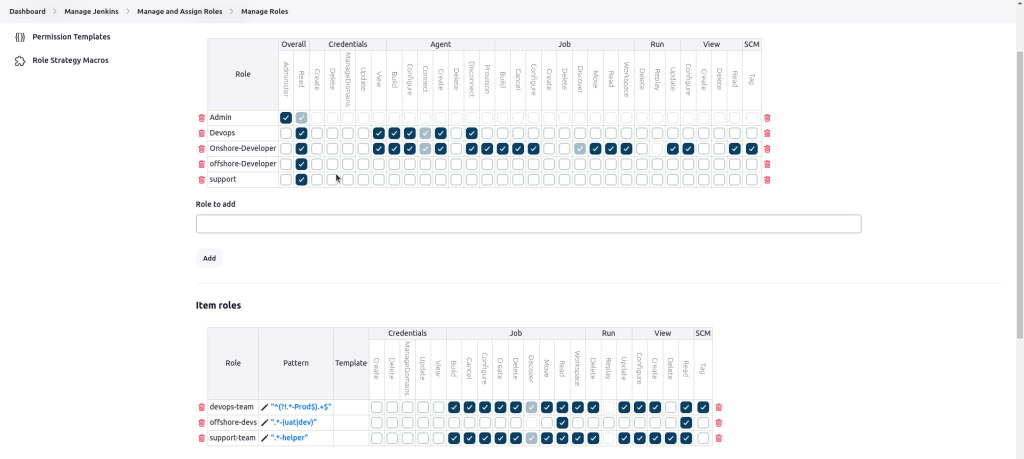
ManageRole View
4. Assign Roles to Users
1. Go to Manage Jenkins > Manage and Assign Roles > Assign Roles.
2. Under Global Roles, assign each user to their corresponding global role.
3. Under Item Roles, assign users to relevant item roles.
Highlights
- You must have noticed that we are providing the minimum required permissions in the global role. This is done so that we can have more control over the user using the Item role.
- In item roles, we are using patterns. This is a powerful feature that enables us to fine-tune what that role can see and do based on regex patterns.
- We are not creating item roles for the Onshore team and Admin. This is because we don’t need to exclude or include specific jobs; we just need to manage permissions, and that option is available in global roles.
Let’s see with an example
Let’s assign Role to a member of Devops team.
Focus on the relevant Devops Global Role and Devops-team Item role of this user
- Global Role: DevOps (Grants overall read access and agent access to Devops).
Global Role for Devops
2. Item Role: For example devops-team (Can access all jobs except those ending with -Prod).
Item role for devops-team
Now the devops team user can only access all the jobs except those ending with -Prod.
Notice we don’t assign item roles to the admin or onshore developer. Their permissions are fully defined by their powerful global roles.
Key Takeaways
1. Global roles provide overall access control.
2. Item roles fine-tune permissions using regex patterns.
3. Assigning the minimum required permissions in Global Roles helps avoid conflicts.
4. Pattern-based control allows flexible and secure access management.
Helpful Resources
Regex for Pattern Matching: https://regex101.com/
Conclusion
By implementing Role-Based Authorization Strategy, we achieved better security and organization within Jenkins, ensuring that users had only the access they needed.
This method is scalable, easy to maintain, and enhances Jenkins security significantly.
The Role-Based Authorization Strategy plugin is an essential tool for managing access control in Jenkins, especially in environments with multiple users and varying levels of access needs.
You can read further here