Migrating databases between AWS accounts is often necessary for environment isolation, organizational changes, or setting up security boundaries. Basic migrations can be performed using dumps or replication. However, production environments need minimal downtime, consistency guarantees, and controlled cutover procedures.
A strong method for migrating databases between accounts is to combine snapshot-based data transfer with Change Data Capture (CDC) using AWS Database Migration Service. This article outlines a technical setup and provides a step-by-step guide for moving a MySQL database from one AWS account to another Amazon RDS instance. This will use snapshot restore and CDC replication.
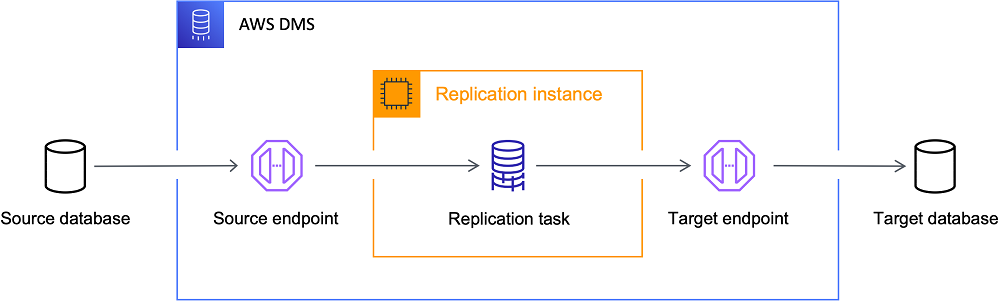
DMS architecture
The migration workflow includes these main components: Source database (Account A), Target RDS instance (Account B), Snapshot restore for the initial dataset, and CDC replication through DMS for ongoing changes.
Target Account’s RDS
Amazon RDS provides a managed relational database where the migrated dataset will reside.
Migration Engine
Database Migration Service
AWS DMS performs the continuous replication of changes from the source database to the target RDS instance by reading transaction logs and applying changes in near real time.
Strategy for Migration
Running a full-load migration through DMS is inefficient for large databases and may result in lengthy migration windows. Rather, a hybrid approach is better:
Transfer of baseline datasets using a snapshot(Sharing your snapshot with the target account)
Continuous replication through CDC
This method allows for almost no downtime cutover while cutting down on migration time.
Phase 1: Transfer of Cross-Account Snapshots
An RDS snapshot is used to transfer the original dataset.
Step 1:- Make a snapshot in the source account.
Make a manual snapshot of the source RDS instance in Account A(Source).
Databases → Actions → RDS Console → Take Snapshot
Step 2:- Give the target account access to the snapshot
Snapshots need to be explicitly shared between AWS accounts.
Choose the Snapshot.
In actions, click on share snapshot.
Snapshot → Actions → Share Snapshot → Add Target Account ID → Share
KMS key needs to be shared with the target account if encryption is enabled on Source RDS.

Share Snaphot

KMS Permission
Copy the snapshot to the target account in step three.
Copy the shared snapshot in Account B.
RDS → Snapshots → Shared with me → Snapshot copy(use KMS of Target account, by this, the destination account owns a new snapshot)
Phase 2 — Preparing Source Database for CDC
To enable continuous replication, the source database must expose transaction logs.
For MySQL-based engines, enable binary logging.
Example parameter configuration:
- log_bin = ON
- binlog_format = ROW
- binlog_row_image = FULL
- binlog retention hours = 24-168hrs, This can be set with
CALL mysql.rds_set_configuration(‘binlog retention hours’, 168);Verify configuration: - SHOW VARIABLES LIKE ‘log_bin’;
- SHOW VARIABLES LIKE ‘binlog_format’;
Take Current Binlog file position with below query this will be used on CDC task creation - SHOW MASTER STATUS;
- Output Ex:-

BinLog Position
- Output Ex:-
ROW binlog format ensures row-level changes are captured properly.
When we use the snapshot + CDC approach, the CDC task should start from the exact binlog position corresponding to the snapshot creation time.
If the CDC task starts from a later binlog position, transactions that occurred between the snapshot and CDC start will be lost.
Phase 3: Account-to-Account Networking
Cross-account networking needs to be set up because DMS needs to access both RDS.
Direct network connectivity between VPCs in two accounts can be achieved by VPC peering or Transit Gateway.
Phase 4: Establishing the DMS Replication Configuration
Actual data replication is carried out by a replication instance.
Configuration parameters:
- Instance of class dms.r5.XX for Mid size database migrations and higher for huge databases
- 100–200 GB of storage, can be increased later on in case of requirement.
- Multi-AZ for Production workloads
- Access for the public is disabled.
Considerations for placement:
- Deploy in VPC that can reach both source and target RDS
- Set up security groups to permit database ports for DMS Instance.
Phase 5: Creating DMS Instance
A Replication Instance is the core compute component that runs migration tasks in AWS Database Migration Service.
It connects to the source database, reads transaction logs, and applies changes to the target database such as Amazon Relational Database Service.
It works like migration engine that processes replication pipelines.
Open AWS DMS Console
Navigate to: AWS Console → Database Migration Service→ Replication Instances
Click: Create replication instance
Configure Basic Instance Settings
Replication Instance Identifier : Provide a unique identifier.
Example: prod-mysql-migration-dms
Best practice naming: <environment>-<source>-<target>-dms
Instance Class :-Defines CPU and memory capacity.
Common production sizes: Example configuration: Instance Class: dms.r5.large(vCPU: 2, Memory: 16 GB)
Rule of thumb: Large tables + CDC + many tasks should have a bigger instance class.
Engine Version
Choose the latest stable DMS engine version.
Benefits:
- Bug fixes
- Improved CDC performance
- Better LOB handling
Allocated Storage
Defines storage used for:
- task logs
- cached transactions
- sorting during migration
Typical values: Example: Allocate

DMS Instance Classes
Network Configuration
The replication instance must run inside a VPC, Select Your VPC, Replication subnet group, VPC security groups, AWS KMS key then other details like Maintenance Window, Tags etc.
Then Create your DMS Instance.
Source Endpoint (Account A)
Required parameters:
- Server name
- Port
- Database Endpoint DNS
- Username
- Password
- Required privileges for the migration user:
- REPLICATION CLIENT
- REPLICATION SLAVE
- SELECT
Connectivity should be verified using the Test Endpoint Connection feature.
Target Endpoint (Account B)
Required parameters:
- Server name
- Port
- Database Endpoint DNS
- Username
- Password
The target database must allow connections from the replication instance security group.
Phase 6 — Configuring CDC Migration Task
Since the snapshot already transferred the baseline dataset, the DMS task should run in CDC mode only.
Task configuration:
- Task identifier name : Provide a name for this task.
- Descriptive Amazon Resource Name (ARN) – optional
- Source database endpoint : Choose a source database endpoint
- Target database endpoint : Choose a target database endpoint
- Task mode
- Provisioned : Select the amount of compute you want to dedicate to your migration or replication task
- Serverless : DMS Will dynamically adjusts the level of compute needed for your migration or replication task(This will not need DMS instance which we have created Phase 5)
- Provisioned instance : Choose a provisioned instance
- Task typeInfo
- Replicate only :This will replicate data from source to target(CDC only)
- CDC configuration
- Enable custom CDC start mode
- CDC start point for source transactions
- Native CDC start point : Put your Bin Log file position here in below format:-
mysql-bin-changelog.000024:373
- CDC stop mode for source transactions : Disable custom CDC stop mode(It will allow you to stop CDC when you want to stop)
- Setting Editing mode
- Wizard
- Target table preparation mode
- Do nothing(This will only put the changes on the Datasets)
- Include LOB columns in replicationInfo
- Limited LOB mode : Should be a numeric value of Max LOB size in your Dataset.
Log settings
- Task logs
- Turn on CloudWatch logs, DMS task logging uses Amazon CloudWatch to log information during the migration process. You can change the component activities logged and the amount of information logged for each one.
- Table mappings
- Editing mode : Wizard(You can enter only a Dataset/Database names here)Ex:-
- Schema name, Schema table name, Action(Include or Exclude)
- Premigration assessment
- A premigration assessment warns you about potential issues before migration begins, running efficiently, and has a minimal impact on your databases.
Migration task startup configuration
- Start migration task
- Automatically on create
- Manually later(Recommended)
Monitoring the Migration
Monitoring replication health is critical for production migrations.
Key metrics: CDCLatencySource(Time between commit and capture), CDCLatencyTarget(Time to apply change to target), CDCIncomingChanges(Replication throughput).
- Monitoring tools include:
- CloudWatch metrics
- DMS task logs
- Table statistics dashboard
Potential Issue you may face:-
Foreign Key Conflicts :- During CDC replication, insert order may violate foreign key constraints which can cause errors.
Example error: Cannot add or update a child row: a foreign key constraint fails
Common mitigation: SET FOREIGN_KEY_CHECKS=0;
This will disable constraints during migration and re-enable after replication completes.
- Final Cutover Procedure
When CDC latency comes to minimal, perform the final cutover.
Standard procedure:- Pause application writes
- Allow CDC replication to reach zero lag
- Validate row counts and checksums
- Update application database endpoint
- Resume application traffic
Typical downtime is less than a few minutes.
Validation and Data Consistency
Before switching production traffic, verify dataset integrity.
Common checks should match with source RDS include:
Row counts : SELECT COUNT(*) FROM table_name;
Checksum validation : CHECKSUM TABLE table_name;
Schema comparison tools can also ensure structural consistency.