AI-Powered Test Automation with Playwright MCP: Smarter, Faster, Resilient
Introduction
Automated test cases—once seen as the key to efficiency—often turn into challenges of their own. For newcomers, writing that first test can feel overwhelming: learning frameworks, setting up locators, handling waits, and structuring assertions. For experienced teams, the bigger struggle is maintenance—UI changes, shifting requirements, and fragile scripts.
Flaky tests only add to the pain. Unpredictable failures waste hours in debugging and erode trust in CI pipelines. A 2021 survey found flakiness in 41% of Google’s tests and 26% of Microsoft’s. Nearly half of failed CI jobs succeed on reruns, showing just how much time gets lost chasing unreliable automation.
Even small UI tweaks—renaming a button, shifting navigation, or adjusting layouts—can break brittle tests faster than teams can fix them. The result? QA engineers and developers get stuck in a cycle of patching instead of innovating.
This is where AI-powered automation, especially Playwright MCP (Model Context Protocol), changes the game. Whether you’re writing your first test or managing a huge suite, AI can generate, adapt, and maintain tests far more efficiently. With LLMs and real browser context, AI doesn’t just write scripts—it understands intent, interprets UI changes, and keeps automation reliable.
Before We Write Our First Test Case…
Before we jump into generating our very first AI-powered Playwright test, it’s important to align on a few key terms. These concepts—LLM, Agent, MCP, Playwright MCP, and GitHub Copilot—will come up repeatedly in our workflow. Understanding what each one does (and doesn’t do) will make it much easier to follow the complete flow later.
Think of this as a quick glossary to get comfortable before we dive into action.
LLM – Large Language Model
What it can do: Generate code, answer complex questions, explain logic, draft documentation or emails.
What it can’t do: Execute real-world actions like opening a browser, clicking buttons, connecting to a database, or calling APIs.
Example: Ask an LLM to test a login flow → it can write a Playwright snippet and suggest locators, but it won’t actually launch a browser or click “Submit.”
Agent
What it can do: Take instructions from an LLM and perform real-world tasks by calling external tools. Acts as the “hands & feet” of the LLM.
What it can’t do: Think independently or generate test logic—it only executes what the LLM decides.
Example: You say: “Log into example.com with user ‘test.’” → LLM: “Click login,” “Type username,” “Submit.” → Agent: Actually opens the browser, fills the form, and returns the page title/URL.
MCP – Model Context Protocol
What it can do: Provide a universal “connector” that lets LLMs talk to tools like browsers, databases, and APIs in a structured, safe way.
What it can’t do: Generate test logic itself—it’s just the communication layer, not the brain.
Example: Agent (via MCP) asks: “What tools are available?” → MCP server responds: navigate, click, fill_form. Agent calls navigateTo(“example.com/login”) and gets structured feedback like URL + page title.
Playwright MCP
What it can do: Combine Playwright with MCP so AI agents can control real browsers using structured DOM and accessibility context (not fragile screenshots).
What it can’t do: Write full test cases on its own—it only executes commands passed via MCP.
Example: LLM: “Click on Login.” → Agent → Playwright MCP executes the click. → Playwright MCP sends back a DOM snapshot. → LLM uses that context to generate the next test step.
GitHub Copilot
What it can do: Act as your coding assistant—suggesting boilerplate, auto-completing assertions, and helping with refactoring when tests break.
What it can’t do: Interact with browsers or external tools—it’s limited to code suggestions inside your editor.
Example: While writing a test, Copilot suggests the test structure. Meanwhile, Playwright MCP runs the actual browser actions, and the LLM generates logic from context. Copilot then helps refine and maintain the code.
Summary Flow
User prompt
↓
LLM processes the request and emits an intention or tool call
↓
Agent (using an agentic framework or SDK) captures the LLM output
↓
Agent queries available tools via MCP servers (tool discovery)
↓
Agent invokes the appropriate tool by calling the MCP interface (e.g., click button via Playwright)
↓
MCP server executes the action and returns structured results (e.g., page state, snapshot)
↓
Agent passes results back to LLM, which can then plan the next action or generate final test code
Prerequisites & Setup – Installing Playwright MCP, configuring the environment
Before diving into AI-powered test automation, ensure your development environment is properly configured.
Required Tools
– Visual Studio Code (version 1.86+; stable builds now include MCP support)
– VS Code Insiders (optional—for early access to upcoming MCP enhancements)
-GitHub Account (free account works – Copilot Free is available!)
-Node.js (version 16 or higher)
-Playwright framework
-MCP Server for Playwright integration
Installation Steps
Step 1: Install GitHub Copilot Extension
Open VS Code
Navigate to Extensions (Ctrl+Shift+X)
Search for “GitHub Copilot”
Install the extension and authenticate with your GitHub account
Step 2: Set Up Playwright
# Install Playwright
npm install playwright@latest
# Initialize a new Playwright project
npm init playwright@latest
# Install Playwright VS Code extension
# Search for “Playwright Test for VSCode” in VS Code Extensions
Step 3: Configure MCP Server
The MCP (Model Context Protocol) server needs to be registered so AI agents can communicate with Playwright. You have two options:
Option A: Automatic Setup (Recommended)
Install VS Code Insiders command in PATH:Press Cmd + Shift + P (Mac) or Ctrl + Shift + P (Windows/Linux) to open the Command Palette
Type: Shell Command: Install ‘code-insiders’ command in PATH
Hit Enter to add code-insiders to your terminal PATH
Register Playwright MCP server:
Hit the following command in the terminal
code-insiders –add-mcp ‘{“name”:”playwright”,”command”:”npx”,”args”:[“@playwright/mcp@latest”]}’
Option B: Manual Configuration
If the automatic setup doesn’t work or you prefer manual configuration:
Open VS Code Settings:Press Cmd + Shift + P (Mac) or Ctrl + Shift + P (Windows/Linux)
Search for Preferences: Open User Settings (JSON)
Press Enter to open your settings.json file
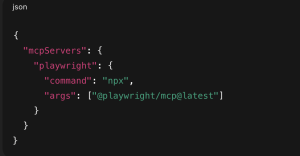
Add MCP Configuration: Add the following JSON configuration to your settings file:

Configuration
Verification
After completing either option, restart VS Code. The Playwright MCP server should now be registered, allowing AI agents to interact with your browser in real-time through structured commands rather than fragile screenshots.
Project Structure Setup
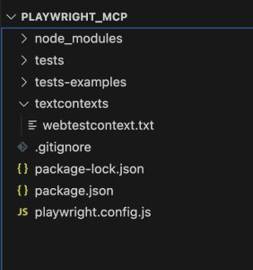
Create a textcontexts in project root directory
Under this folder, create the following file webtestcontext.txt to make the project structure as given in below screenshot

Project Structure
Your First AI-Generated Test – Step-by-step walkthrough
Now that your environment is configured, let’s walk through generating both web and API tests using the AI-powered workflow.
Web UI Test Generation
Step 1: Add following instructions in webtestcontext.txt file
You are a playwright test generator.
You are given a scenario and you need to generate a playwright test for it.
DO NOT generate test code based on the scenario alone.
DO run steps one by one using the tools provided by the Playwright MCP.
Only after all steps are completed, emit a Playwright JavaScript test that uses
@playwright/test based on message history.
Save generated test file in the tests directory.
Execute the test file and iterate until the test passes.
Step 2: Generate Your First Web Test
Drag and drop the webtestcontext.txt file into GitHub Copilot chat
Enter the following prompt:
Generate a Playwright test for the following scenario:
1. Navigate to http://www.automationpractice.pl/index.php
2. Search for ‘T-shirts’
3. Verify the “Faded Short Sleeve T-shirts” appears in the search results
Step 3: Watch the Magic Happen
The AI will:
Use MCP to interact with the browser in real-time
Gather actual page context and element information
Generate precise locators based on the live DOM
Create a robust test file in your tests/ directory
Execute and refine the test until it passes
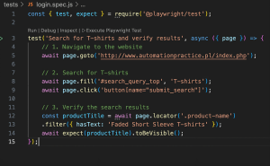
Expected Generated Test Structure

Test Case Structure
Conclusion
The era of spending more time writing test cases and fixing tests than writing them is over.
What we’ve covered in this guide represents a fundamental shift in how we approach test automation. Instead of wrestling with brittle selectors, debugging flaky tests, and updating scripts for every UI change, we now have AI that understands browser context and generates resilient test cases in minutes.
The key takeaways:
LLMs provide the intelligence to understand your testing intent
Agents bridge the gap between thinking and doing
MCP creates a universal standard for AI-tool integration
Playwright MCP delivers real browser context instead of fragile screenshots
GitHub Copilot enhances the workflow from planning to maintenance
Whether you’re a newcomer writing your first test case or an experienced team managing hundreds of automation scripts, this AI-powered approach solves the core problems that have plagued test automation for years.
Ready to get started? Set up your environment, create your first context file, and watch as AI transforms your approach to test automation. The future of QA isn’t automated—it’s intelligent.

