Introduction
The main goal of this blog is to provide production-grade best practices for Microservices Infra in a way to implement the entire system easily on your own. You’ll see what an end-to-end solution looks like, including how to combine Kubernetes, AWS VPCs, data stores, CI/CD, secrets management, and a whole lot more to deploy your applications for companies that need reliable infrastructure for production use cases.
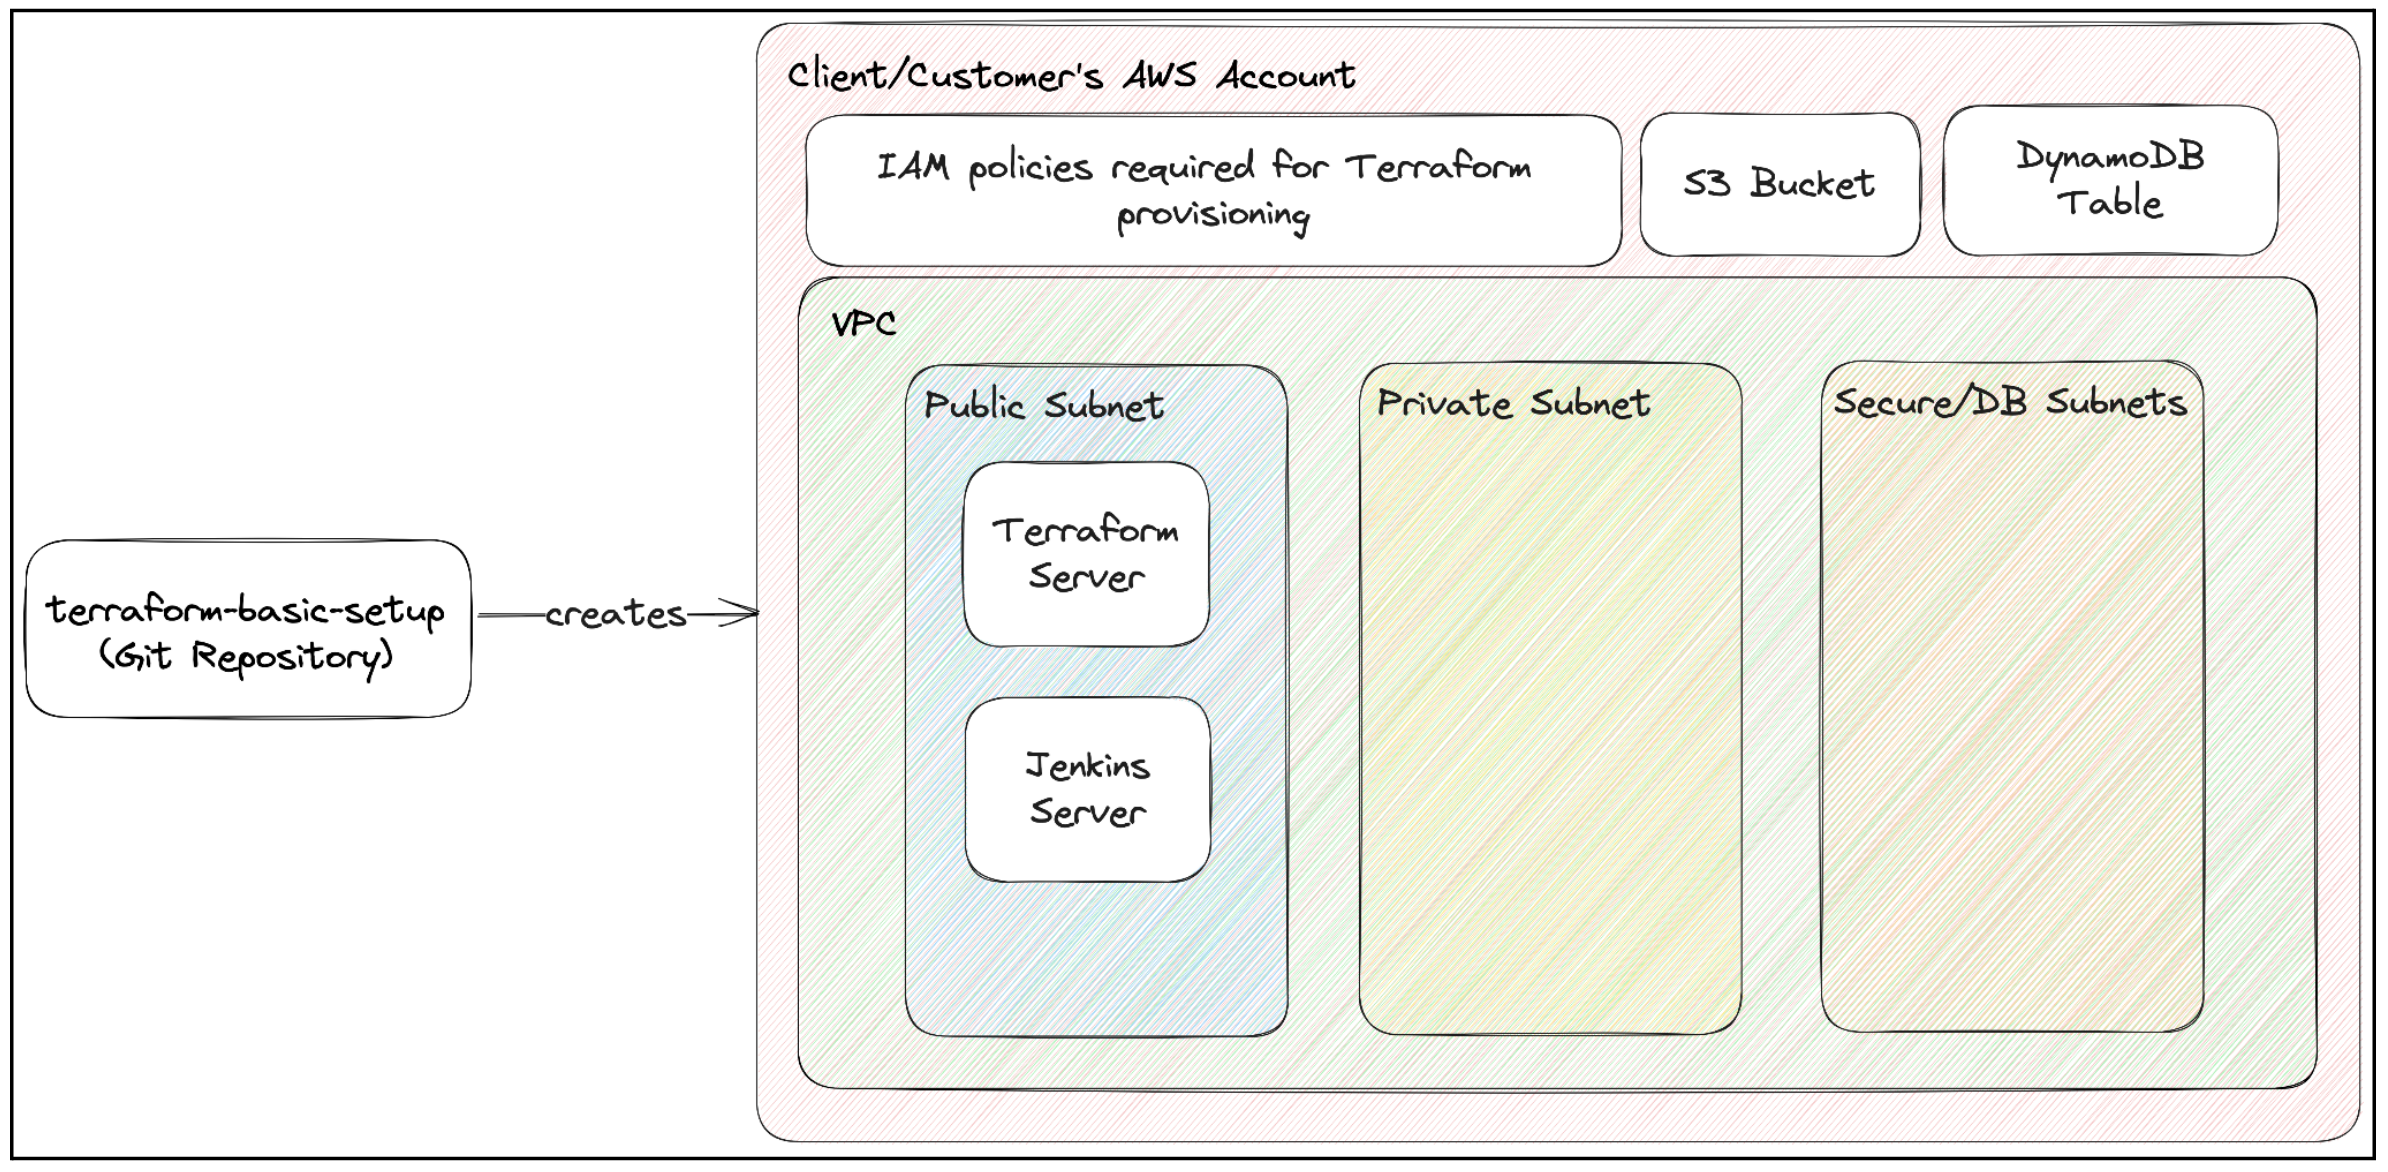
Base Infra Setup
This repo creates a bundle of resources that are required before we can start building infrastructure for our application basically your n/w layer i.e.
- VPC
- NAT Gateways
- Subnets
- Internet Gateway
- Attach diff – diff routes that you would need
- Create required IAM Roles
- Terraform Server
- Jenkins Server – to run terraform scripts for your application
- S3 Buckets
- DynamoDB tables
- & all those things that you would need eventually for Terraform to work.
Link: https://github.com/tothenew/terraform-basic-setup
First, copy the above repo into the client’s/customer’s repo. For e.g. let’s say Rahul is a client in his organization. In very few words, we will import this repo, modify some parameters based on the client, and then execute this terraform. We are using this repo as the template for our base setup.
- Keep your repo private.
- Import the repo using the above link in your git repository. For this guide, we will be following below naming convention i.e.
infra-<git-org-name/client-name>-base
- Once the repo is imported. Clone the same on your machine.
git clone <your-repo-url>
- The only prerequisite tools for this solution are “make” & “docker” which are already installed in all modern systems. Copy the template of the repo & create a repo for yourself.
Update the config.yml:
- account_name: How are you going to refer to resources bundled in this logical namespace?
- account_id: The account id of your AWS account but is not getting used anywhere; this is just for ease of reference & to set mapping to your account_name.
- project_name:
- client name i.e. <git-org-name/client-name>. E.g., if multiple clients are in one account, then the project name would be the same, but the client names would be different.
- All uncommon variables required to run our infra will be passed as shown in config.yml. For a detailed example, visit the link.
- Now to run this, first export on which “workspace” you want to run it & then run “make init” as shown below:
export WORKSPACE=nonprod-us-west-1-default
make init
Now, run “make plan”
make plan
This will create 63 resources in total. To name few major ones are mentioned below:
- Jenkins-Master Server
- Terraform EC2 Agent – (Terraform will run from this ec2 instance created by the base infra.)
- Network Resources
- Some IAM Roles
- 1 S3 Bucket
- Subnets
- DynamoDB
Every time we execute “make plan” it will store the planned output in “.terraform-plan-nonprod-us-west-1-default” & use this plan to “apply.”
Now, run “make apply”
make apply
Once “make apply” has finished creating all 63 resources, the base infrastructure is ready, which you will need before starting the actual infrastructure creation.

BASE INFRA is created. Do Not Forget to commit back everything to your git repository, including state-file, as your state file will be local.
Setup Application Infrastructure
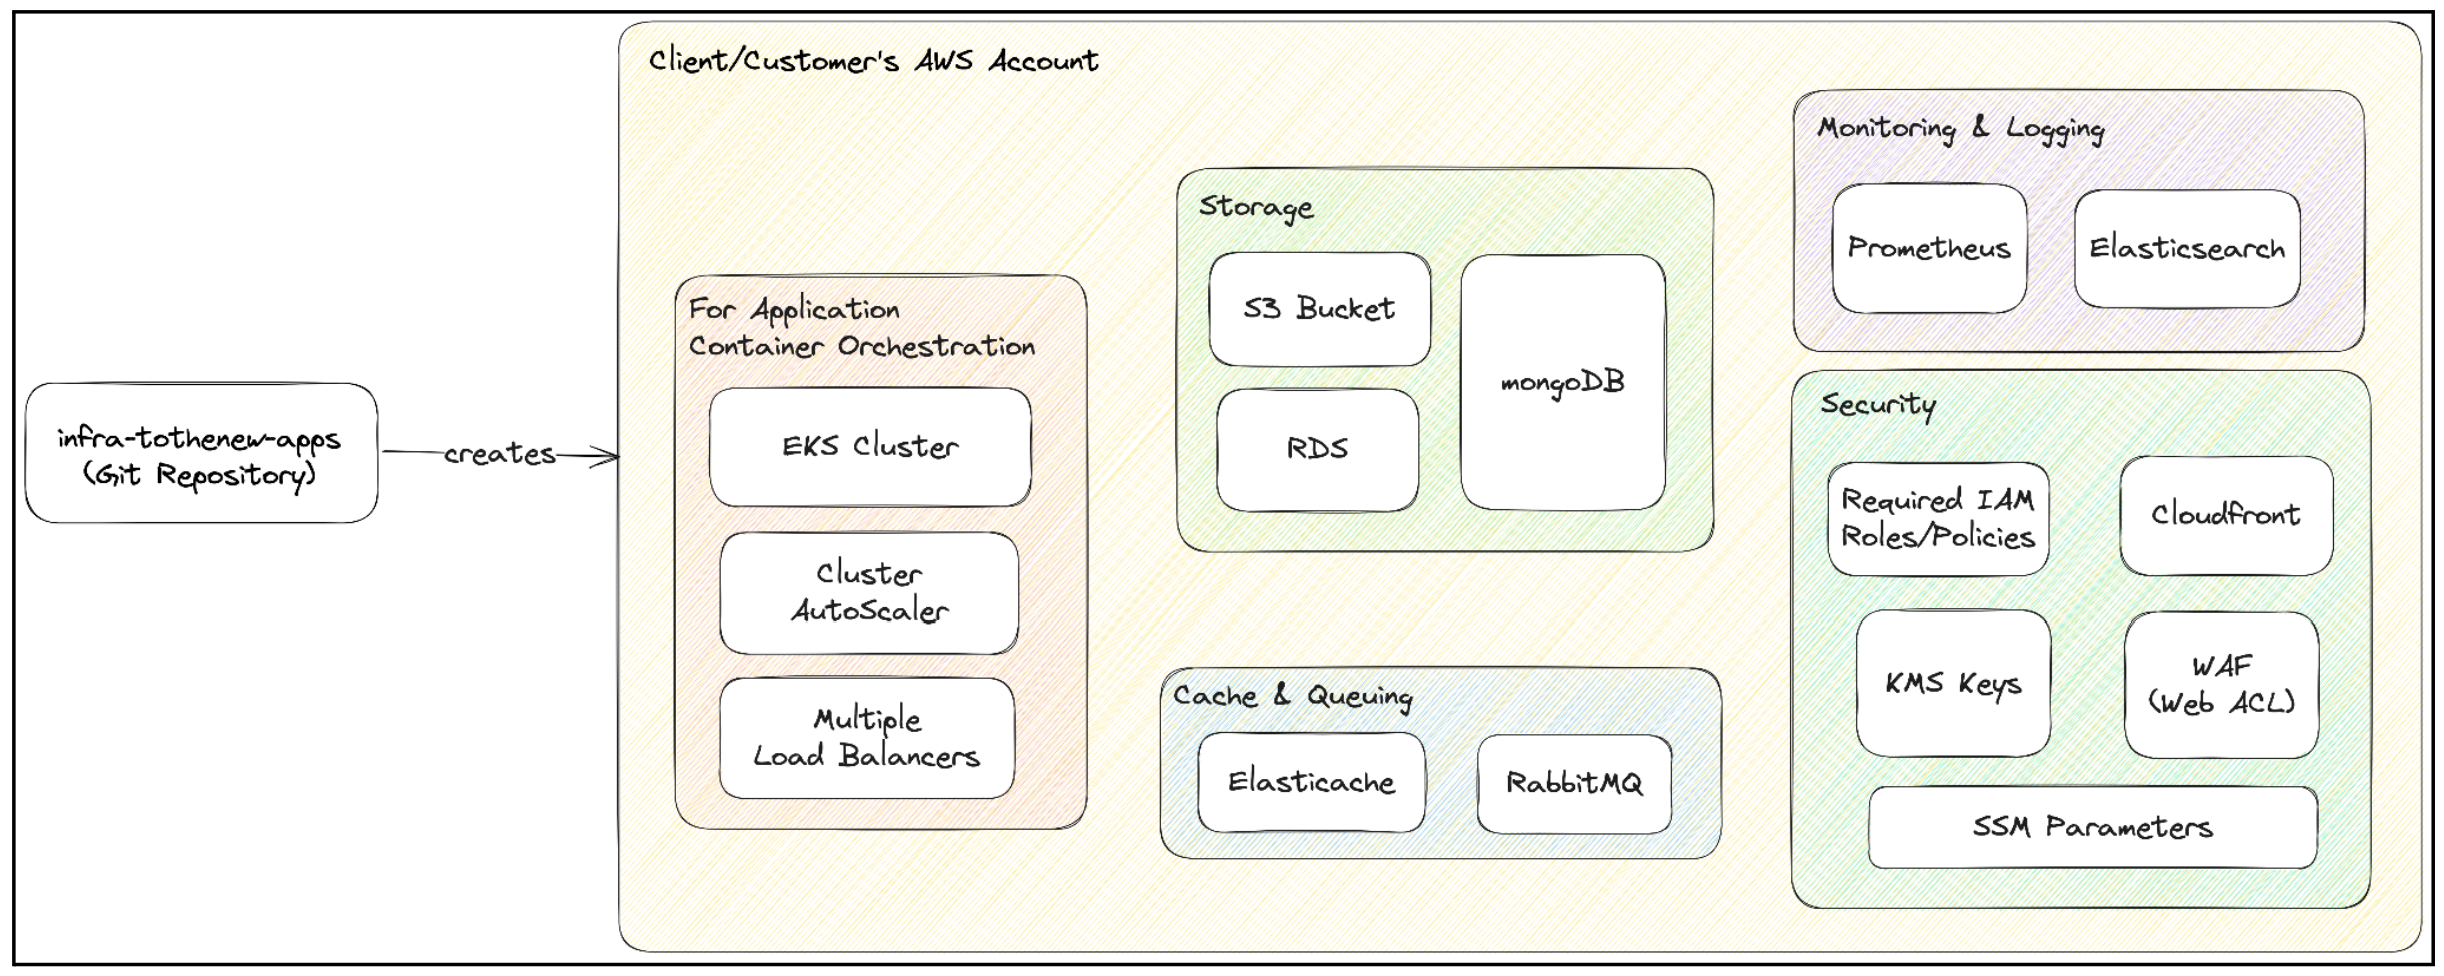
Link: https://github.com/tothenew/infra-tothenew-apps
Import the above repo as we did earlier for base infrastructure.Now, we will connect to terraform agent instance, which we created in base-infra.
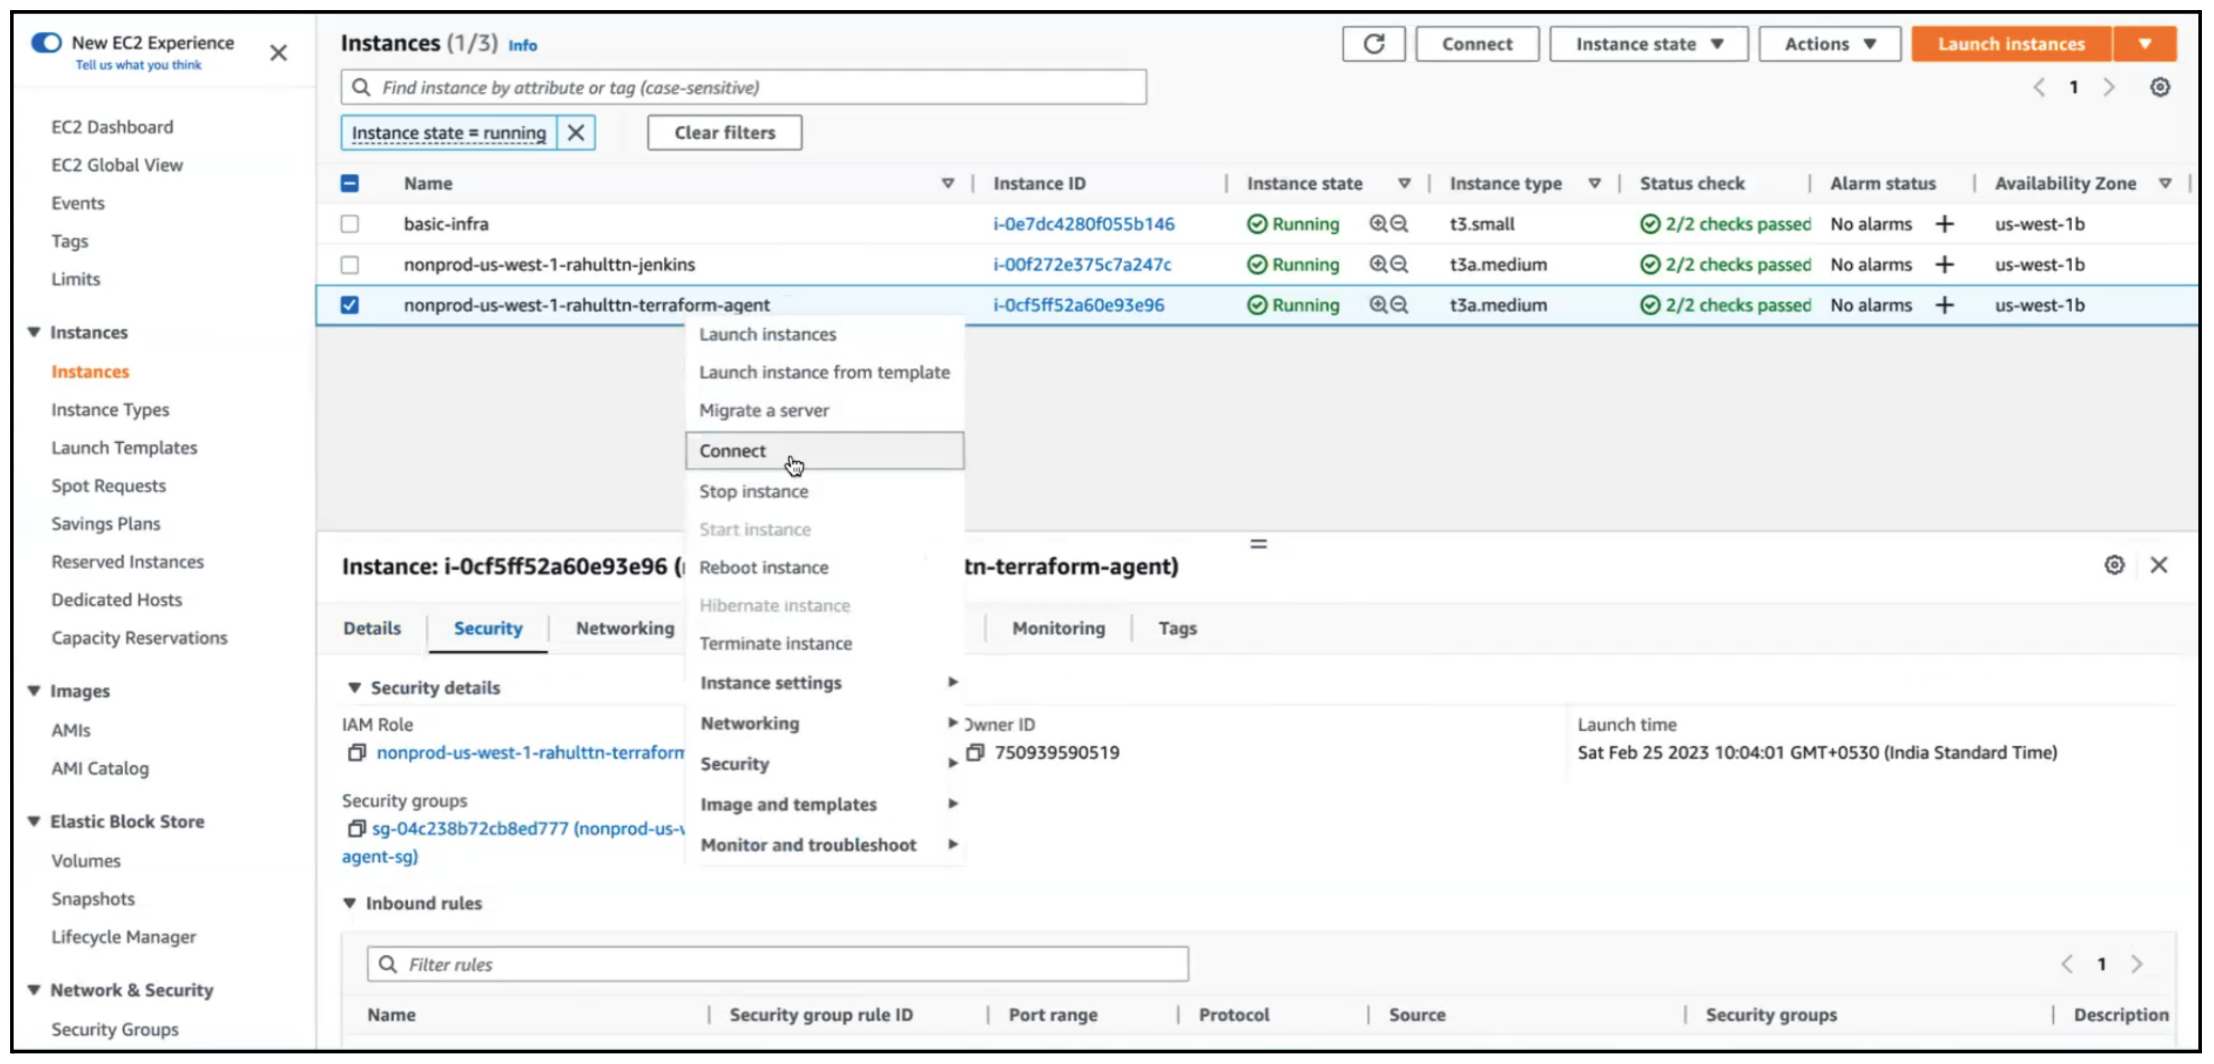
Base Infrastructure can be created from anywhere as it doesn’t need any VPC, Subnet, or any other required resources as a pre-requisite. But, this infrastructure/application that we are about to create needs to be created from terraform agent instance as in our code, the resources being used would need to connect with different components like rabbitMQ, RDS, and EKS private cluster.
Each VPC would need to have a terraform agent server. For any new setup, we will clone the repo inside the client’s account:
- Base Infra:
-
- The state file will be committed back in git. So, make sure to create only those resources in which we aren’t generating any secrets.
-
- <app-name>-Infra
-
- Actual Infrastructure resources are created here, where applications would be deployed post-creation of base infrastructure.
- <app-name> is project/environment/product.
-
- Update config.yml for <app>-infra, with your details like:
-
-
- Role
- region
- Project_name
- Envinoment_name
- Any other changes that you desire
-
4. Export workspace & execute “make init”.
export WORKSPACE=nonprod-us-west-1-qa
make init
5. After initialization, execute “make plan”.
make plan
6. Update Bucket Name in “_settings.tf” & execute “make init plan”
make init plan
7. Run “make apply”
make apply
8. Setup Application Infra is provisioned with a basic monitoring stack already installed in it with Prometheus & node exporter. We can deploy a sample application now.
Deploy Sample Application
ArgoCD
Once the application infra is created, you can add more addons like argoCD; we already have some examples ready in the “more-examples” directory; you can copy from it & initialize again.
cp <cloned repo>/more-examples/argocd.tf <cloned repo>/

export WORKSPACE=nonprod-us-west1-qa
make init
Run “make plan apply”
make plan apply
We have scripts inside the docker container in the more-examples directory which you can use to get endpoint & creds by passing app-name, region & role-arn as the arguments.
cat more-examples/getArgo.sh
Using endpoint & creds we can access argoCD Console. Till here infrastructure setup is done. Now if you want to deploy an application.
Sample Application
Go to Link: https://github.com/tothenew/tothenew-sample-helm-app
- Open argoCD from the previous steps. And, In ArgoCD go to Settings -> Repositories -> Connect Repo.
- Fill git Repository URL with the above link & click CONNECT. You will see the Connection Status as Successful.
- Go to Applications, select NEW APP fill in details as per your application to deploy it via ArgoCD.
- Click on CREATE & It will get created. Once created, click on the created application.
- Open the app created. Select SYNC & then click SYNCHRONIZE. This will create all required Kubernetes resources basis on the helm chart.
- Click on nginx-app-ingress. Scroll down to copy the load balancer ingress hostname & you can access your application via the same.
If you execute & run it as is, you will have your infrastructure ready more or less with all the best practices which you should follow for a microservice architecture.
Conclusion
This solution can also be extended further to solve the remaining requirements (if any) per your use case. We have started using terminologies that we use IaaC to create our Infra. But, what we all are doing is creating a template & then we use that template to launch a stack that is it. It is not really IaaC until & unless we can actually follow the same principle of application development.
We are in the process of rolling out this Automation Accelerator that we want all of us to use instead of how we have been using IaaC in the past traditionally. We hope it would’ve helped you the way we intended it to. Subscribe to our blogs for further insights.