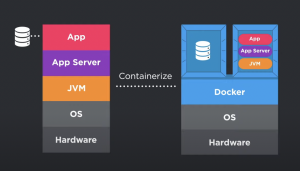
Dockerizing a spring boot application, that uses more than one container.
We have a spring boot application that takes user input as form data and saves it in a MySQL database.
The context of dockerizing a spring boot application is so that other developer using my application doesn’t have to set up the tomcat server or run a MySQL server manually.
will use different docker concepts to minimize the setup necessary to get the application up and running on their machine.
First we will create a database container, then a container for my application code and everything it needs to run including the app server and JVM.
P.S: make sure the docker engine is running in the background
Step 1: Creating a Database Container
creating a MySQL container that my application will use to persist the data, same steps can be applied to create a container of another database too.
To create a container you need a base image from you will create your container. And there are lots of images available on the docker hub for you to use and create a container from it.
Pull a MySQL image and run a container from it
docker pull mysql
Run the container in detached mode (So that database logs are not populated over the terminal), also passing the environment variable like MySQL password and DB name directly
docker run –name app-db -d -e MYSQL_ROOT_PASSWORD=password -e MYSQL_DATABASE=myDB mysql (image that is used to create this container)
![]()
we see our container id above that states that our container was created and started successfully.
You can also check the logs of the container you are running by
docker logs app-db(container name or id)
P.S: With the current setup. the data persisted in the MySQL container will be wiped out whenever you re-create or you re-start the container.
To persist the data you can use the docker file to persist the container data on the host file system.
GitHub-Repository:-
The spring boot application code contains the JSP file, it’s a simple form-based application where you can fill in the required details and it will be persisted in the MySQL database.
Containerize this spring-boot application:
Step 1: Create an image of the application
To create the image will create a Dockerfile that contains instructions for building a container image with our application code.
Dockerfile:
** Image
tomcat:10-jdk11 -> Official image that contains the tomcat as well as the JVM
Build the application war/jar file and transfer it to the target directory where our application war/jar file will be placed from my host machine to image file system.
/usr/local/tomcat: MyWebdirectory where tomcat needs in order to run the application when the tomcat starts in the container.
EXPOSE: To make container visible outside the container, and to make port accessible outside the container and bind that port to the host machine.
CMD: command we want to run when the container starts. Here it is the catalina.sh script that starts the tomcat server.
Dockerfile basically says build my application image from the base image defined in the Dockerfile that include the specified version of java and tomcat, drop my application war in the appropriate tomcat directory and then start tomcat.
Step 2: Build the image: docker build -t my-web-app:1.O .
Here . indicates, build the image from current directory and giving the image name as my-web-app:1.O, with 1.O tag.
image
Step 2: Creating the container
Create our application container from the image we build, giving the container a name and running it in detached mode.
docker run –name app -d -p 8080:8080 my-web-app:1.O
using -p we bind the tomcat running inside container port to the host machine port.
You can check the logs of the container running as well
docker logs app(container_name)
Now we can access our application from localhost:8080 that is running inside container.
Communication between docker container
Here the communication between app container and mysql container
In docker there are several types of networks that allow you to create secure networks for communication between container.
Bridge network between container are created by default
Let’s create a bridge network to handle communication between our two different container.
docker network create app-network(network name)
docker network ls (to list down all the networks we have)
** image
Now we have our network created lets connect both our container to these network so that our application container can persist the data in mysql database container.
**Connecting our app db container to the network
docker network connect app-network app-db
Before connecting our app to the network we need to change how our application connects to the mysql database.
we want to connect our application to the database container so we need to provide the mysql db container by referencing name of the database container.
** image
Because we have made change in the application code we need to re-build the app and image and delete our previous container running
mvn clean install
docker build -t my-web-app:1.O
docker rm -f app
Recreating our application container
docker run –name app -d -p 8080:8080 –network=app-network my-web-app:1.O
Now our both application container and app-db container connected to the app-network, these two network and communicating with each other.
Docker Compose
Allows you to define your application services and lets you codify your different run commands.
First step is to create docker-compose.yml file and in this file defines the services that makes up this application one is database service and other is app service with the image it is using. The compose file also command to build the image as well as the port binding required for it to be accessible at the host machine.
Also we will define the environment variable require to run the container in the docker-compose.yml file itself.
** image
Now that we have created our docker-compose.yml file we can use docker compose up -d (command that will bring our application up by creating and starting both the container) without executing different commands.
We can access our application running inside the container at localhost:8080 and it persist the data too, without setting up the different java version and running mysql server on your local machine with the help of a simple docker-compose up -d command.
P.S: Docker compose automatically creates a bridge network for the application services that you have defined in the docker compose file and attaches your container to it. So you don’t have to manually do it yourself.
You can check the network that docker compose create for us by
docker network ls
Now for other people to run our application below are the steps without worrying about the development environment, java version my project is using, and database setup. Things become so simple and fast using docker.
Clone the github repos and run the application
I. Docker should be running
II. Build the cloned application
III. docker-compose up
IV. go the browser to the exposed port and api/handle