Introduction
Kubernetes is a powerful tool for managing containerized applications. It helps us to automate the deployment, scaling, and management of our applications in containers, which are like lightweight, standalone packages for software.
In the market, multiple tools are available to set up Kubernetes clusters locally (on our host machines), like Minikube, Microk8s, Kind (Kubernetes in Docker), KubeSpray, etc. One of them is Kubeadm, and we will be going to learn how to set up a Kubeadm cluster on an AWS EC2 machine.
Kubernetes Architecture
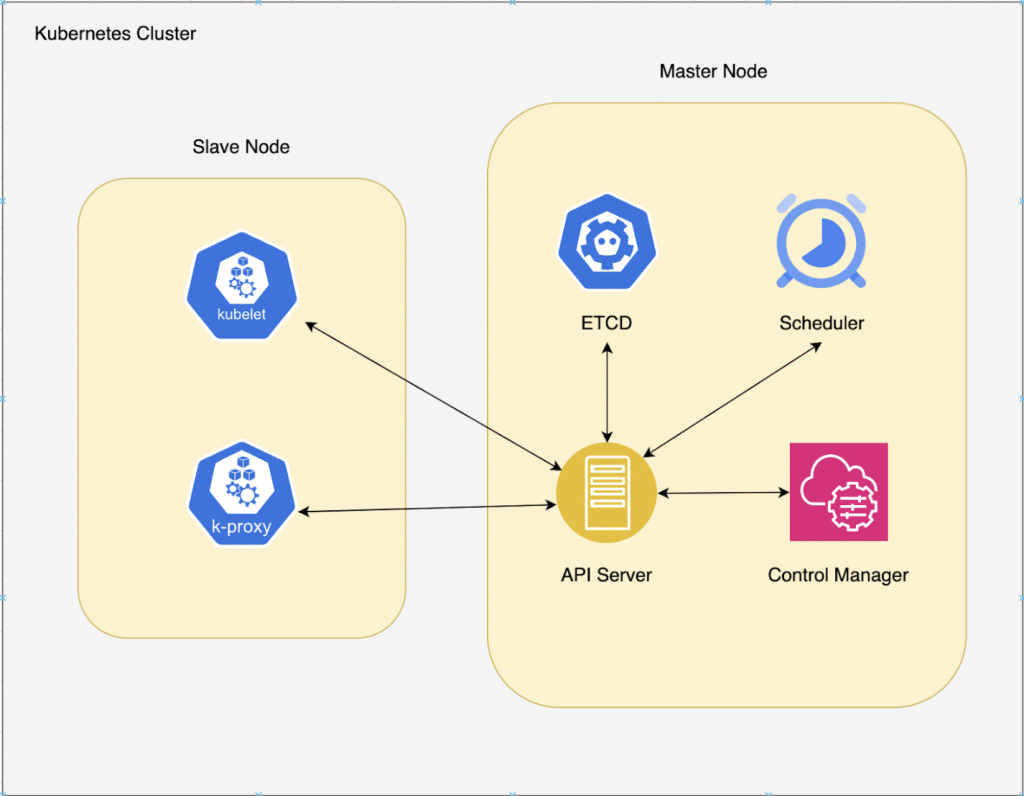
Control Plane Components:
- Etcd: Cluster Data Store — Kubernetes uses “etcd.” This is a strong, consistent, and highly-available key value store that Kubernetes uses for persistent storage of all API objects.
- API Server: The API server exposes a restful Kubernetes API and consumes JSON manifest files.
- Controller Manager: Known as the “kube-controller manager,” this runs all the controllers that handle routine tasks in the cluster.
- Scheduler: The scheduler watches for newly-created pods (groups of one or more containers) and assigns them to nodes.
- Cloud Controller Manager: If we are using Kubernetes as a cloud provider service like EKS (AWS’s Kubernetes service), then the whole master node is managed by the AWS in the backend using this component
Slave Node Components:
- Kubelet: An agent that runs on each node and makes sure that containers are running in a pod
- Kube Proxy: An agent that runs on each node and makes sure that containers are running in a pod
About Kubeadm
- A tool to create a Kubernetes cluster
- Different from Microk8s, Minikube, Kind, etc., Kubeadm sets up the whole cluster from scratch. I.e., master node and slave nodes, respectively, with each component like etcd, scheduler, controller manager, api-server, etc. However, Microk8s, Minikube, etc., are mainly used to test our deployments and pods.
- Kubeadm is versatile, i.e., it allows us to create clusters on our own hardware or cloud servers.
- We have more control over the cluster’s configuration, which is useful for custom setups.
Benefits of Kubeadm
- Kubeadm is more versatile and flexible, suitable for various scenarios, including production.
- MicroK8s and Minikube are designed for simplicity and are excellent for beginners or local development.
- Kind is great for lightweight, multi-node cluster simulation during development and testing.
- The choice depends on our needs i.e., if we want production-level control, then kubeadm is best suited. If we want a quick and easy setup, MicroK8s or Minikube might be better.
- Kubeadm offers more customization and is best for advanced use cases, while MicroK8s, Minikube, and Kind are simpler tools tailored for specific purposes, like quick local setups or lightweight development and testing environments.
Prerequisites
- Two EC2 instances (1 for master node setup and 1 for slave node setup)
- Security group rules for master (control-plane) node and slave node:

Setup
- Setting up the master node by running the following script:
#! /bin/bash

set -eo pipefail

# disable swap

sudo swapoff -a

# keeps the swaf off during reboot

sudo sed -i '/ swap / s/^\(.*\)$/#\1/g' /etc/fstab

# Updating the system

sudo apt-get update -y

sudo apt-get install -y \

    apt-transport-https \

    ca-certificates \

    curl \

    gnupg \

    lsb-release

# Process to install Docker

curl -fsSL https://download.docker.com/linux/ubuntu/gpg | sudo gpg --dearmor -o /usr/share/keyrings/docker-archive-keyring.gpg

echo \

  "deb [arch=amd64 signed-by=/usr/share/keyrings/docker-archive-keyring.gpg] https://download.docker.com/linux/ubuntu \

  $(lsb_release -cs) stable" | sudo tee /etc/apt/sources.list.d/docker.list > /dev/null

sudo apt-get update -y

sudo apt-get install docker-ce docker-ce-cli containerd.io -y

# Setting CGroup to systemd for Docker

cat <<EOF | sudo tee /etc/docker/daemon.json

{

  "exec-opts": ["native.cgroupdriver=systemd"],

  "log-driver": "json-file",

  "log-opts": {

    "max-size": "100m"

  },

  "storage-driver": "overlay2"

}

EOF

sudo systemctl enable docker

sudo systemctl daemon-reload

sudo systemctl restart docker

echo "Docker Runtime Configured Successfully"

# Installing net-tools, curl, kubernetes certs to install kubectl, kubeadm, and kubelet

sudo apt-get update

sudo apt-get install -y apt-transport-https ca-certificates curl

sudo curl -fsSLo /usr/share/keyrings/kubernetes-archive-keyring.gpg https://packages.cloud.google.com/apt/doc/apt-key.gpg

echo "deb [signed-by=/usr/share/keyrings/kubernetes-archive-keyring.gpg] https://apt.kubernetes.io/ kubernetes-xenial main" | sudo tee /etc/apt/sources.list.d/kubernetes.list

sudo apt-get update -y

sudo apt-get install -y kubelet kubeadm kubectl

# Pausing the updates for kubelet, kubeadm, and kubectl

sudo apt-mark hold kubelet kubeadm kubectl

# Initialize the cluster

sudo kubeadm init

mkdir -p $HOME/.kube

sudo cp -i /etc/kubernetes/admin.conf $HOME/.kube/config

sudo chown $(id -u):$(id -g) $HOME/.kube/config

# Creating pod network (without setting this network, the deployments and pods will not come up....they will always be in not-ready state)

curl https://docs.projectcalico.org/manifests/calico.yaml -O

kubectl apply -f calico.yaml
The above script does the following:
-
- sudo swapoff -a: Disables the system’s swap space. Kubernetes typically requires a swap to be disabled.
- sudo sed -i ‘/ swap / s/^\(.*\)$/#\1/g’ /etc/fstab: This line comments out the swap entry in the /etc/fstab file, ensuring that swap remains disabled even after a system reboot.
- Updating the system and then installing Docker
- Configuring the Docker to use systemd as the cgroup driver and setting up some logging and storage options
- Installing additional packages required for Kubernetes installation, including curl and certificates, and then importing GPG keys
- Now, the most important part of installing the Kubernetes components: kubelet (responsible for managing containers that are part of the pod), kubeadm, and kubectl (cli to interact with Kube’s api-server)
- sudo apt-mark hold kubelet kubeadm kubectl: Pausing the updates for these components
- Initializing the Kubernetes cluster by running sudo kubeadm init. This command sets up the control plane on the current node.
- The components of the control plane are the scheduler, api-server, etcd, and the control manager.
- Setting up the Kubernetes configuration for the user by creating a ~/.kube/config file.
- This file is responsible for accessing the Kubernetes cluster
- Now, we are setting up a calico pod network.
- Calico is a commonly used network plugin for Kubernetes that allows pods to communicate with each other
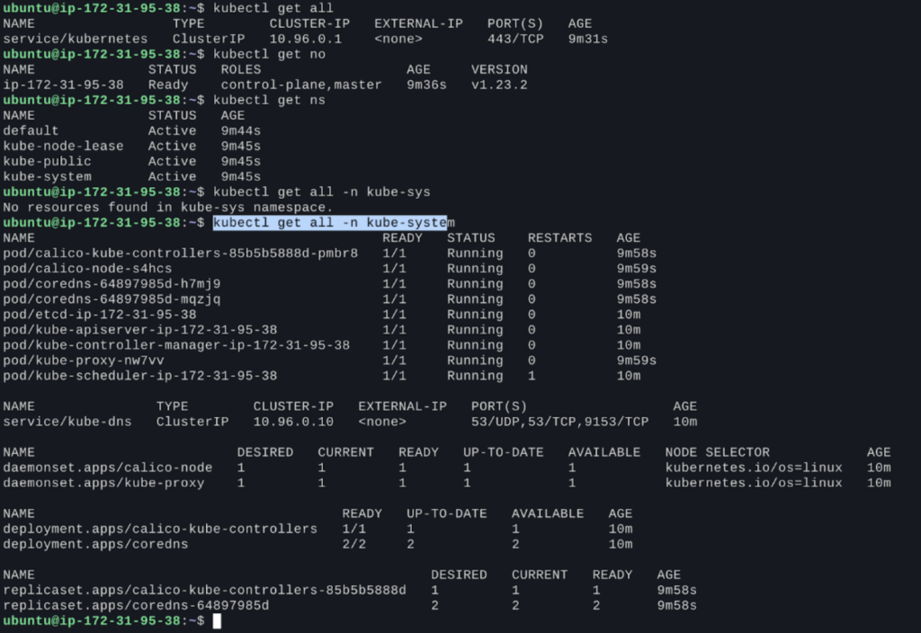
We are all set now. To check whether our cluster is running or not, just ssh inside the master node and run the following Kubernetes commands:
kubectl get all; kubectl get all -n kube-system; kubectl get nodes……etc
NOTE: By default, the cluster is accessible via the master node only because in $HOME/.kube/config this file, there will be a private IP listed for the cluster, and to access this cluster from our local machine, we need to add public IP here (not secure). The more secure option to access the cluster is using a VPN.
Now, it’s time to join the slave nodes in our cluster. To join slave nodes, run the below script in the slave nodes:
#! /bin/bash

set -eo pipefail

# disable swap

sudo swapoff -a

# keeps the swaf off during reboot

sudo sed -i '/ swap / s/^\(.*\)$/#\1/g' /etc/fstab

sudo apt-get update -y

sudo apt-get install -y \

    apt-transport-https \

    ca-certificates \

    curl \

    gnupg \

    lsb-release

curl -fsSL https://download.docker.com/linux/ubuntu/gpg | sudo gpg --dearmor -o /usr/share/keyrings/docker-archive-keyring.gpg

echo \

  "deb [arch=amd64 signed-by=/usr/share/keyrings/docker-archive-keyring.gpg] https://download.docker.com/linux/ubuntu \

  $(lsb_release -cs) stable" | sudo tee /etc/apt/sources.list.d/docker.list > /dev/null

sudo apt-get update -y

sudo apt-get install docker-ce docker-ce-cli containerd.io -y

# Setting up CGroup to systemd in docker runtime

cat <<EOF | sudo tee /etc/docker/daemon.json

{

  "exec-opts": ["native.cgroupdriver=systemd"],

  "log-driver": "json-file",

  "log-opts": {

    "max-size": "100m"

  },

  "storage-driver": "overlay2"

}

EOF

sudo systemctl enable docker

sudo systemctl daemon-reload

sudo systemctl restart docker

sudo apt-get update

sudo apt-get install -y apt-transport-https ca-certificates curl

sudo curl -fsSLo /usr/share/keyrings/kubernetes-archive-keyring.gpg https://packages.cloud.google.com/apt/doc/apt-key.gpg

echo "deb [signed-by=/usr/share/keyrings/kubernetes-archive-keyring.gpg] https://apt.kubernetes.io/ kubernetes-xenial main" | sudo tee /etc/apt/sources.list.d/kubernetes.list

sudo apt-get update -y

sudo apt-get install -y kubelet kubeadm kubectl

sudo apt-mark hold kubelet kubeadm kubectl
The above script installs and configures the same things that are in the master node except for initializing the cluster.
- Once we have installed all the required components via the above script, we need to ssh into the master node to generate the Token and Hash, which the slave nodes will use to join the cluster. The below command will generate the token and hash:
sudo kubeadm token create --print-join-command
- Once we get the command to join the slave nodes to the cluster, we ssh into the slave nodes and run that command:
sudo kubeadm join <master node IP>:6443 --token <token value> --discovery-token-ca-cert-hash sha256:<hash value>
- Once this is successful, you can ssh in the master node and check the status of the attached node using the below command:
Kubectl get nodes
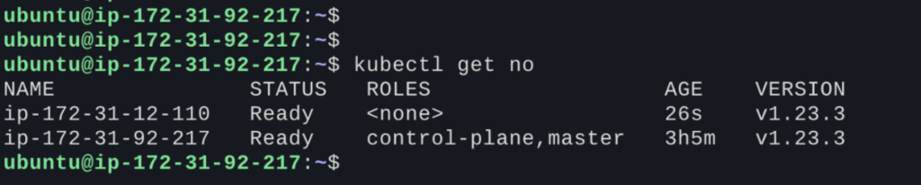
- Now, we have a running Kubernetes cluster with master and slave nodes.
Conclusion
So, in this blog, we have learned about the basics of Kubernetes, which includes its architecture and components, as well as the use of each element. We have also checked multiple approaches for creating Kubernetes clusters using different tools and how to use Kubeadm to set up a Kubernetes cluster from scratch, including master and slave nodes.