
Mongo Point in Time Restoration

While working with databases sometimes there is a need to have data till a specific time or date across all the secondaries or database peers which is useful for testing a particular functionality. Also, in the event of outage, few folks would like to restore it to a specific weekend or month end just to have uniformity across all the dependent applications.
Here I am going to discuss how it can be achieved in MongoDB. I will be using MongoDB’s native tools – mongodump & mongorestore. Although these tools are heavily used to take database/table dumps of mongo data, these can also be used to have Oplog backup. Before proceeding, you must have idea of Oplog.
Oplog is like a normal collection (or table) in MongoDB which keeps all the operations that are received by MongoDB on its port. These operations can be updates, inserts, deletes etc. That means a working or executing copy of all the transactions that are stored in the normal collections will also be there in Oplog. However, this cannot be treated as a backup. You must keep your backup copies as well since Oplog is a capped collection, which means that it will keep overwriting the oldest data as new data comes in, once its capacity is full. So, choose Oplog size accordingly.
To have mongo restored to point in time, you must take its backup accordingly. This assumes you are already taking mongo data backups regularly. Just in addition to that, take Oplog dump as well:
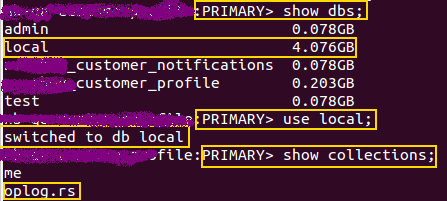
Here is what you need to take backup of – oplog.rs collection:
Take the backup using mongodump:

From above command, local is the database and oplog.rs is the collection name. oplogBack_5April2016 is the non-existent directory where you will take backup. oplog.rs.bson is the required dump collected after running this command and which will be used to have point-in-time restored data.
To restore to point in time, you must have your ‘time’ handy. What that means is you must know the date and time up to which you want to actually restore. That is calculated on the basis of epoch value. Oplog keep all the transactions on the basis of this epoch value available as timestamp.
Now suppose you want to restore up to a date, say 31st March 2016 23:59:00. Its epoch value will be calculated as 1459468740. Having said that, it is not necessary Oplog will have a record created exact on the same time, it might create a record earlier or later to this time. And obviously that will happen most of the time. In that scenario, you must find an epoch value just less than the required epoch time and you will restore up to that timestamp. Your goal is to find “”ts”:{“timestamp”:{“t”:x,”i”:y}}” entry and note its values from Oplogs. X is the epoch value we are interested in and Y is an incrementing ordinal for operations within a given second. In case you find more than 1 value of Y for the same value of X, you should use the largest Y value.
In my case, I created and used this script to get an epoch just less than my desired point-in-time epoch value from Oplogs. To be able to use this script you must have your Oplog dump in human readable format. bsondump is such utility to convert your bson dump to json values.

Say or For example, I have got “ts” : timestamp(1459464310, 1) & “ts” : timestamp(1459464310, 2) as epoch just less than my desired timestamp value. This corresponds to 31 Mar 2016 22:45:10 and this is the last record my Oplog had just before 31st March 23:59:00. The ordinal value I choose will be 2.
Once you are ready with the Oplog dump and the correct epoch and ordinal values, use following procedure for restoration:
Step1. Restore the normal data from latest dump just before the point-in-time timestamp. Say you do weekly backup and so you had backup only till 27th March 2016 (Sunday). So, restore the data on new node up to 27th March 2016. It will be done using your normal restoration procedure.
Step2: Rename your dump with oplog.bson as mongorestore will look for oplog.bson in the specified directory or in the root of dump directory if no directory specified.
![]()
Step3. Replay your Oplogs until 1459464310:2.

–oplogReplay: Replays the oplog after restoring the dump to ensure that the current state of the database reflects the point-in-time backup.
–oplogLimit: Prevents mongorestore from applying oplog entries with timestamp newer than or equal to <timestamp>.
oplogRest: This is the directory where I have kept my oplog.bson.
Just note that restoring Oplogs is an idempotent activity and it will do no harm if you run this multiple times. This is the time you can verify if you have restored correctly upto your desired timestamp. That should be all.


It works on Sharded cluster if yes then how…
Hi Amit, any pointers where I can read more about idempotent operatoin? How to figure that part for incremental backups?
very well explained. Thank you for sharing.