
PayU Payment Gateway : Android Integration
About PayU India
Gurgaon-based PayU India Internet Pvt. Ltd. offers online payment solutions to websites and mobiles apps. PayU offers electronic payment services to merchant website through its partnerships with various banks and payment instrument companies.
PayU India started in October 2011 and claims to be the number one payments company in the e-commerce category in the country. It is currently serving more than 8,500 businesses in India, up from 5,000 merchants in November 2013. Its clientele includes companies such as BookMyShow, Snapdeal, Micromax, HUDA water board, Amity University, Religare Insurance, Goibibo and redBus.
Before going ahead with your integration please download the sample app source code provided by the PayU from here, run it and play with it. It will help you understand different classes in their sdk you need to use and parameters setting while creating payment requests.
Payment Methods available with PayU
Using PayU customers can make electronic payments through a variety of modes which are mentioned below:
- Credit Card
- Debit Card
- Online Net Banking Account
- EMI Payment
- Cash Card
- Email Invoicing
- IVR
- Cash on Delivery(COD)
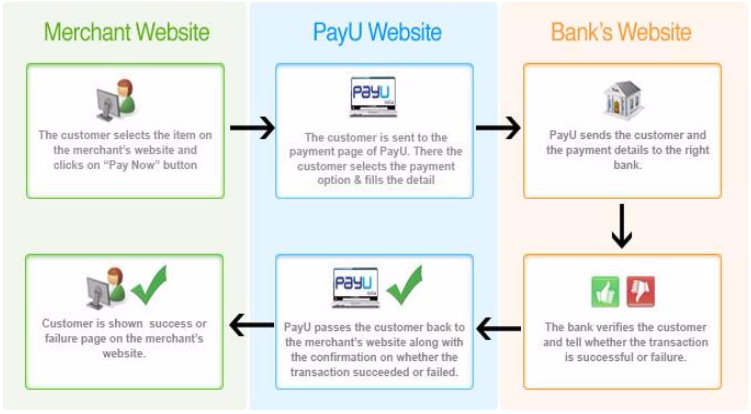
Payment Process Flow
Android Integration
This post shows the integration of PayU with your android application. Before proceeding further with this blog, make sure that you must already have installed and configured:
- Java JDK version 1.6 or greater
- Android SDK
- A Git client
- Android Studio / Eclipse
- All PayU PG Prerequisites (Key, Salt)
PayU provides the following two types of solutions using their SDK:
- Non-Seamless: In case you decide to not build your own UI, you are free to use this module
- Seamless: In this case you need to build your own UI to collect user banking information for example credit card number, CVV etc.
Non-Seamless Integration: Using SDK’s Inbuilt UI
- Get all the required parameters
- Create an object of
PaymentParams, put all the obtained parameters in it by using its default set methods andsetHashto paymentHashPaymentParams mPaymentParams = new PaymentParams(); mPaymentParams.setKey(“gtKFFx”); mPaymentParams.setAmount(“15.0”); mPaymentParams.setProductInfo(“Tshirt”); mPaymentParams.setFirstName(“Guru”); mPaymentParams.setEmail(“guru@gmail.com”); mPaymentParams.setTxnId(“0123479543689”); mPaymentParams.setSurl(“https://payu.herokuapp.com/success”); mPaymentParams.setFurl(“https://payu.herokuapp.com/failure"); mPaymentParams.setUdf1(“udf1l”); mPaymentParams.setUdf2(“udf2”); mPaymentParams.setUdf3(“udf3”); mPaymentParams.setUdf4(“udf4”); mPaymentParams.setUdf5(“udf5”); mPaymentParams.setHash("your payment hash");- You don’t need to set udf1-5 in case you are not using them
- Email and Firstname can be empty strings “” if you don’t want to use them
- For store user card feature
mPaymentParams.setUserCredentials("your_key:user_id"), you need to pass user_credentials here - For offers
mPaymentParams.setOfferKey("your_offer_key") - For any other payment default param (like phone and others)
mPaymentParams.setPhone("your_number")
- Get the required hashes by using your own server. Create an object of class
PayuHashesand set the corresponding hashes using the default set methods providedmPaymentParams.setHash(payuHashes.getPaymentHash()); - Create a new intent pointing to
PayUBaseActivityand do the following:intent.putExtra(PayuConstants.ENV, PayuConstants.PRODUCTION_ENV); intent.putExtra(PayuConstants.PAYMENT_DEFAULT_PARAMS, mPaymentParams); intent.putExtra(PayuConstants.PAYU_HASHES, payuHashes); - To enable one-click payment
// Enable one click with MOBILE as storage option for hash intent.putExtra(PayuConstants.STORE_ONE_CLICK_HASH,PayuConstants.STORE_ONE_CLICK_HASH_MOBILE); OR // Enable once click with MERCHANT SERVER as storage option for hash intent.putExtra(PayuConstants.STORE_ONE_CLICK_HASH,PayuConstants.STORE_ONE_CLICK_HASH_SERVER); OR // DISABLE one click payment intent.putExtra(PayuConstants.STORE_ONE_CLICK_HASH,PayuConstants.STORE_ONE_CLICK_HASH_NONE); - Start the activity and let PayU SDK take care of the rest
startActivity(intent);
Seamless Integration: Using your own UI
In seamless kind of integration, we will only discuss the example of Credit Card and Net Banking transactions. Though you can integrate Cash Cards, Store Cards, one-click Payment Cards and PayU Money payments using this technique.
Seamless Credit / Debit card Payment Integration

Create an object of PaymentParams, put all the obtained parameters in it by using its default set methods in the same way as you will create for the non-seamless style and setHash to paymentHash
- Set the following additional properties to
mPaymentParamsmPaymentParams.setCardNumber(cardNumber); mPaymentParams.setCardName(cardName); mPaymentParams.setNameOnCard(cardName); mPaymentParams.setExpiryMonth(expiryMonth);// MM mPaymentParams.setExpiryYear(expiryYear);// YYYY mPaymentParams.setCvv(cvv); - To enable one-click payment
// To store one click payment hash pass 1 mPaymentParams.setEnableOneClickPayment(1); // Otherwise pass 0, OR don't call the method at all mPaymentParams.setEnableOneClickPayment(0); - Create a
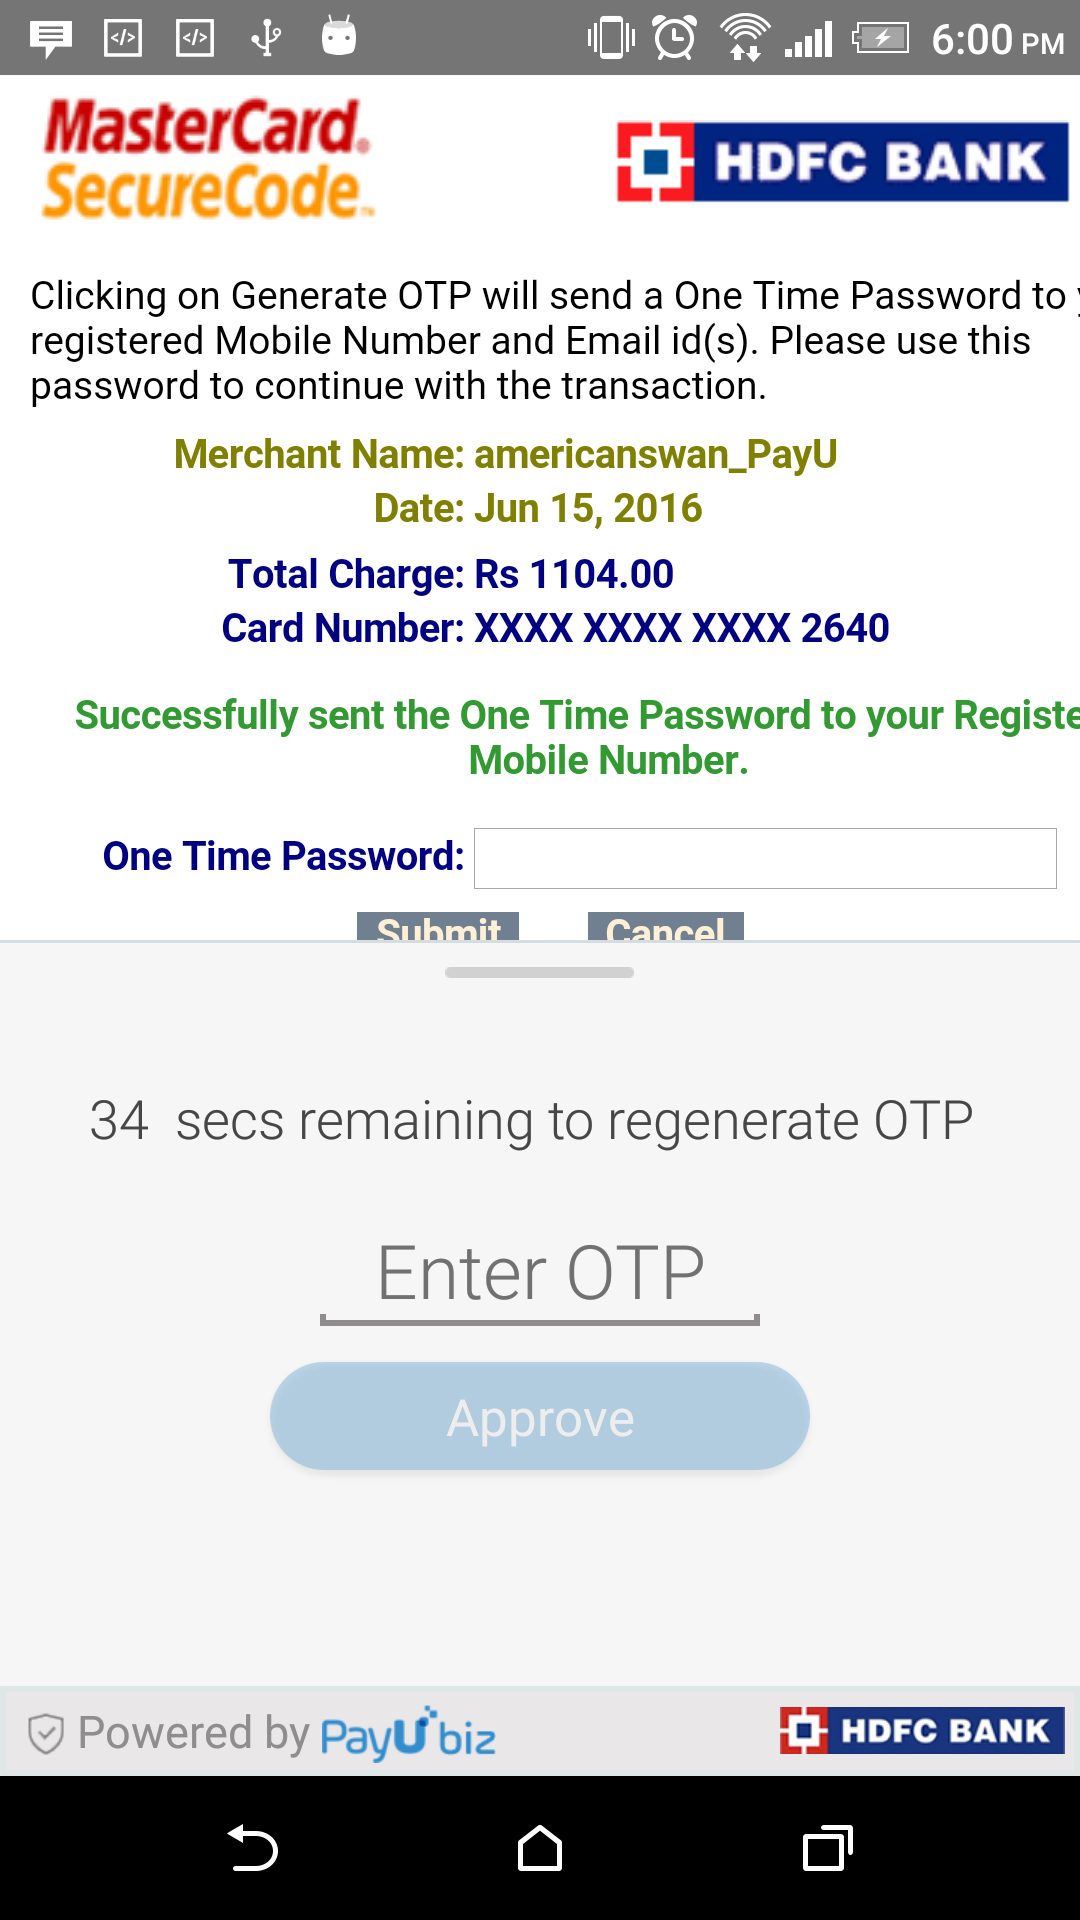
PaymentPostParamsobject with the above data of the typePostData. Make sure to set the environment (test or prod), create intent and launch the PaymentsActivity activityPostData postData = new PaymentPostParams(mPaymentParams, PayuConstants.CC).getPaymentPostParams(); if (postData.getCode() == PayuErrors.NO_ERROR) { // launch webview PayuConfig payuConfig = new PayuConfig(); payuConfig.setEnvironment(PayuConstants.PRODUCTION_ENV); payuConfig.setData(postData.getResult()); Intent intent = new Intent(this,PaymentsActivity.class); intent.putExtra(PayuConstants.PAYU_CONFIG,payuConfig); startActivityForResult(intent, PayuConstants.PAYU_REQUEST_CODE); } else { // something went wrong Toast.makeText(this,postData.getResult(), Toast.LENGTH_LONG).show(); }At this point you should be able to see Bank’s 3D Secure page like the following for HDFC Bank

Seamless Net Banking Integration
- Create an object of
PaymentParams, put all the obtained parameters in it by using its default set methods in the same way as you will create for the non-seamless style andsetHashto paymentHash - Get the bankCode (String) of selected bank from your spinner/list view adapter and add it to the
mPaymentParamscreated abovemPaymentParams.setBankCode(bankCode); - Create
PaymentPostParamsobject of the type PostData and start the PaymentsActivityPostData postData = new PaymentPostParams(mPaymentParams, PayuConstants.NB).getPaymentPostParams(); if (postData.getCode() == PayuErrors.NO_ERROR){ // launch webview PayuConfig payuConfig = new PayuConfig(); payuConfig.setEnvironment(PayuConstants.PRODUCTION_ENV); payuConfig.setData(postData.getResult()); Intent intent = new Intent(this,PaymentsActivity.class); intent.putExtra(PayuConstants.PAYU_CONFIG,payuConfig); startActivityForResult(intent, PayuConstants.PAYU_REQUEST_CODE); } else { // something went wrong Toast.makeText(this,postData.getResult(), Toast.LENGTH_LONG).show(); }
To start off the integration process, you would be provided a test setup by PayU where you would be given a test merchant account and test credit card credentials to have a first-hand experience of the overall transaction flow. Here, you can make transaction request in our sample app (pointed to the testing server). Next step is to integrate the SDK code with your app. Once the testing is complete, you should be ready to point your app to the PayU production server for some real transactions.
Test credentials
Start with test key and salt (which targets the test server) to enable extra logs. Please use the following test account (only on test environment):
- key: gtKFFx
- Salt: eCwWELxi
Dummy test card
This will succeed only in the test environment. Also, all other cards (real or not) will fail on the test server.
- Name on Card: Any name
- Card Number: 5123456789012346
- CVV: 123
- Expiry Date: 05/2017
Its all about getting started with PayU integration in Android App. Best of Luck for you integration!


can you share running code for integration of payUmoney in testmode??
Great insights. You are posting this information in your blog the same information is not available in pay u site.
Hi, I need more information about how to implement pay u in Android apps. If there is an example code in Github or something like that, it would be very helpful to be notified.
Thank you.