
Migrate PostgreSQL on Linux server to AWS PostgreSQL RDS using Londiste (Skytools 2)
PostgreSQL is another SQL. It is the second most popular Structured Query Language after MySQL. The steps discussed in the blog can be used for any kind of migration of PostgreSQL. From on-premise to cloud or on-premise to on-premise or cloud to on-premise.
![]()
Use-case
I had to migrate my PostgreSQL running on an EC2 server to RDS PostgreSQL for production environment with NO to minimal downtime & NO data loss which occurs when we usually make a dump, restore it and change the DB host. I read about Londiste – A tool that makes that happen easily. So, you can follow these steps to migrate running PostgreSQL. in any environment. The thing to remember here is you don’t get a bash shell for AWS RDS. We will achieve this by connecting the production PosgreSQL to the AWS RDS PostgreSQL which is production live and then starting the replication. Once the production DB is in sync with AWS RDS DB we make the DB host change in our application.
Prerequisites
All steps are basically for Ubuntu but just with minimal changes it will work on any other OS. The postgreSQL version is 9.1 in my case. The packages you would need to download are:
- skytools – skytools-2.1.12.tar.gz — http://pgfoundry.org/frs/download.php/2872/skytools-2.1.12.tar.gz
- psgcpy – https://pypi.python.org/packages/source/p/psycopg2/psycopg2-2.6.1.tar.gz
- You can get the latest packages from pgfoundry.org
STEPS
1. Install Skytools by running the following commands:
[js]tar -xvf skytools-2.1.12.tar.gz
cd /usr/local/src/skytools-2.1.12
./configure –prefix=/opt/skytools-2.1.12 –with pgconfig=/usr/lib/postgresql/9.1/bin/pg_config
(/usr/lib/postgresql/9.1/bin/pg_config is the directory of postgreSQL config file and you can locate the file by using <strong>locate</strong> bash command)
make
make install [/js]
2. Install psycopg2 by running the following commands:
[js]tar -xvf psycopg2-2.4.2.tar.gz
cd psycopg2-2.4.2
python setup.py install –prefix=/usr/local
python setup.py build_ext –pg-config /usr/lib/postgresql/9.1/bin/pg_config[/js]
3. Now, change file permissions:
Give the postgres user (the user which automatically gets created when you install postgreSQL)
[js]chown -R postgres:postgres /opt/skytools-2.1.12
chown -R postgres:postgres /usr/lib/postgresql/9.1/ [/js]
4. Set paths:
Set the LD_LIBRARY_PATH & PYTHONPATH and start the two newly created clusters.
[js]export PYTHONPATH=/opt/skytools-2.1.12/lib/python2.6/site-packages/
export LD_LIBRARY_PATH=/usr/lib/postgresql/9.1/lib/:/usr/lib:/opt/perlbrew/perls/perl-
5.14.2/lib/5.14.2/x86_64-linux-gnu/CORE: [/js]
5. Edit the londiste.ini & pgqadm.ini Files in the below directory cd /opt/skytools-2.1.12/share/doc/skytools/conf”
Londiste provides us with some default docs and files. So, for ease of use we will edit the example file itself and use it. Londiste.ini should look something like below:
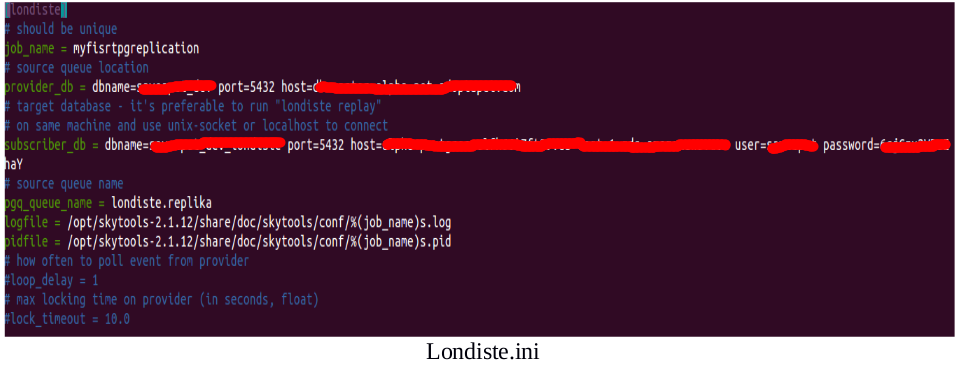 In provider(source) line: Enter provider_db details:
dbname=
port=5432 (For PostgreSQL)
host= (hostname of EC2 PostgreSQL server)
I have not entered the username and password for this DB server since the credentials are in the PostgreSQL conf file.
In subscriber(destination) line: Enter same set of details for subscriber_db.
Then enter log file locations of your choice. Make sure postgres user has access to the directory.
Now, lets edit pgqadm.ini in the same directory:
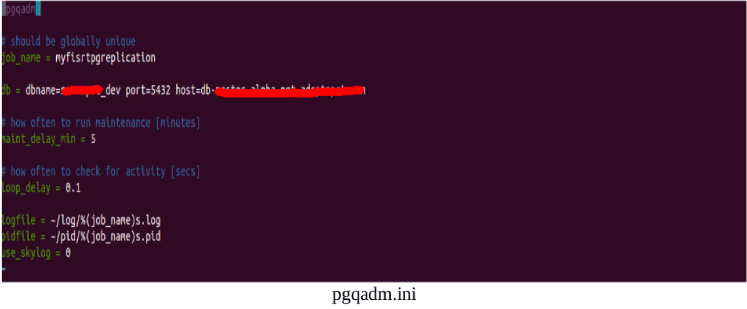
In this, enter details of source DB. I have kept the maint_delay_min to 5 minutes. Loop_delay should be least. It checks what has changed in the master in that interval of time and replicates onto the RDS Instance. You can reduce it.
One log & pid file will be in /opt/skytools-2.1.12/share/doc/skytools/conf
for Londiste.ini & the other set in /var/lib/postgresql/ /log & /pid folders. I Have kept 2 sets of log & pid files different data in both.
6. Now, install the ini file and for that cd into /opt/skytools-2.1.12/share/doc/skytools/conf/ directory
Also, just before that go to /opt/skytools-2.1.12/lib/python2.6/site-packages/skytools and increase the timeout in the file psycopgwrapper.py so that connection does not break if the host machine’s DB takes time to reply.
Install londiste.ini and install provider DB & subscriber DB( go to /opt/skytools-2.1.12/bin/)
We need londiste.ini file to validate the provider DB & the suscriber DB i.e. the destination DB, whether it is accessible or not.
[js]londiste.py /opt/skytools-2.1.12/share/doc/skytools/conf/londiste.ini provider install
londiste.py /opt/skytools-2.1.12/share/doc/skytools/conf/londiste.ini subscriber install[/js]
Note: Error may occur if the current server you are working on has no access to the provider DB host or subscriber host. So, first ensure connectivity using telnet from the server on host and port.
pgqadm.ini install and enable ticker:
[js]pgqadm.py /opt/skytools-2.1.12/share/doc/skytools/conf/pgqadm.ini install
pgqadm.py /opt/skytools-2.1.12/share/doc/skytools/conf/pgqadm.ini ticker -d
londiste.py /opt/skytools-2.1.12/share/doc/skytools/conf/londiste.ini replay -d
pgqadm.py /opt/skytools-2.1.12/share/doc/skytools/conf/pgqadm.ini status[/js]
Note: “-d” option is to run the londiste/PgQ daemons in background.
Status can be checked using the last command the status one.
The daemon can be stopped using:
[js]londiste.py /opt/skytools-2.1.12/share/doc/skytools/conf/londiste.ini replay -s[/js]
and started again using -d switch in place of -s
(But if you kill the daemon process & If this throws error In-case you stop/start/restart the server or process you might need to delete the pid files before starting the ticker & replay daemon again. Delete the pid file in /var/lib/postgresql/pid/myfisrtreplication.pid)
Also, you will have to Repeat step 2 & step 4.
7. Initiating Replication
Add tables and start replication, for example in the following command table name family_nicknames is added:
[js]londiste.py /opt/skytools-2.1.12/share/doc/skytools/conf/londiste.ini provider add
family_nicknames
londiste.py /opt/skytools-2.1.12/share/doc/skytools/conf/londiste.ini subscriber add
family_nicknames[/js]
Once a table is added, the table will be copied and also all future changes made will automatically replicate in the RDS from the master DB. To replicate all use:
[js]londiste.py /etc/skytools/conf.ini provider add –all (adding all tables on provider for replication)
londiste.py /etc/skytools/conf.ini subscriber add –all (adding all tables on subscriber for replication) [/js]
8. The replication starts. You can check the logs at:
/opt/skytools-2.1.12/share/doc/skytools/conf then tailf myfisrtpgreplication.log
and
/var/lib/postgresql/log/myfisrtpgreplication.log
9. You can check the replication by logging in to RDS:
[js]psql –host abcd-postgres.xyz1234567.us-east-1.rds.amazonaws.com –username=dev[/js]
To test, you can make a few changes to a table in the master or provider DB & then add the table for replication & then go to the RDS PostgreSQL and check if the changes are replicated or not. Later once all the replication is complete (check logs) you just need to change the DB endpoint to AWS RDS endpoint
This is very useful when it comes to migration of on-premise applications with DB to AWS as a matter of fact any cloud platform. Hope this has been useful to you.


Not able to follow skytool installation step.
pgsql-9.3/lib/pgxs/src/makefiles/pgxs.mk: No such file or directory :No such file or directory… I am on CentOS 6.7.