
Real-time transactional messaging in Adobe Campaign Classic: A complete guide
In today’s world, everyone expects instant communication, whether it’s a password reset, purchase confirmation, welcome message, or money credited/debited message and here transactional messages play a crucial role to deliver them instantly and increase customer experience. Adobe Campaign Classic has a specially designed campaign module called “Message Center” to manage and trigger messages generated from events by external systems either via an Email or SMS or Push Notification or any other channel.
What is Real Time-Transactional Messaging?
These are event-driven automated messages triggered by some actions in real time. These messages have high open rates and are mostly used for order updates & account notifications and not for any promotional content because it defines client-customer relationships.
Message Center Architecture
In Adobe Campaign Classic, Message Center is made up of 2 instances:
- Control Instance: This is where events and message templates are created and used to generate message previews using seed list and to monitor execution instances.
- Execution Instance: This is where events are received and linked to transactional messages to deliver personalized messages to each recipient.
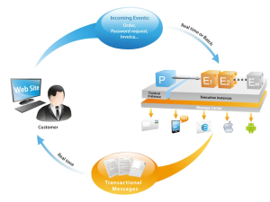
Message center architecture
Use Case
Let’s take an example of an online retail company that wants to send a welcome email immediately after a customer signs up on their website. To start this, we need to follow the steps below:

Steps to Implement in ACC:
- Create an Event Type:
a. Go to Administration > Platform > Enumerations in Campaign Explorer in Control Instance and open Event Type from the list.
b. Create an Event type such as “Welcome_TTN” and restart the instance.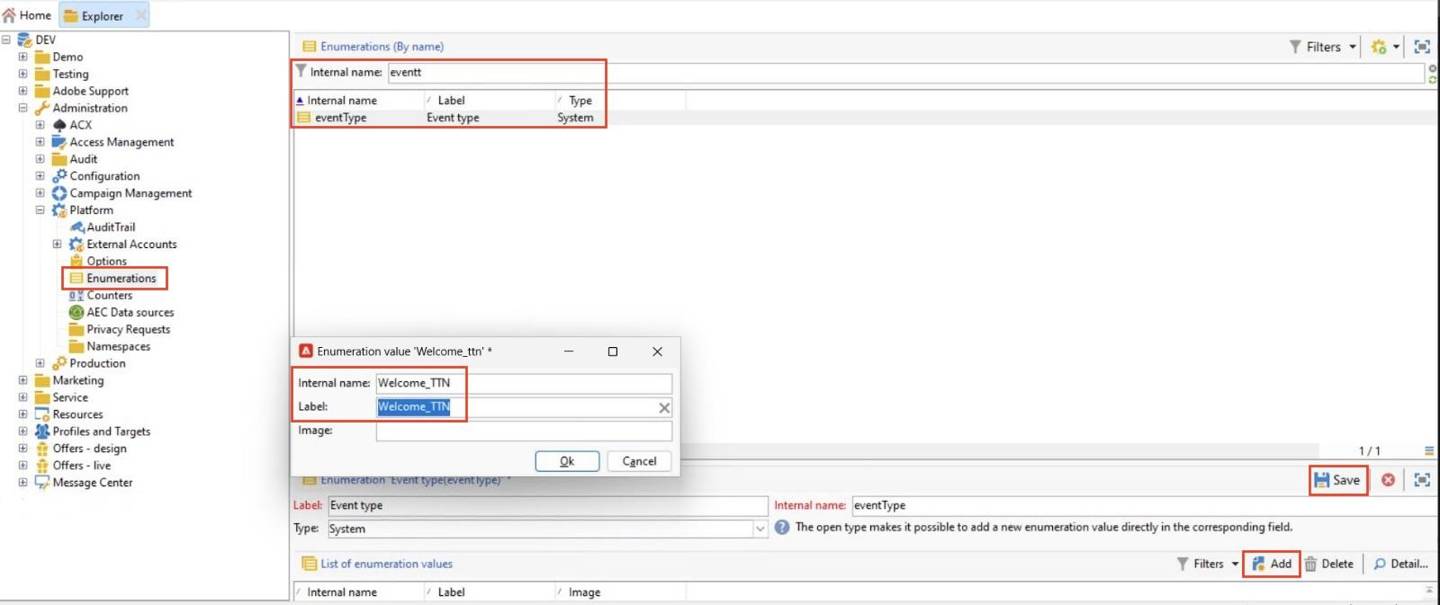
Adding Event Type
- Create and Design Message Template:
a. Go to Message Center > Transactional Message Templates in Explorer and create a new template.
b. Select a suitable delivery template such as Email or SMS and fill out the Label and select your Event Type from the drop-down list i.e. “Welcome_TTN”.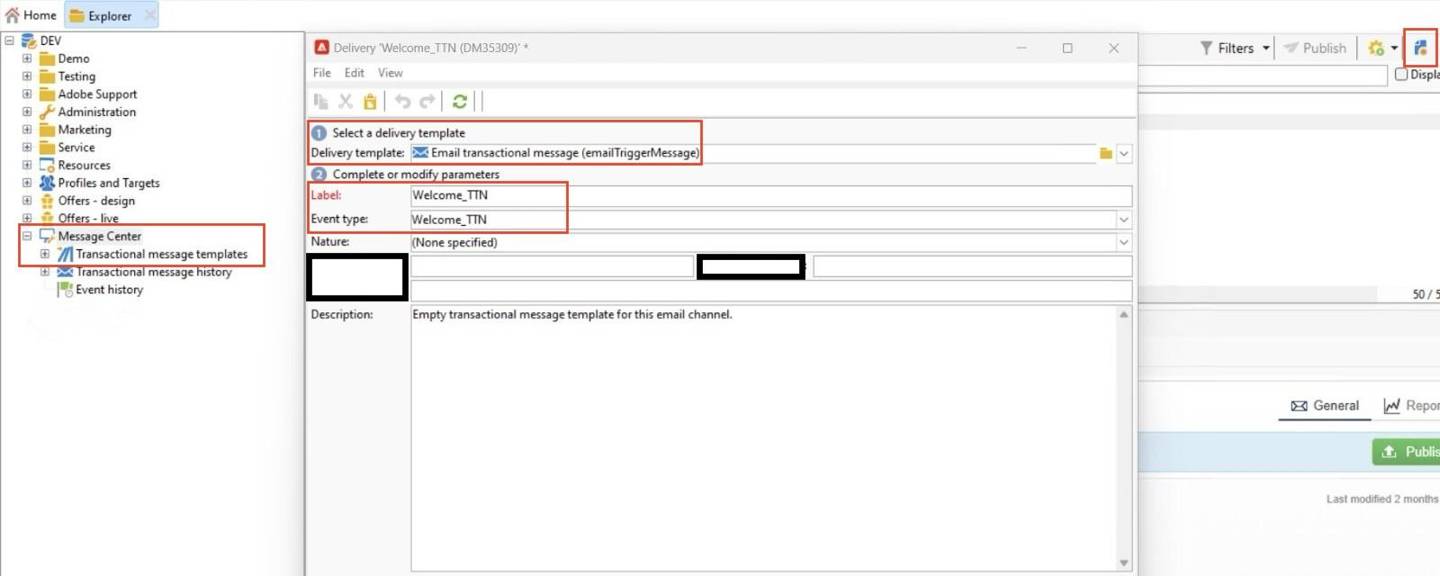
Creating Real time Transactional Delivery
c. Add your From Address Label, Subject line, and HTML content (in the source tab below) and update the Internal Name following the camelcasing method.
d. Add personalization if required using the Real-time events > Event XML tag and save your content.
Note: Always follow best practices while creating your deliveries or workflows like using camel-casing in internal naming convention or filling out description fields so that every other campaign user can understand it etc.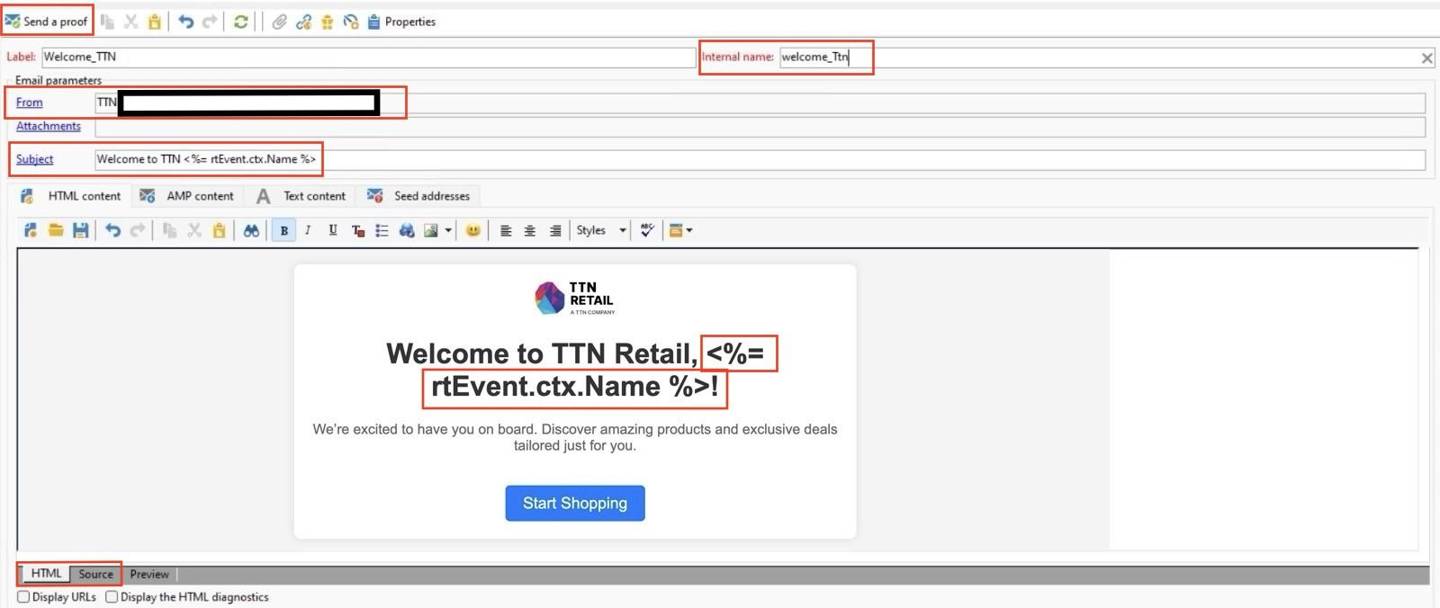
Inside Delivery Template like Personalization and Subject line etc.
Note: Here in the above image, “rtEvent.ctx.Name” is a personalization field labelled as “Name”. Using this way, we can add multiple fields as required if they are included in the API payload.
- Test the Message: You can test your transactional messages either via Seed List or Send a Proof or SOAP UI. We’ll follow the Send a Proof method here.
a. Click the Send a Proof button in the delivery window at the top left.
b. Fill in your email address and CTX personalization fields and values as required in the template.
c. Analyze the delivery and hit Confirm Delivery if no errors are available.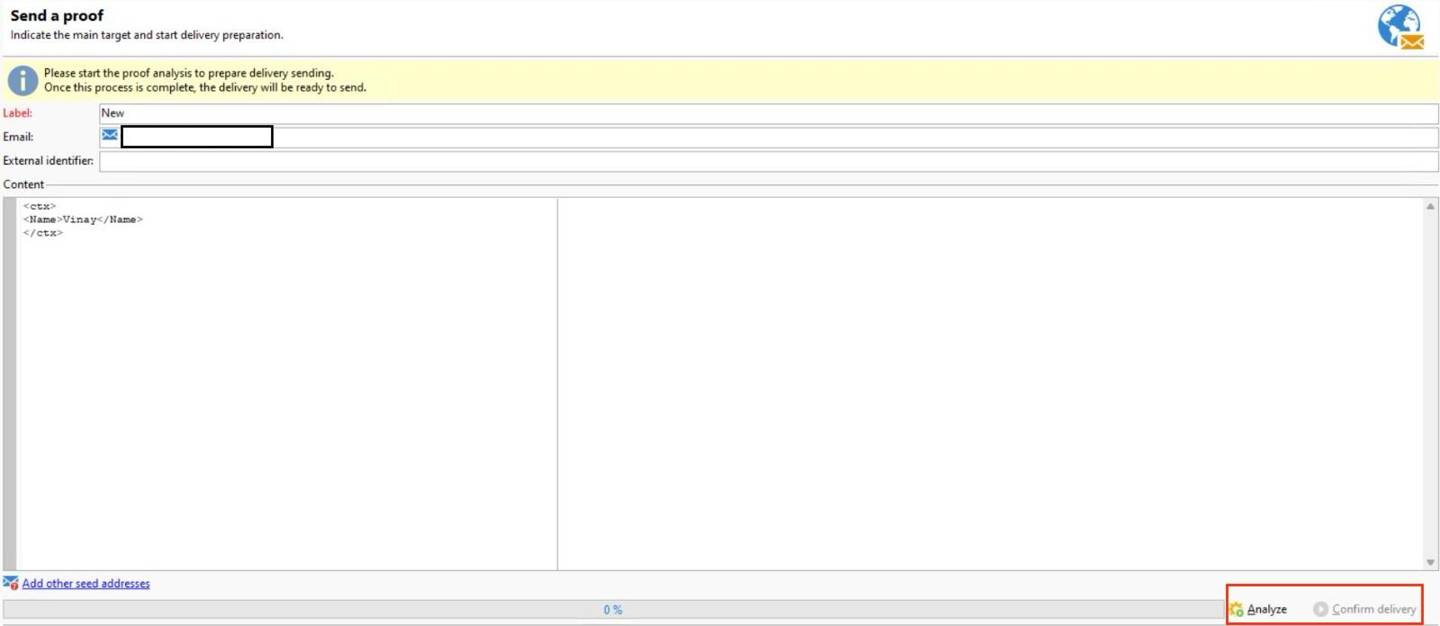
Send a Proof
Note: Below is a sample SOAP request too to trigger the message from the system.
<soapenv:Envelope xmlns:soapenv="http://schemas.xmlsoap.org/soap/envelope/" xmlns:urn="urn:nms:rtEvent">
 <soapenv:Header/>
 <soapenv:Body>
  <urn:PushEvent>
   <urn:sessiontoken>?</urn:sessiontoken>
   <urn:domEvent>
    <rtEventtype="Welcome_TTN" email="vishal.dabas@tothenew.com" wishedChannel="email">
     <ctx>
      <Name>Vinay</Name>
     </ctx>
    </rtEvent>
   </urn:domEvent>
  </urn:PushEvent>
 </soapenv:Body>
</soapenv:Envelope>
d. Check your Inbox and check the message delivered with all required values and content.
Note: Proofs of delivery summary can be accessed in each template’s Audit tab.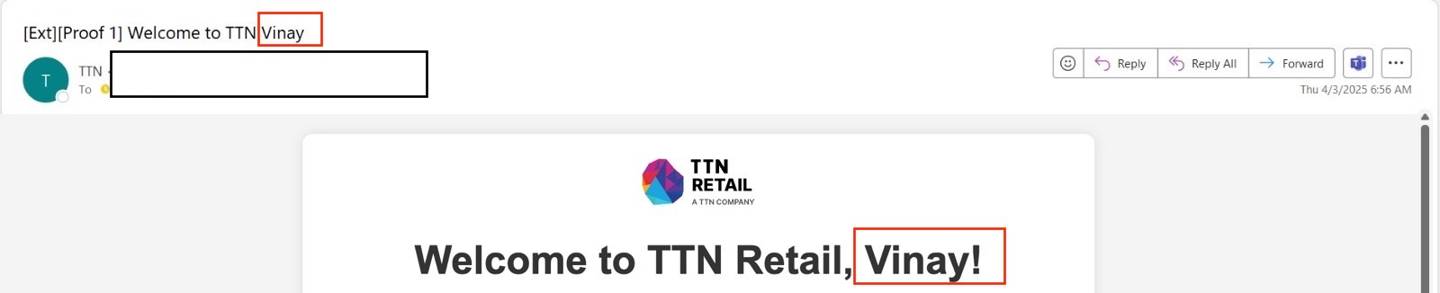
Proof
- Publish the Message Template:
a. Go to Message Center > Transactional Message Templates in Explorer and select the template you want to Publish.
b. Click Publish and it will be published or LIVE on Execution Instance.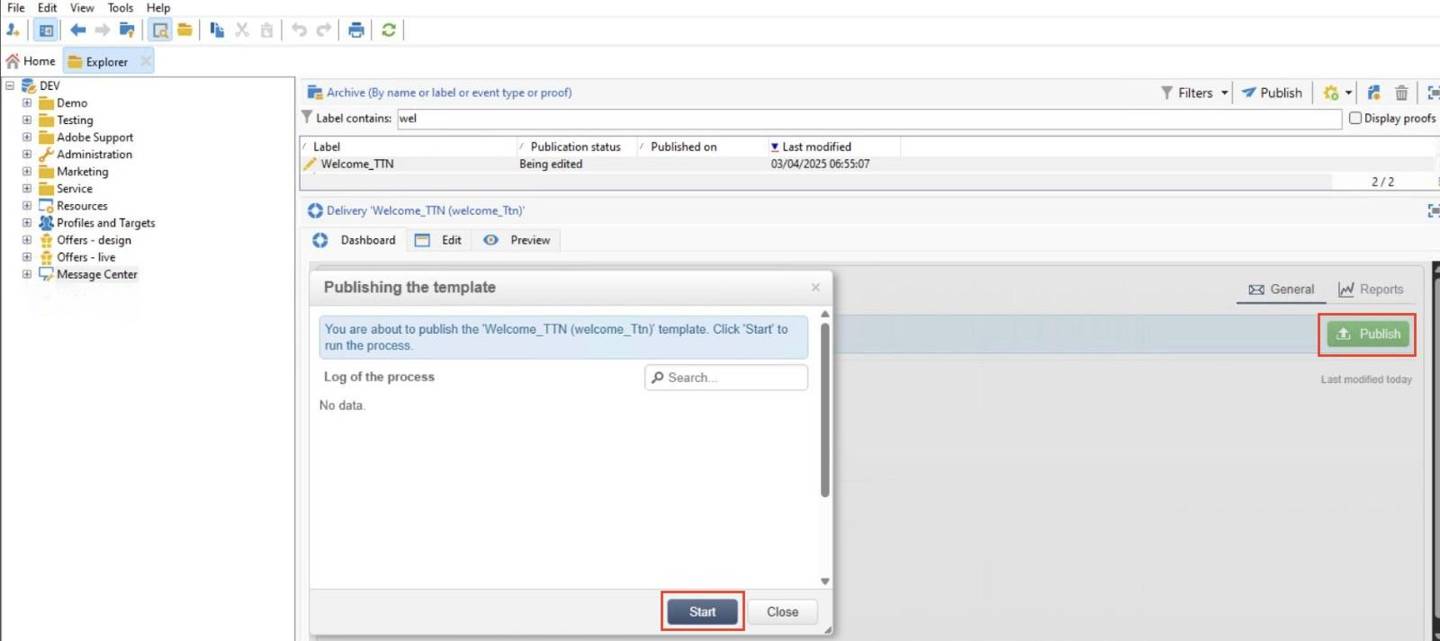
Publishing
c. Once a template is published, if the corresponding event is triggered, the execution instance will receive the event then it will link it to the transactional template and send the corresponding transactional message to each recipient.
Note: If a template is not required anymore, you should Unpublish it so that whether events of that template are running or not, customers won’t receive the messages.
Other Use Cases
- An online retail company wants to send a personalized order confirmation email immediately after a customer completes a purchase on their website.
- A Banking Client wants to send each transaction Email/SMS completed by a customer in real time.
- A Retail company wants to send a reminder email to customers who have left some items in their carts.
Conclusion
Real-time messaging using Adobe Campaign Classic is a powerful capability that helps businesses to engage with customers with timely, personalized and relevant messages. And using their multi-channel support, Brands can enhance the experience of customers and grow their business. Implementing Real-time transactional messages requires careful planning, integration, and continuous optimization to achieve better results.
