Rolling Node Replacement: The Safest Way to Upgrade Kubernetes
Introduction
What if upgrading your Kubernetes cluster required no downtime at all?
Imagine if you could upgrade your Kubernetes cluster and keep everything running smoothly, with zero downtime. Sounds pretty great, right? A lot of teams worry that upgrading will mean their apps go offline, but with solid planning, it’s actually possible to have safe and totally disruption-free upgrades.
Kubernetes upgrades are basically swapping out your old nodes or cluster version to grab security patches, better performance, and support for newer APIs. Staying up-to-date matters — old nodes open the door to vulnerabilities, outdated features, and flaky workloads.
Here’s what you’ll get from this blog:
- What a Kubernetes node upgrade actually is
- Why upgrades matter in production
- How pros handle upgrades, step-by-step
- Upgrading clusters without node groups or Karpenter
- Tips for true zero-downtime upgrades
What Is a Kubernetes Node Upgrade?
So, what is a Kubernetes node upgrade? It’s about replacing old worker nodes with ones running the latest OS image, Kubernetes version, or security fixes. Instead of poking at nodes in place, production setups use a rolling replacement: add new nodes, shift workloads, and remove old nodes. This keeps your apps up and running through the whole upgrade.
Why upgrade?
- Patch security holes
- Avoid broken APIs
- Boost performance and reliability
- Stay compatible with tools and add-ons
- Keep your vendor support intact
Skipping upgrades? That just sets you up for headaches down the line.
Upgrade Architecture Flow
Let’s look at the upgrade flow you’d follow in a real production environment: EKS Upgrade Flow
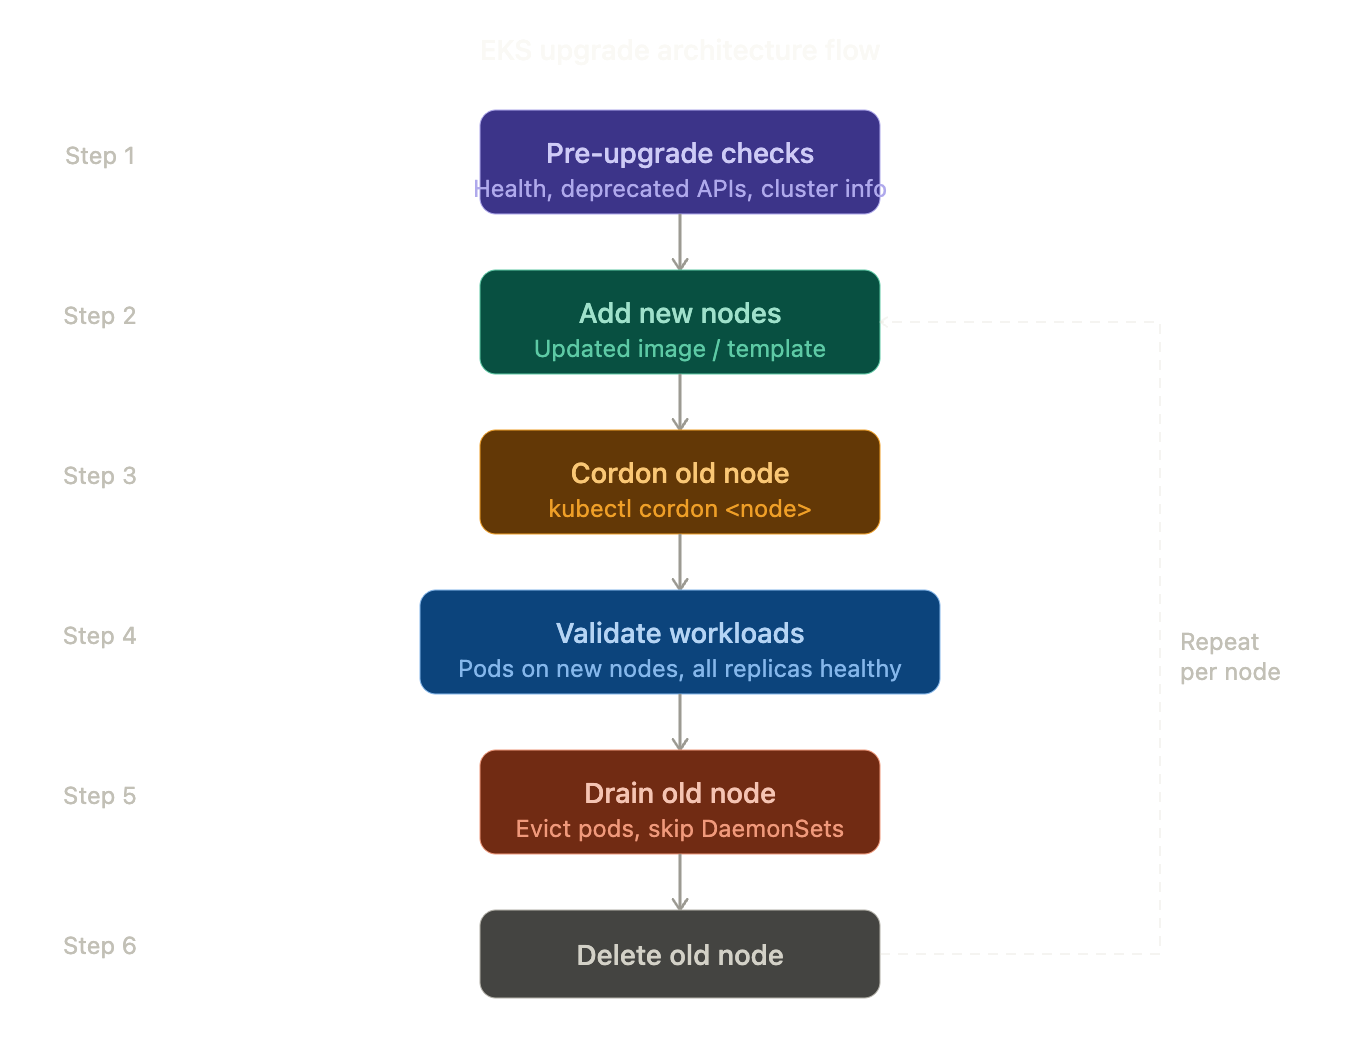
eks_upgrade_flow
Pre-Upgrade Checklist
1. Verify Cluster Health
| kubectl get nodes kubectl get pods -A |
All nodes must be ready.
2. Spot Deprecated APIs (tools like Pluto help)
| pluto detect -A |
If Pluto reports deprecated APIs, fix them before upgrading.
3. Write Down Your Cluster’s Details
| aws eks describe-cluster –name <cluster> |
Record:
- Endpoint
- Certificate
- CIDR
- Cluster name
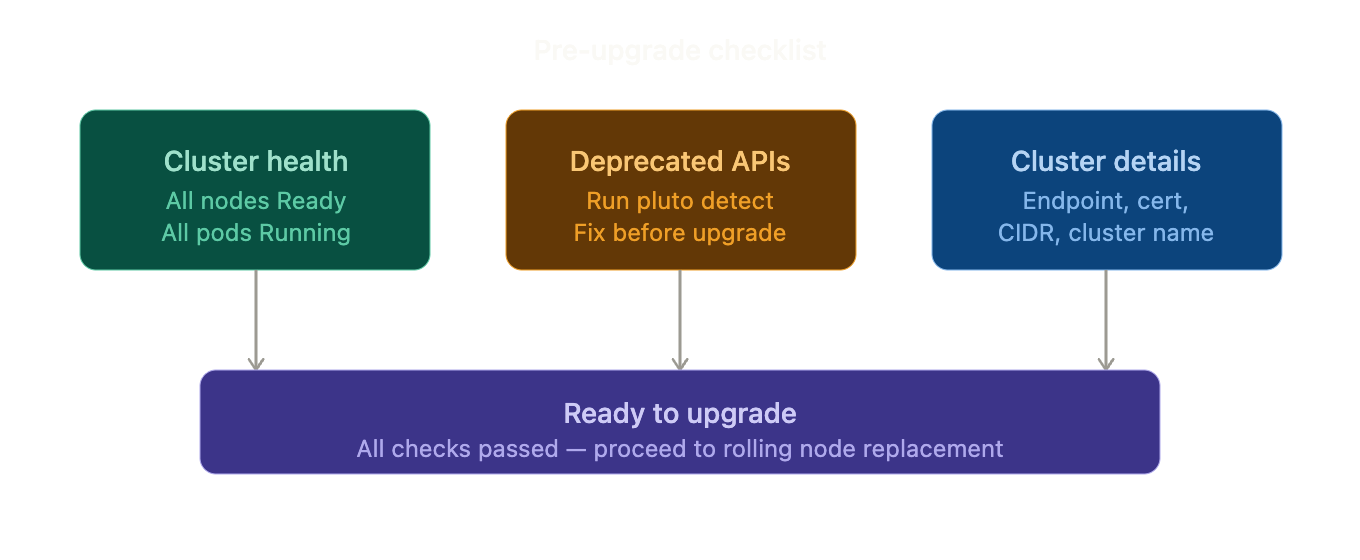
pre_upgrade_checklist
Universal Upgrade Method (Works Everywhere)
This method works for:
- Managed node groups
- Self-managed nodes
- Bare-metal clusters
- Clusters without autoscalers
Step 1 – Add New Nodes
Create new nodes using the updated image/template.
| kubectl get nodes |
Wait until they show Ready.
Step 2 – Stop Scheduling on Old Node
| kubectl cordon <node> |
Step 3 – Validate New Nodes
Restart one deployment:
| kubectl rollout restart deployment <app> |
If pods start successfully → continue.
Step 4 – Validate Workloads Before Draining (Critical Step)
Check where pods are running:
| kubectl get pods -o wide |
Ensure:
- Pods are running on new nodes
- All replicas are healthy
- No pods are pending
- Applications are accessible
Never drain until workloads are confirmed healthy on new nodes.
Step 5 – Drain the Old Node
Now safely evict pods:
| kubectl drain <node> –ignore-daemonsets –delete-emptydir-data |
This command:
- Evicts running pods
- Reschedules them on available nodes
- Skips DaemonSets (CNI, kube-proxy, etc.)
Evict pods so they get rescheduled on available nodes. DaemonSets (like CNI and kube-proxy) aren’t touched. Wait for the drain command to finish.
Step 6 – Validate After Drain
| kubectl get pods -A kubectl get events –sort-by=.metadata.creationTimestamp |
Confirm:
- No CrashLoopBackOff pods
- No scheduling failures
- No Pending workloads
Step 7 – Remove Old Node
| kubectl delete node <node> |
Terminate the underlying VM if required.
Step 8 – Repeat
Repeat for the remaining nodes until all are upgraded.
Golden Rule for Production Upgrades
Add capacity → Validate workloads → Drain → Validate again → Delete node
Skipping validation is the most common cause of upgrade-related downtime.
Zero Downtime Requirements
To avoid downtime during the upgrade:
- Minimum 2 replicas per deployment
- Readiness probes configured
- PodDisruptionBudget enabled
- Extra cluster capacity available
Common Mistakes to Avoid
- Upgrading nodes before the control plane
- Draining all nodes together
- Ignoring deprecated APIs
- No spare capacity
- No rollback plan
Rollback Strategy
If something breaks:
- Create nodes with the previous image
- Cordon new nodes
- Drain new nodes
- Delete new nodes
This safely restores the previous state.
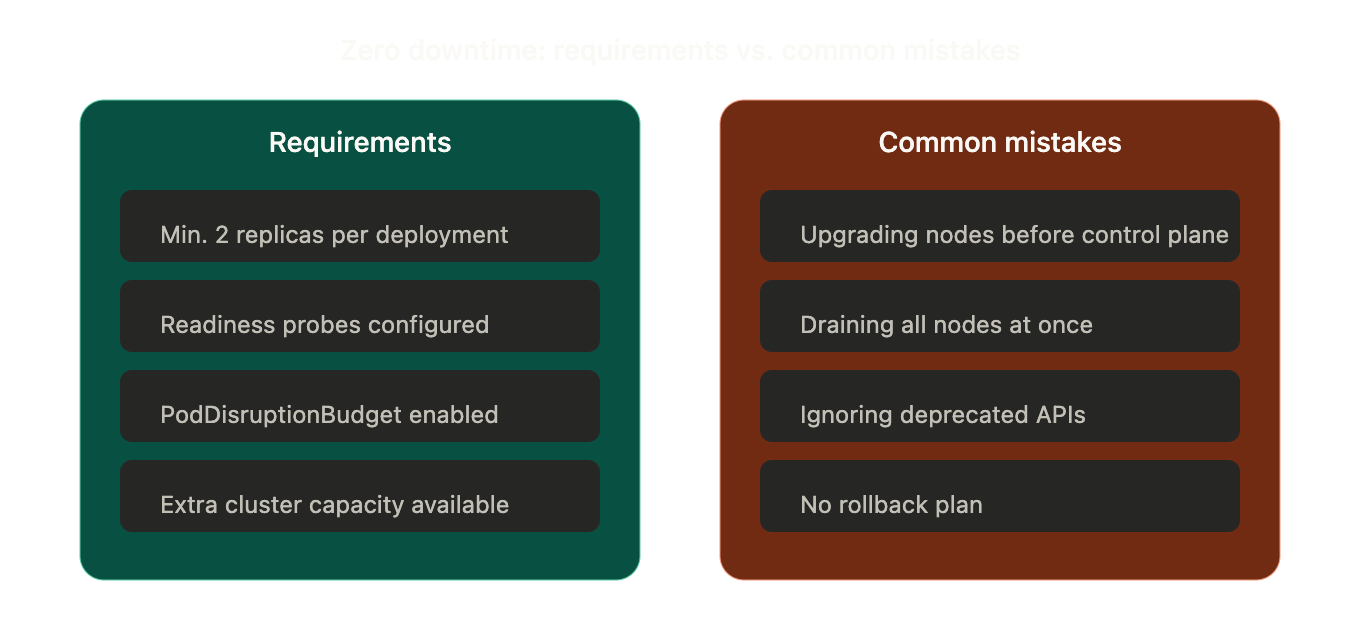
zero_downtime_requirements_vs_mistakes
Conclusion
In the end, Kubernetes upgrades shouldn’t keep you up at night. With rolling replacements, you can upgrade with confidence and no downtime, whether you rely on node groups, autoscalers, or manage infrastructure the old-fashioned way.
Key takeaway: Always add new nodes, migrate workloads, and then delete the old ones. Never try upgrading everything all at once.