Introduction
In modern application development, DynamoDB has emerged as a robust choice for managing NoSQL databases in the cloud. However, developers often need a local environment for testing, debugging, and even offline development. This blog will dive into setting up DynamoDB locally within a Java Spring Boot application, enabling seamless development and testing workflows.
Prerequisites
Before we embark on our journey, ensure you have the following prerequisites:
- Basic understanding of Java Spring Boot.
- JDK is installed on your machine.
- Maven or Gradle for dependency management.
Two Paths to Setup DynamoDB locally:
- Using DynamoDB Local: DynamoDB Local is a downloadable version of DynamoDB that enables you to develop and test applications without connecting to the actual DynamoDB web service. It’s particularly useful for local development and testing scenarios where you want to simulate DynamoDB functionality without incurring costs or requiring internet access.
- Utilizing NoSQL Workbench: Alternatively, developers can opt for NoSQL Workbench, a graphical tool provided by AWS. This approach offers a user-friendly interface for managing DynamoDB tables and data, making it suitable for those who prefer visual interaction or are new to DynamoDB.
Java Springboot Configurations:
Before starting, please set up the configuration below in your Java Springboot project for dynamoDB.
- Add AWS SDK dependency to your Java Spring Boot project:
- To interact with DynamoDB in your Java Spring Boot application, you need to include the AWS SDK for DynamoDB as a dependency in your project’s configuration file (pom.xml for Maven or build.gradle for Gradle).
- Example: pom.xml (Add below Dependency in your Spring project)
<dependency>
     <groupId>com.amazonaws</groupId>
     <artifactId>aws-java-sdk-dynamodb</artifactId>
     <version>1.12.656</version>
</dependency>
- Configure the DynamoDB client in your Spring Boot application:
- After adding the SDK dependency, you need to configure the DynamoDB client in your Spring Boot application to connect to the locally running instance. This involves specifying the endpoint configuration for DynamoDB.
- Configure DynamoDB in the Springboot application as below:
AWSDynamoDBConfig.java
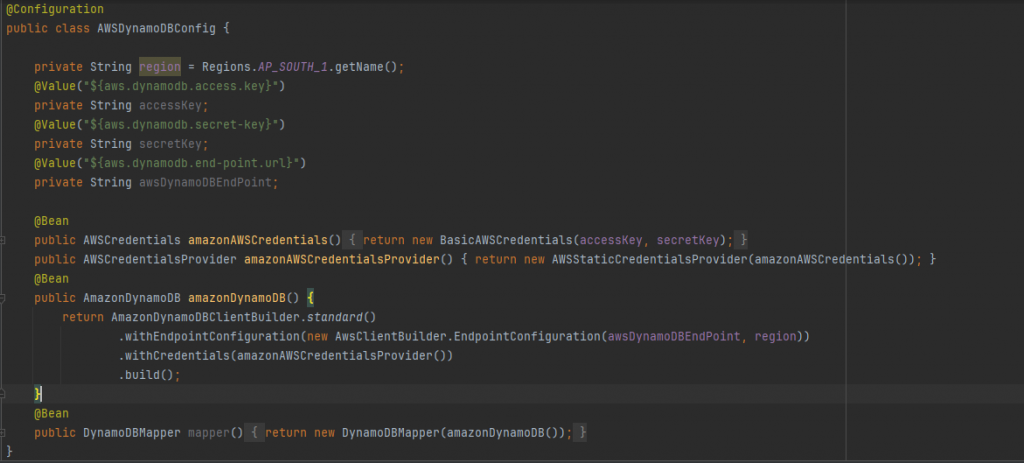
-
- application.properties (Add any Dummy data in access-key and secret-key)

Now that the configuration is complete, let’s set up DynamoDB locally.
1. Using DynamoDB Local
Setting up with the DynamoDB Local:
- Download DynamoDBLocal.jar:
- Visit the AWS documentation page or GitHub repository to download the latest version of DynamoDBLocal.jar. or download it from here
- Save the JAR file to a directory on your local machine and extract the contents.
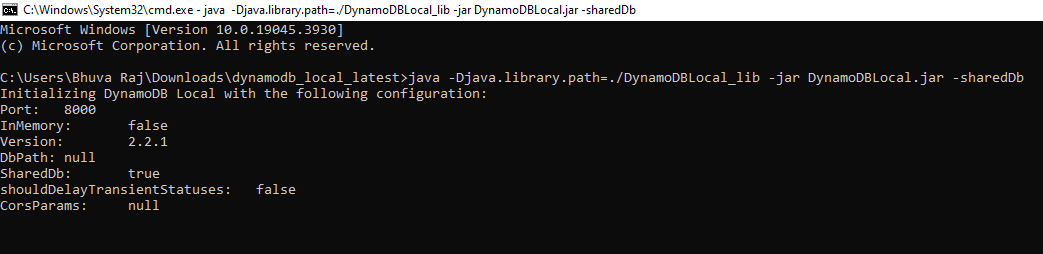
- Start DynamoDB Local:
- Open your terminal or command prompt.
- Navigate to the directory where you saved DynamoDBLocal.jar contents.
- Run the following command to start DynamoDB Local:
java -Djava.library.path=./DynamoDBLocal_lib -jar DynamoDBLocal.jar -sharedDb
-
- Here, -Djava.library.path=./DynamoDBLocal_lib sets the path to the native libraries required by DynamoDB Local.
- -jar DynamoDBLocal.jar -sharedDb starts DynamoDB Local with a shared database, allowing multiple connections.
- AWS credential configuration:
- The next step is to run “$ aws configure” in the terminal. If you already have the credentials, simply press Enter. If you don’t have the credentials, you’ll need to provide the following details: (Add any Dummy data in access-key and secret-key) :
- AWS Access Key ID
- AWS Secret Access Key
- Default region-name
- Default output format

- Interact with DynamoDB using the AWS SDK:
- With the Server started and AWS (dummy)credential configured, you can now interact with DynamoDB within your Spring Boot application or AWS command-line interface. This includes performing CRUD operations, querying and scanning tables, and any other operations your application requires.
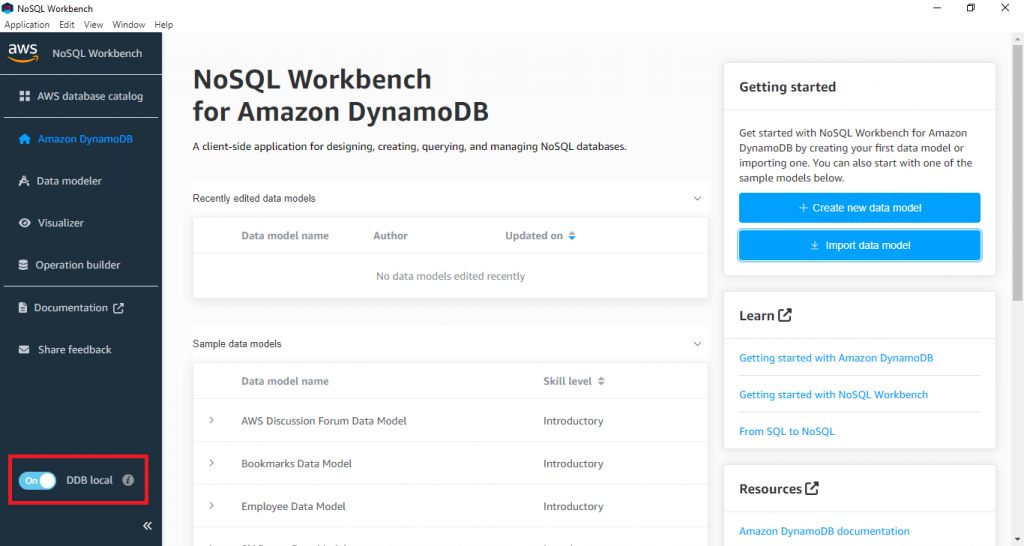
2. Utilizing NoSQL Workbench
- Download and install NoSQL Workbench:
- NoSQL Workbench is a graphical tool provided by AWS for interacting with DynamoDB. You can download and install it from the AWS website.
- Start DDB local in WorkBench:
- As Shown below, start the DDB local server at the same port no described(8000) in the Java application.
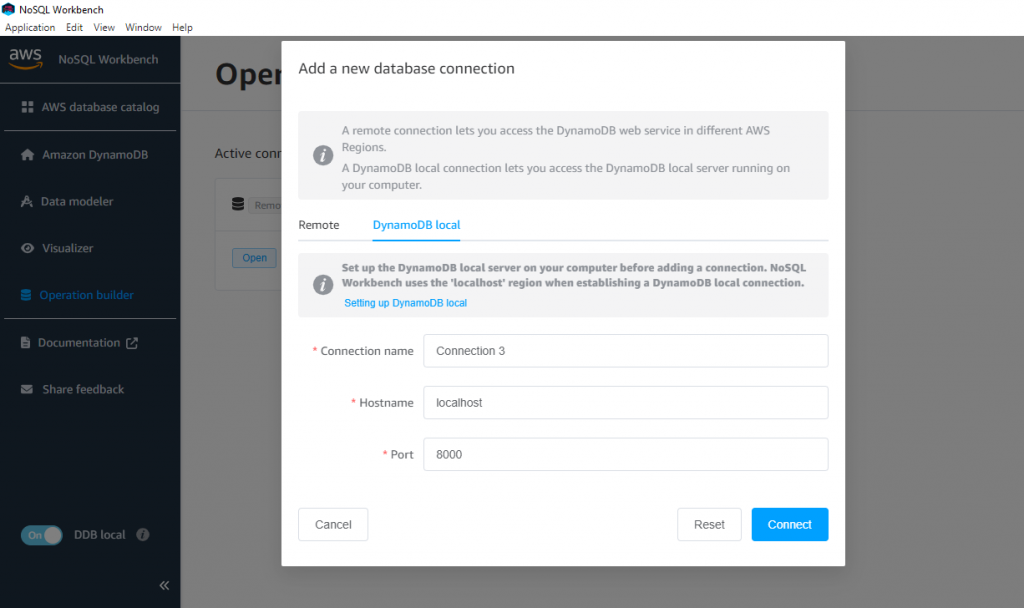
- Configure a new connection to a local instance of DynamoDB:
- Once DDB local starts, open the operation builder and configure a new connection to a local instance of DynamoDB. Provide the endpoint and port for your locally running DynamoDB instance.
- Use NoSQL Workbench’s graphical interface:
- With the connection configured, you can now use the NoSQL Workbench graphical interface for managing DynamoDB tables, inserting and updating data, running queries, and analyzing performance. You can also interact with DynamoDB within your Spring Boot application. You can create, edit, and delete tables, as well as perform advanced operations such as batch writes and exports.

Conclusion
In conclusion, both DynamoDB Local and NoSQL Workbench provide convenient ways to set up DynamoDB locally for development and testing. Whether you prefer the command-line interface of DynamoDB Local or the graphical interface of NoSQL Workbench, you can select the method that aligns best with your workflow and development requirements.
Check out our other blog posts for more insights. If you still have questions, comment and join the discussion.