
Setting up SMTP Server with GUI for Testing purpose
Setting up SMTP server with GUI is needed for testing emails in applications. This setup not only prevents the mails from delivering to the email addresses but also sends the emails to invalid email addresses.
I have come up with a scenario where I have to setup an SMTP server for the testing purpose in the development environment. This requires the web application to be configured, so that the developers and testers could test their application by sending email to different people. Previously, they were using Gmail account to send the emails. The emails were either delivering to the same email account or they have to login to different receiver email account to check if the mail is delivered successfully. To handle this scenario, GUI was required along with a fake SMTP server so that all the sent emails can be gathered at a central place.
The solution was to set up an SMTP server with following added advantages:
- GUI console for aggregating all send emails.
- Simple and easy to set up on developer’s machine.
- Simple and easy to configure.
- Open source and free of cost.
- Preferably available cross-platform.
- To be set up on a local network to avoid any network related issues.
There are many open source fake SMTP servers that are available in the market which are designed for unit and system testing to send emails. Some popular fake SMTP servers are:
- Greenmail
- MailDev
- FakeSMTP
- Dumbster
In my blog, I will brief you about Greenmail and MailDev SMTP servers. These are easy to setup and configure.
Greenmail:
- It is an open source, intuitive and easy-to-use test suite of email servers for testing purposes.
- It supports different protocols like SMTP, IMAP and POP3.
- It can be easily integrated into JUnit Tests.
- It provides the different ways for setup: running jar as a standalone JVM process, running war as a WAR module , running container from a docker image or running as a JBOSS service.
- The JBOSS service provides you with a GUI while the other two set up process don’t provide a GUI.
Docker image:
- It also provides a preconfigured docker image to launch the service as a standalone application. The docker container will launch the standalone greenmail application and it will be working on the following ports:
- SMTP port: 3025
- SMTPS port: 3465
- IMAP port: 3143
- IMAPS port: 3993
- POP port: 3110
- POP3s port: 3995
- The ports can be mapped across the host and the docker container so that the application can start using the protocols.
- The following commands can be used to launch the docker container as a standalone application:
docker pull greenmail/standalone:1.5.2
docker run -t -i -d -p 3143:3143 -p 3025:3025 -p 3110:3110 -p 3995:3995 -p 3465:3465 -p 3993:3993 greenmail/standalone
- It will run the docker container and will provide you with a container id.
JBOSS service:
- The application can be integrated with JBOSS application server. Each developer will have its own local mail server and thus the emails will not be sent to the recipient addresses.
- The JBOSS service also provides you with a JMX console which will be integrated with greenmail plugin.
- To set up the application as a JBOSS service, you need to install JBOSS version 6 into your host.
- To install JBOSS 6 on the host follow the below steps:
- Download the JBOSS 6 zip file from the source.
- Unzip the downloaded zip file into /usr/local directory.
- Install jdk version 7 onto the host.
- Create directory greenmail-jboss-service.sar at $JBOSS_HOME/server/default/deploy
- Download the greenmail sar from http://www.icegreen.com/greenmail/#download
- Unjar the sar at $JBOSS_HOME/server/default/deploy/greenmail-jboss-service.sar
- Execute the script run.sh present at /usr/local/jboss/bin with parameter -b 0.0.0.0
- To execute the above steps, run the following commands:
wget -O ~/jboss-as-distribution-6.0.0.Final.zip http://sourceforge.net/projects/jboss/files/JBoss/JBoss-6.0.0.Final/jboss-as-distribution-6.0.0.Final.zip/download
unzip ~/jboss-as-distribution-6.0.0.Final.zip -d /usr/local/
mkdir /usr/local/jboss/server/default/deploy/greenmail-jboss-service.sar
cd /usr/local/jboss/server/default/deploy/greenmail-jboss-service.sar
cd ..
wget /usr/local/jboss/server/default/deploy/greenmail-jboss-service.sar
unzip /usr/local/jboss/server/default/deploy/greenmail-jboss-service.sar -c /tmp/
cp /tmp/greenmail-jboss-service.jar /usr/local/jboss/server/default/deploy/greenmail-jboss-service.sar/
sudo add-apt-repository ppa:webupd8team/java
sudo apt-get update
sudo apt-get install oracle-java7-installer
./usr/local/jboss/bin/run.sh -b 0.0.0.0
- After setting up the JBOSS service, the JMX console will open at port 8080 http://localhost:8080/jmx-console/
- The jmx-console will be opened as shown:
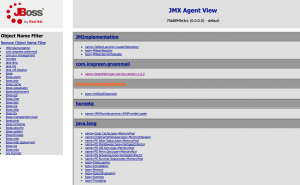
JMX console JBOSS
- Click on name=GreenMail,type=service,version=1.5.2
- A new console will be opened as shown:
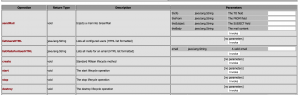
- Here under sendMail you can specify theTo, theFrom, theSubject and theBody to send emails.
- Under listMailsforUserHTML you can retrieve the email addresses by entering the email.
- You can configure your application to send emails using JBOSS SMTP protocol and retrieve them using the jmx-console.
The one cons of using Greenmail was to set up the JBOSS environment for sending the emails and retrieving them using the GUI. MailDev email server helps us in this situation by providing a docker image and binding them automatically to the host ports.
MailDev
- MailDev is an another SMTP server which can be used for testing purpose.
- It provides an easy to use web interface that runs on your machine.
- It allows us to send and receive emails with attachments.
- The emails will not be delivered to the recipient addresses and will be aggregated at a central place.
- It also provides a command line interface for configuring SMTP applications.
- MailDev can be set up using node js and docker image.
- To install docker image and running docker container, run the followig commands:
- docker pull djfarrelly/maildev
- docker run -p 1080:80 -p 1025:25 djfarrelly/maildev
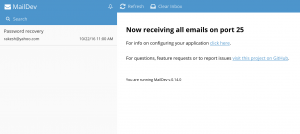
- After running the container, the MailDev application will start running.
- SMTP will be running on port 1025 of your host.
- Web UI will be running on 1080 port of your host.
- All send emails via SMTP will be aggregated and can be viewed in the console.
- The GUI will look as follows:
There are many such SMTP tools available in the market which are used for testing purposes. I started with the aim of setting up such an SMTP server with a GUI console and didn’t need the mails to be in relay. You can use either of the above tools or any other popular tool depending upon your use case.


nothng