
Understanding Kubernetes Architecture and Setting up a Cluster on Ubuntu
As we discussed previously “what is Kubernetes” and “what are the benefits of this orchestration tool”. So, if you are wondering what Kubernetes is, for a better understanding, see getting started with kubernetes. Now, in this blog we are here to discuss about running Kubernetes cluster on bare-metal.
In order to have better understanding of the architecture we decided to deploy Kubernetes on bare-metal. Before setting up Kubernetes on bare-metal, we will discuss the architecture of Kubernetes. In the previous blog, we have discussed the basic term that what is master node,pods, kubectl, etc. and some generally used commands, so let’s have a deep dive on the architecture.
Kubernetes Architecture
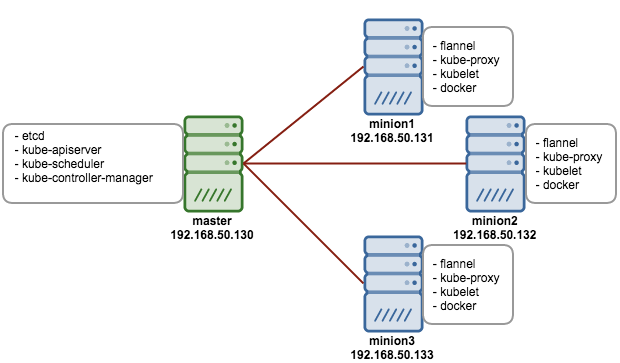
Master Node Architecture
Etcd: It is an open source key-value store developed by CoreOs team. Kubernetes uses ‘Etcd’ to store the configuration data accessed by all nodes (minions and master) in the cluster.
Kube-ApiServer: The Kubernetes api-server generally validates the configuration data store in ‘Etcd’ and the details of the deployed container that are in agreement. It also provides a RESTful interface to make communication easy.
Kube-Schedule Server: It is responsible for assigning task to minions in the cluster.
Kube-Controller-Manager: It is generally responsible for handling the cluster level function such as replication controller. Whenever the desired state of the cluster changes it is written to Etcd and then the controller manager tries to bring up the cluster in the desired state.
Minion Node Architecture
Docker: One of the basic requirement of nodes is Docker. Docker is responsible for pulling down and running container from Docker images. Read here for more information on docker .
Kube-Proxy: Every node in the cluster runs a simple network proxy. Using proxy node in cluster routes request to the correct container in a node.
Kubelet: It is an agent process that runs on each node. It is responsible for managing pods and their containers. It deal with pods specifications which are defined in YAML or JSON format. Kubelet takes the pod specifications and checks whether the pods are running healthy or not.
Flannel: It is an overlay network that works on assigning a range of subnet address. It is used to assign IPs to each pods running in the cluster and to make the pod-to-pod and pod-to-services communications.
Setup Kubernetes on Ubuntu (Bare-metal)
Prerequisites for each server:
- Linux Bridge utils Package [To install : sudo apt-get install bridge-utils ]
- Docker
- ssh-agent configured properly
- All server have ssh-logged in using key authentication
- All nodes private-key identity must be added in master node for SSH communication.
Steps:
- git clone –depth 1 https://github.com/kubernetes/kubernetes.git
- Configure the cluster information in kubernetes/cluster/ubuntu/conf-default.sh file:
[js]export nodes="root@ip root@ip root@ip"
export role="a i i"
export NUM_NODES=${NUM_NODES:-2}
export SERVICE_CLUSTER_IP_RANGE=192.168.3.0/24
export FLANNEL_NET=172.16.0.0/16[/js]Change these variables ,the variable “node” defines all the cluster nodes, “roles” defines what role should assign to each node and “num_nodes” define the number of minions.
Note:
Role “a” for master and “i” for node (minion)
Flannel_net ip should not be the same as cluster CIDR address. - After all the variables are configured correctly, run config-default.sh:
[js] cd kubernetes/cluster/ubuntu
./config-default.sh[/js]Now, all variables are now set for that particular session.
- The following command will bring online the whole cluster:
[js]cd kubernetes/cluster/
KUBERNETES_PROVIDER=ubuntu ./kube-up.sh[/js]The script automatically copies all config and binaries files using scp and starts Kubernetes services on each node.
- Now, that the cluster has been setup, we can check by running kubectl on master node. Firstly, export all binaries into bashrc:
[js]export PATH=$PATH:/homedirectory/kubernetes/cluster/ubuntu/binaries
source .bashrc
kubectl get nodes[/js]
- Now, Deploy Addons like DNS and UI to manage Kubernetes through UI:
[js]cd kubernetes/cluster/ubuntu
KUBERNETES_PROVIDER=ubuntu ./deployAddons.sh[/js] - Access UI: http://master_node_ip:8080/UI
I hope this will help in understanding the architecture and how to setup Kubernetes on Ubuntu. In my next blog, we will setup auto-scaling in pods using external load-balancer.


Is it still actual method to setup Kubernetes on bare-metal with kube-up.sh? Am I right that kube-up.sh is deprecated and better to use kubeadm?
Getting Error
[sudo] password to start master:
Error: 100: Key not found (/coreos.com) [3]
{“Network”:”192.168.0.0/8″, “Backend”: {“Type”: “vxlan”}}
{“Network”:”192.168.0.0/8″, “Backend”: {“Type”: “vxlan”}}