
How to Create Custom WooCommerce API with Secure JWT Token : A Developer Guide
Introduction
If you are working on a mobile app, a headless site, or just want to connect WooCommerce with some external system, then you wll probably need a secure way to access data via API.
WooCommerce already gives REST API by default, but it works on API keys, which is a bit old-school now. Not that flexible also, especially when you want to handle login-like flows.
So a better way is to just create your own REST API endpoints and protect them using JWT (JSON Web Token). JWT is easy, clean, and supports modern auth flows like login, logout, token-based access, etc.
So here, I’m just building a custom REST API for WooCommerce and validating it with JWT for security. That way, external apps can connect safely without messing around with the traditional WooCommerce API keys. No need to rely on WooCommerce’s legacy API or generate API keys manually.
Why Use JWT Instead of WooCommerce API Keys?
WooCommerce’s default REST API uses key/secret authentication, but this setup has some limitations:
- Requires manual key setup via the WooCommerce admin
- No token expiry or session logic
- Not suitable for modern Single Page Applications (SPA) or mobile apps
Instead, JWT (JSON Web Token) is a modern, stateless solution that allows:
- Login-based token generation
- Role/permission control
- Expiry-based sessions
- Easy integration with mobile/JavaScript apps
Requirements
Make sure the following things are ready in your development setup:
- WooCommerce Plugin installed and active
- Permalinks set to anything except “Plain”
Go to Settings > Permalinks [select Post name or Day and name] - PHP version 7.4+
- Composer installed globally (we’ll use it to install the JWT library)
Plugin Folder Structure Overview
We’ll create a custom plugin called jwt-token-wc-api . Here’s what the folder layout will look like:
In Project Root: wp-content/plugin/
Create a Folder Named – jwt-token-wc-api/
- jwt-token-wc-api.php
- includes/
– class-jwt-token-helper.php - vendor/
– autoload.php
Step 1: First, install the PHP Library for JWT using Composer
For the Library, we just need to open our terminal, and in the plugin folder, we need to run the below command in the terminal:
composer require firebase/php-jwt
This command will create a Firebase JWT package in the Vendor folder that we will use to generate a token later.
Step 2: Now add the JWT Token Secret-Key in This File (wp-config.php)
In the WordPress project, open the wp-config.php file and add the following code.
define('JWT_Token_AUTH_SECRET_KEY', 'secure-jwt-secret-key');
Step 3: Create a JWT Token Helper Class
Now we will create a helper class that will handle JWT logic like generating and verifying tokens.
we will create a new file inside our plugin: includes/class-jwt-token-helper.php
<?php

// Block file accessed if directly trying to open it.
if (!defined('ABSPATH')) {
  exit;
}

// Load the Composer autoloader class.
require_once plugin_dir_path(__DIR__) . '../vendor/autoload.php';

use Firebase\JWT\JWT;
use Firebase\JWT\Key;

class JWT_Token_Manager {

// Getting jwt token secret key from wp-config
   const JWT_Token_Key= JWT_Token_AUTH_SECRET_KEY;

/**
* Function to create token for given user-id.
* 1 hour token validity
*/
public static function create_user_jwt_token($user_id) {
   $jwt_token_data = [
     'issuer' => get_site_url(),
     'issued_at' => time(),
     'expires_at' => time() + 3600,
     'user_id' => $user_id,
  ];

   return JWT::encode($jwt_token_data, self::JWT_Token_Key, 'HS256');
}

/**
* Check JWT Token from Incoming API Request.
*/
public static function validate_request_token(WP_REST_Request $request) {
   $auth_header = $request->get_header('authorization');

// If no jwt token found then showing this error.
if (!$auth_header || !preg_match('/Bearer\\s(\\S+)/', $auth_header, $matches)) {
   return new WP_Error('token_missing', 'Authorization header is missing.', ['status' => 401]);
}

$jwt_token = sanitize_text_field($matches[1]);

try {
// Decoding and verify the jwt token.
   $decoded_jwt_token = JWT::decode($jwt_token, new Key(self::JWT_Token_Key, 'HS256'));
   return true;
  } catch (Exception $e) {
   return new WP_Error('token_invalid', 'The provided token is invalid or expired.', ['status' => 403]);
  }
 }
}
Step 4: Create Now Main-Plugin File.
We will now create a new file inside our plugin folder named: jwt-token-wc-api.php
<?php
/**
* Plugin Name: Secure WooCommerce API with JWT Token
* Description: Adds custom WooCommerce REST API with JWT login – handy if you're building mobile apps or need to connect outside system.
* Version: 1.0.0
* Author: TO THE NEW Private Limited
*/

// Block file accessed if directly trying to open it.
if (!defined('ABSPATH')) {
  exit;
}

// Load the jwt token helper class file.
  require_once plugin_dir_path(__FILE__) . 'includes/class-jwt-token-helper.php';

/**
* Registering the login route to issue secure JWT token.
*/
add_action('rest_api_init', function () {
   register_rest_route('jwt-token/v1', '/login', [
   'methods' => 'POST',
   'callback' => 'handle_jwt_user_api_login',
   'permission_callback' => '__return_true',
     'args' => [
       'username' => ['required' => true],
       'password' => ['required' => true],
     ],
   ]);
});

/**
* Callback funciton to authenticate username & password and return JWT token.
*/
function handle_jwt_user_api_login(WP_REST_Request $request) {
   $username = sanitize_text_field($request->get_param('username'));
   $password = $request->get_param('password');

   $user = wp_authenticate($username, $password);

   if (is_wp_error($user)) {
     return new WP_Error('login_failed', 'Username or password is incorrect.', ['status' => 403]);
   }

   if (!user_can($user, 'read')) {
     return new WP_Error('not_allowed', 'You do not have permission to use the API.', ['status' => 403]);
   }

   $jwt_token = JWT_Token_Manager::create_user_jwt_token($user->ID);

   return [
     'token' => $jwt_token,
     'user' => [
     'email' => $user->user_email,
     'name' => $user->display_name,
   ],
 ];
}

/**
* Registering a secure API endpoint to fetch WooCommerce order details by order id.
*/
add_action('rest_api_init', function () {
   register_rest_route('order-jwt-api/v1', '/order', [
     'methods' => 'GET',
     'callback' => 'get_woocommerce_order_data_by_id',
     'permission_callback' => ['JWT_Token_Manager', 'validate_request_token'],
     'args' => [
       'order_id' => ['required' => true, 'type' => 'integer'],
     ],
   ]);
});

/**
* Fetch WooCommerce order data by order-id (JWT protected).
*/
function get_woocommerce_order_data_by_id(WP_REST_Request $request) {
   $order_id = $request->get_param('order_id');
   $order = wc_get_order($order_id);

   if (!$order) {
     return new WP_Error('order_not_found', 'No order found for this ID.', ['status' => 404]);
   }

   return [
     'order_id' => $order->get_id(),
     'status' => $order->get_status(),
     'total' => $order->get_total(),
     'customer' => $order->get_billing_first_name() . ' ' . $order->get_billing_last_name(),
     'items' => array_map(function ($item) {
       return [
        'product_id' => $item->get_product_id(),
        'name' => $item->get_name(),
        'quantity' => $item->get_quantity(),
        'line_total' => $item->get_total(),
      ];
     }, $order->get_items()),
   ];
}
Now Let’s Test Our Custom API Using Postman:
Step 1: First, Get the JWT Token Using the Username & Password
Just open Postman and make a POST request to this endpoint: POST /wp-json/jwt-token/v1/login
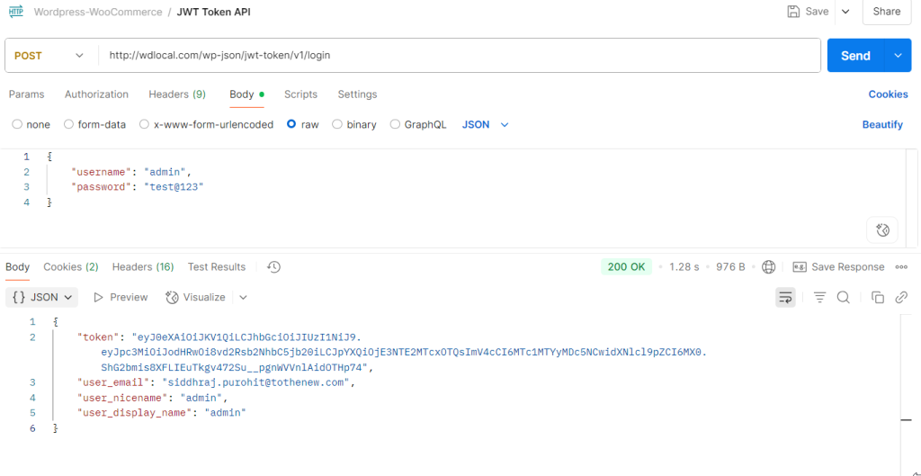
Generate Token
You can see in the above image that we are getting the token value on the login endpoint with the correct username/password
Step 2: Get Order Data Using the JWT Token
We now have a JWT token, let’s fetch the order details using it.
Now we will request this endpoint: GET /wp-json/order-jwt-api/v1/order?order_id=<order-id>
In Postman, go to the Authorization tab, choose Bearer Token, and paste our JWT token there.
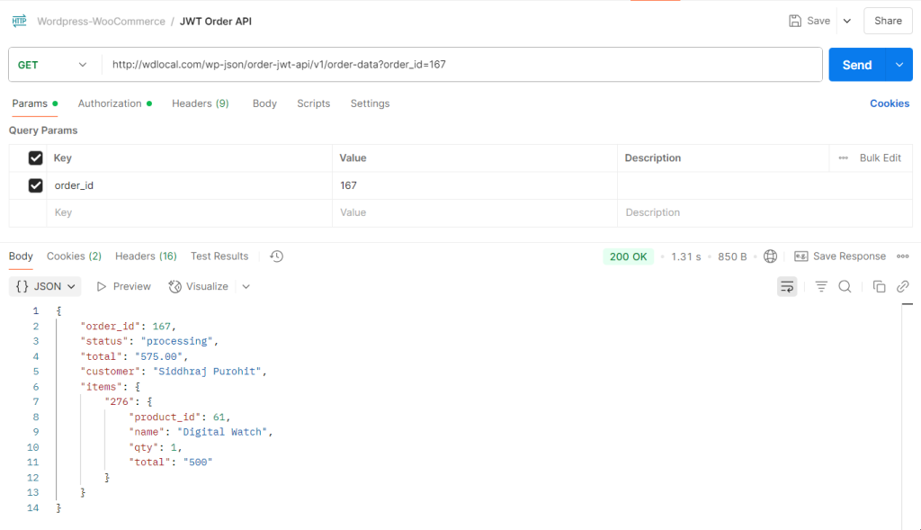
Order Data
Conclusion
JWT login is just easier, honestly. You don’t need to deal with WooCommerce’s default API keys and all that stuff. Once it’s working, you hit your custom routes with the token – no token, no data, that’s it.
I’ve used this in a few projects like pulling order data for mobile apps, syncing with other platforms, whatever. It keeps things secure, and you don’t need to send your username/password everywhere. Just works better for custom setups.
