Introduction
Adobe Target, as an integration in AEM, provides varied site visitors to experience personalized content from AEM intelligently. It lets us leverage its different variations based on multiple use cases to target different audiences.
Its client-side implementation can be done in two ways – one by using Target AT.js Javascript Library and the other through Adobe Experience Platform Web SDK. In this blog, we will be using the AT.js library.
At the end of this blog, you will be able to integrate Adobe Target with AEM and export an Experience Fragment to Adobe Target. It later aims to do personalization targeting using experience fragments; however, that will be covered in later blogs. Further, Adobe launch configuration is done to load tag libraries to our project site based on rules on how our site responds to the visitor’s interaction.
Prerequisites:
- Up and running local AEM Cloud SDK.
- Have approver-level access to Adobe Target console to create audiences and activities.
- Have access to create Property under Tags in the Data Collection console.
- Have Editor access to the Project created in Adobe Developer Console.
- Admin console access to provide access to the project.
Integration steps:
- Create IMS configuration for Target in AEM
- Project creation in Adobe Developer Console
- Configure IMS configuration for Target in AEM:
- Legacy Cloud services for Target
- Update cloud services configuration in the Root folder under which the Experience Fragment resides.
- IMS configuration for Launch
- Create a Property under Tags in the Data Collection Console and rules to load the script.
- Adobe Launch configurations
- Provide the cloud configuration in the Project site’s root folder properties.
Steps Explained:
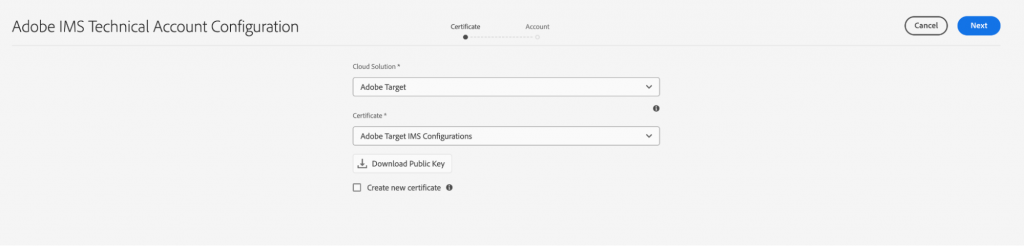
1. Create IMS configuration for Target in AEM (For Authentication)
Head towards your AEM instance and follow the below steps:
- Navigate to Tools > Security and then Adobe IMS Configurations.
- Click on Create and select “Adobe Target” as Cloud Solution.
- Select the checkbox to create a new certificate by providing some alias to it.
- Click on Create Certificate and download the generated public key (which will be added to the project created in #2 to use Adobe Target services).
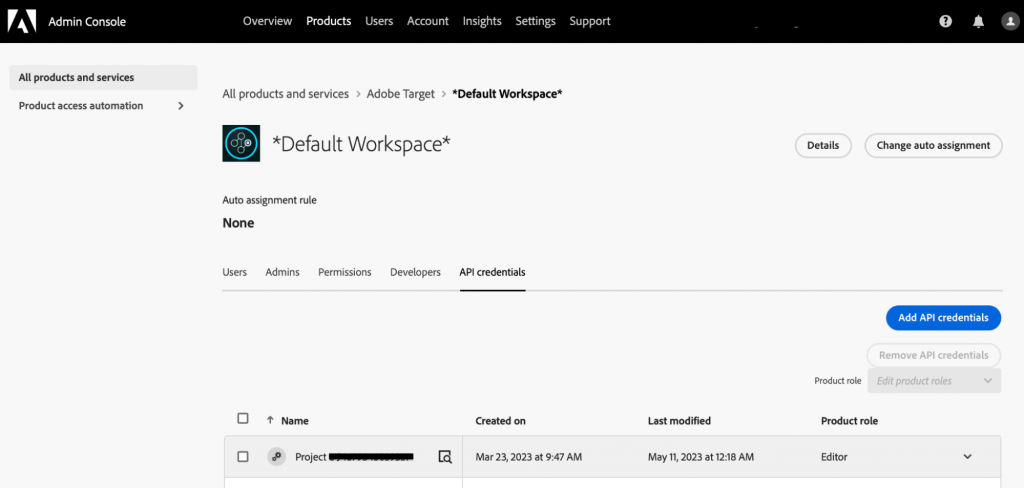
2. Project creation In Adobe Developer Console:
We’ll now start creating a project in Adobe Developer Console, by following the below steps:
- Create a new empty project on the developer console.
- Click on Add to Projects to add the “Adobe Target” API.
- In the authentication method, select “Service Account (JWT).”
- Upload the public key generated in #1.
- Click Next and select the relevant Product Profiles.
- Similarly, add “I/O Events” API and “Experience Platform Launch API.”
- Now go to Adobe Admin console and navigate to Products > Adobe Target > Product Profile.
- Under the “API Credentials” tab, provide Editor access to the created project.
 We will now be using this project’s credentials to configure an IMS configuration for Adobe Target in AEM created in #1.
3. Configure IMS configuration for Target in AEM:
- Now, coming back to #1 for configuring the Account tab, fill in the respective fields from the project’s JWT credentials details.
- Provide a relevant name in the Title field.
- Provide only the domain name from the ‘aud’ attribute value in the Authorization server field(take the ‘aud’ attribute from Project > Credential(JWT) > Generate JWT tab > JWT Payload).
- Provide the Client ID in the API key field.
- Provide the Client Secret in the Client Secret field.
- Provide the whole JWT payload in the Payload field and save the configuration.
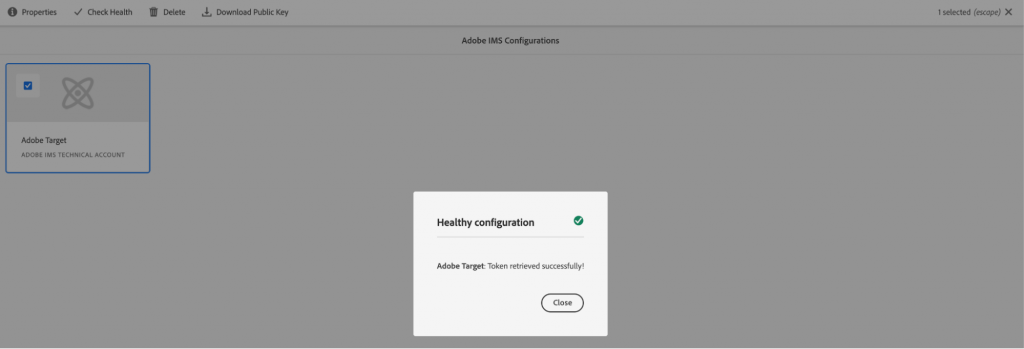
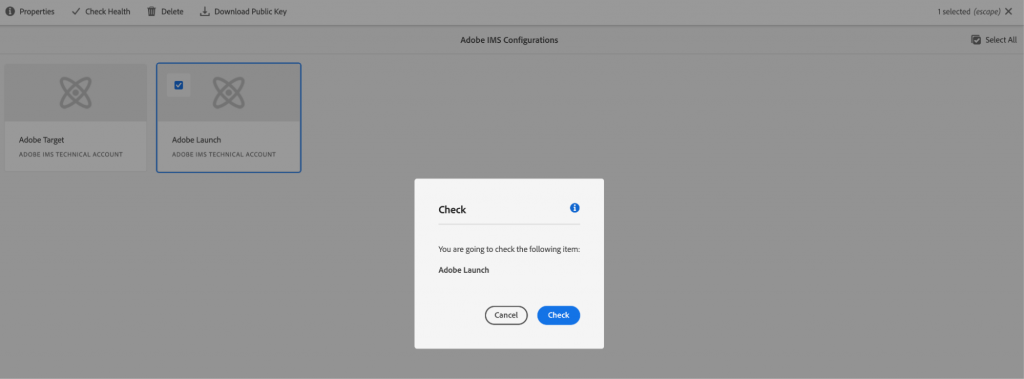
- Now select the created configuration and “Check Health” to be able to see the pop-up “Token retrieved successfully.”
4. Legacy cloud services for Target: (For creating a direct connection between, and publishing content from, AEM to Adobe Target Back-end)
- In the AEM, go to Tools > Cloud Services > Legacy Cloud Services.
- Scroll down to Adobe Target > Configure Now and provide a relevant title.
- Choose Authentication as IMS, Client code as Client ID from the JWT tab, Tenant ID as Organization code (can be picked from Adobe Experience Cloud Console URL – https://experience.adobe.com/#/@TENANT_ID/xxxx), IMS Configuration as the one created in #3, API Type as REST, Client Library as AT.js
- Check the connection by clicking on Connect to Adobe Target and it should popup up with the message “Connection successful”.Now, you have completed the Target connection with AEM and are ready to create and export Experience Fragments in the next steps.

5. Update cloud services configuration in the Root folder under which the Experience Fragment resides:
- In the AEM, go to Navigation > Experience Fragments > Select Root Folder under which Experience Fragment resides and whose variation can be exported to Adobe Target.
- Open its properties > Cloud Services > Cloud Services Configurations and select Adobe Target.
- In Adobe Target, select the configuration created under Legacy cloud services for Target, select Adobe Target Export Format HTML/JSON/both, Adobe Target workspace as default Workspace, and save the properties.
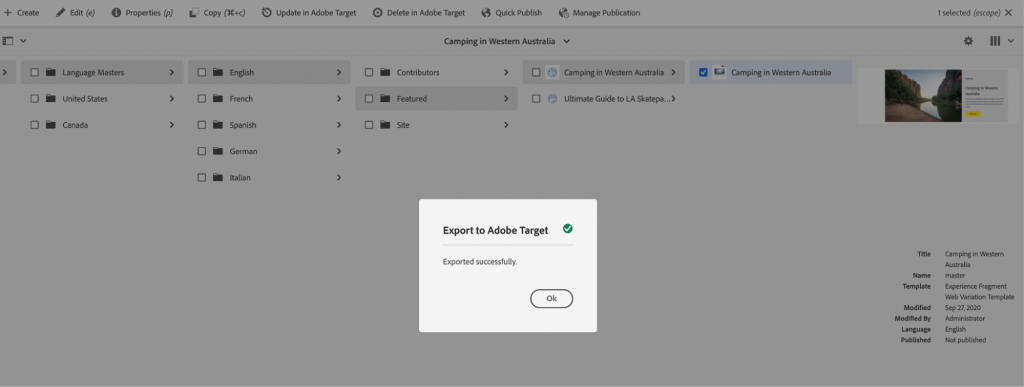
- Now go to the Experience Fragment and select; we should be able to see the option to “Export to Adobe Target.”
- Once we click on Export to Adobe Target, we can then go to the Adobe Target console and check in the Offers tab to see the exported Experience Fragment variation.
6. IMS configuration for Launch:
- Follow the Steps mentioned in #1 and #2, and from the dropdown, select Adobe Launch this time.
7. Create a Property under Tags in the Data Collection Console and rules to load the script:
- Navigate to Data Collection Console on AEC > Tags.
- Click on New Property.
- Provide some name to the property, and in the Domain, provide a valid domain name (for local AEM, put it as localhost.com).
- Save the property.
- Navigate to the Extensions tab and install the “Adobe Target V2” extension from the catalog.
- To add rules for loading delivery calls from AEM to Target, navigate to the created property.
-
-
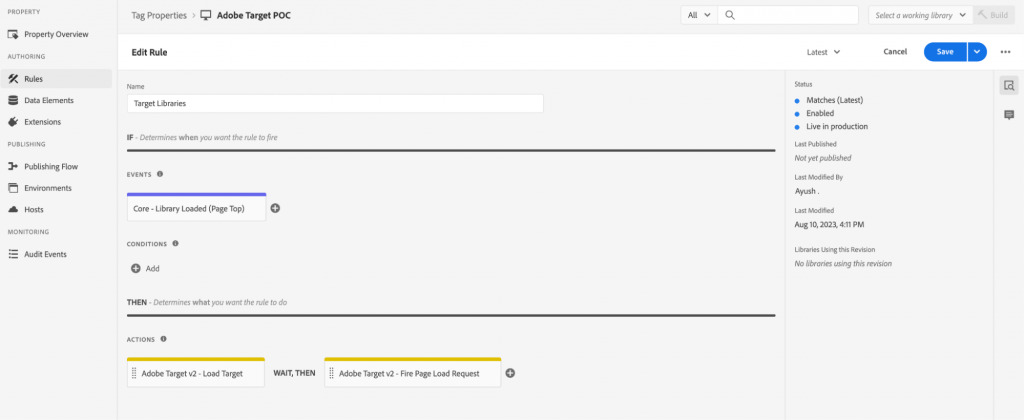
- Click on Add Rule.
- Provide a name.
- In the Events, add an Event Configuration by providing Extension as “Core”, and Event Type as “Library Loaded (Page Top)”.
- In the Actions, add an Action Configuration by providing an Extension as “Adobe Target V2” and an Event Type as “Load Target”.
- Similarly, add one more action, “Adobe Target v2 – Fire Page Load Request”.
- Save all the changes.
-
Adobe Launch configurations:
- In the AEM, go to Tools > Cloud Services > Adobe Launch Configurations.
- Select the Project under which you want to enable launch services and click Create.
- Provide Title for the configuration in the Associated Adobe IMS configuration, provide the IMS configuration for Launch created in #6, in the Company, provide Tenant ID (can be picked from Adobe Experience Cloud Console URL – https://experience.adobe.com/#/@TENANT_ID/xxxx), in the Property select the property created in #7.
- Click on Next and enable the toggle button to Load Library Asynchronously for Staging and Production.
- Now, we need to add the library created from the launch configuration to the site’s project <head> tag.
- Navigate to the newly created library under the Data Collection Console > Tags > Property > Environments.
- Click on the Install icon, copy the script tag, and paste it under the head tag of the project.
9. Provide the cloud configuration in the Project site’s root folder properties.
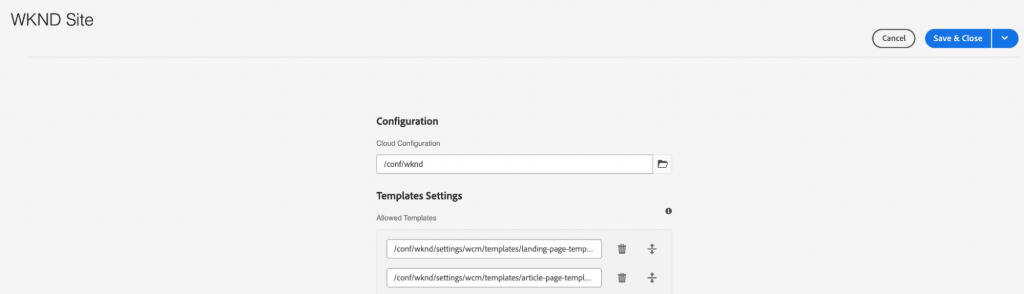
- Go to the AEM sites console and select the Project Site root.
- Open its properties and go to the Advanced Tab.
- In the cloud configuration field, select the folder under which the launch configuration has been added in #8.
- Save the properties.
After following all the mentioned steps, open any page in AEM, and you will be able to see one delivery call in the browser’s Network Tab.
Conclusion:
This article sums up how to integrate Adobe Target with AEM using Launch and I/O and exporting different variations of experience fragments to Adobe Target. In the upcoming blogs, we will describe to you the various activity types and audiences in Adobe Target.
Stay connected for more insights. Do share your feedback, and also feel free to write in comments for any queries.
References:
https://experienceleague.adobe.com/docs/experience-manager-learn/sites/integrations/experience-platform-data-collection-tags/overview.html?lang=en
https://experienceleague.adobe.com/docs/experience-manager-learn/aem-target-tutorial/aem-target-implementation/using-launch-adobe-io.html?lang=en
https://experienceleague.adobe.com/docs/experience-manager-cloud-service/content/sites/integrations/integrating-adobe-target.html?lang=en