
API Testing Using SoapUI
API testing is crucial to companies. In this blog, we will share the basic procedure of working with SoapUI.
Let us start by understanding the basic requirements and how to set up a SoapUI in the machine. Once done, we will navigate towards a sample project structure.
Basic Requirements
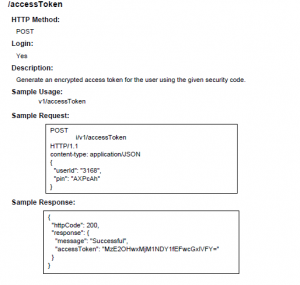
Before starting with the SoupUI tool, consider developing a product API document which should contain all the information about the API (REST or SOAP) used in production. This should contain a detailed description of each API, HTTP Methods (POST, GET, PUT, and DELETE), detailed information about Request and Response. Relationship OR interrelated API should properly communicate through this document.
Here’s an example
Working with SoapUI
Outlined below are the steps or sequences which are to be followed to use a Soap API efficiently.
– Set up SoapUI
– Requirement Document
– Get started with project Structure
– Add a workspace and Project
– Add a test suite and test case
– Add a test step
– Run a test suite
– Add Property Transfer (If needed)
– Add an assertion
How to get started with the project structure?
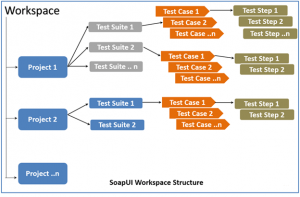
Let us first understand the project structure in SOAP UI:-
- As a first step, create a workspace. There can be several projects associated with a workspace. Users can create more than one workspace. In SOAP UI Pro version, we can seamlessly switch environments to map it to different end points
- For each project, we can create several test suites
- For each test suite, there can be several test cases attached to it
- For each test case, there can be several test steps associated with it
Below is the pictorial representation of a workspace structure in SOAP-UI:-
Now let us walk you through steps for adding workspace and project
Step 1 – Start SOAPUI
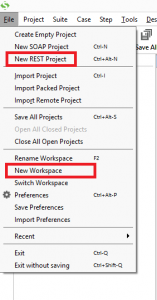
Step 2 – Create a Workspace
File | Right Click | New Workspace or
Project Navigational Area |Right Click | New Workspace
Step 3 – Enter the name of the workspace
Step 4 – Select the path where you want to save your workspace
Step 5 – Click on Save.
Step 6 – Create Project
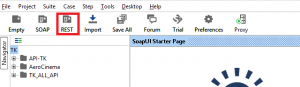
File | Right Click | New REST/SOAP Project or
Quick Access Toolbar |Select REST/SOAP/EMPTY (according to the API)
Step 7 – Enter the URI available in the API doc. (Taking an example of REST API).For e.g. – In API 1, URI is Http:// cloudapp.net:3000/v1/pin
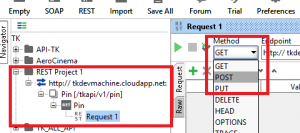
A new project should have shown up in the Navigator section in the left section of SoapUI. “Request 1” is a name that SoapUI has generated for us. We want to change it to a name that is more descriptive. In this example, we have chosen “Request Pin.” Right click on “Request 1” and set the new name.
Step 8 – Change the method, according to the API doc, if required. For E.g. in this case, this is a Post method.
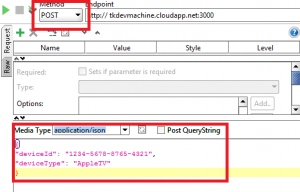
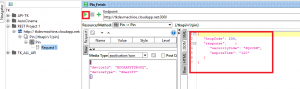
Step 9 – From the media type, select application/JSON (according to this API)
Step 10 – Enter the JSON request (parameters with its value) in the block as shown below
Note: If you want to validate whether the request is valid, you can provide a small, green arrow at the top left corner of the request editor and check the response.
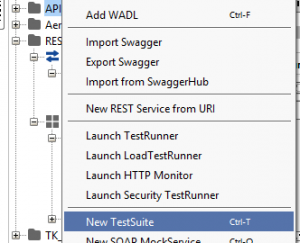
Step 11 – Create Test Suite
Select Project | Right Click | New TestSuite or “Ctrl+T” or
Click on the third icon from the left of the request editor (as shown below)
![]()
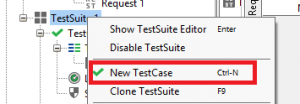
Step 12 – Create Test Case
Select TestSuite | Right Click | New TestCase or “Ctrl+N” or
Click on the third icon from the left of the request editor (as shown above) |Enter the TestSuite Name | Enter the TestCase name | Click on OK
Step 13 – Create Test Step
- Select TestCase | Right Click | Add Step |Rest Request (according to the API)
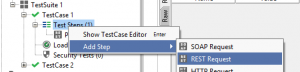
- Enter the step name
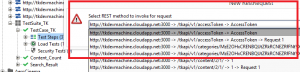
- Upon clicking ‘OK’, a dialog pops up to select the operation to invoke. All the operations are listed, and the user can select the operation that they would like to invoke.
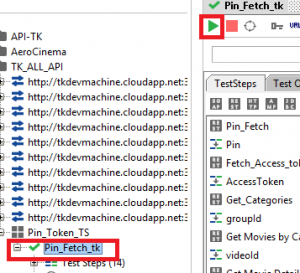
Step 14 -Run a TestStep/TestCase/TestSuite. Click on the small, green arrow at the top left corner of the request editor.
If you want to run all of your TestCases or TestSuite in one go then select the TestCase or TestSuite respectively and click on their respective green arrow icon as shown in the image below.
Run Testcase
Run TestSuite

Hope this blog was helpful and you will now be able to test your APIs using SOAPUI.


Attached Images are blurred Not able to see it properly…the blog is Gud. If possible please attach a video for the same. That will be easy to understand.:)