
Fortifying your REST API using Spring security
Spring Security is a lightweight security framework that provides authentication and authorization support in order to secure Spring-based applications. It comes bundled with popular security algorithm implementations.
I would cover a series of different topic related to spring security in my upcoming blogs. We will go through the setup process first, then analyze when and where to apply, explore different authentication methods and securing password with encoding schemes.
User and Role Management
Suppose you want to create a REST application, User and Role management system to give each user a set of roles that grants access to the different functions. Also give users privileges as per the role and capability to apply the role to specific assets, networks, or other objects.
In this scenario, you can view the existing users, their roles and privileges from the Administration section. And only the user of Administration privilege would be allowed to create/update other users.
If you are a Spring user and new to Spring security, basic authentication would be best option to start with and for demonstration, we’ll be creating a sample application using the following tech stack:
| Build Tool | Gradle 2.3 or higher |
| Web framework | Spring Boot 1.4.3.RELEASE |
| Security Tool | Spring security |
| Repository | MySQL |
| ORM Tool | Spring Data Jpa |
| Version Control | GIT |
For simplicity there will be 3 types of users in this application:
| Role | Permission |
| ADMIN | Create user, View users |
| USER | Can view/update own details |
| ANONYMOUS | Can only view total no of users in the system |
Step 1: Application Setup
Let’s start with a very basic application (in terms of setup needed) that boots a Spring application context. Two tools that will help us with that are Gradle and Spring Boot.
I skip lines that aren’t particularly interesting like the maven repository configuration. You can find the complete code at GitHub.
[sourcecode language=”java”]
apply plugin: ‘org.springframework.boot’
dependencies {
compile(‘org.springframework.boot:spring-boot-starter-data-jpa’)
compile(‘org.springframework.boot:spring-boot-starter-web’)
runtime(‘mysql:mysql-connector-java:5.1.13’)
}
[/sourcecode]
Here we are using: spring-boot-starter-data-jpa as the ORM tool.
Step 2 : CRUD for User entity
[sourcecode language=”java”]
@Entity
public class UserDetail {
@Id
@GeneratedValue(strategy = GenerationType.AUTO)
private long id;
private String name;
private int age;
}
[/sourcecode]
Create the following api’s for UserDetail Entity:
| URL | Method | Description |
| {host}/user/ | GET | List all user details |
| {host}/user/{id} | GET | Fetch specific user detail |
| {host}/user/ | POST | Add new user |
| {host}/user/{id} | PUT | Update detail for a user |
| {host}/user/{id} | DELETE | Delete a specific user |
| {host}/user/ | DELETE | Delete all user |
You can find the complete code for CRUD and Api’s at GitHub.
Step 3: User Authentication
Now we need an authentication mechanism to allow only authenticated users to access the system.
Add a domain for user credentials:
[sourcecode language=”java”]
@Entity
public class Authentication {
@Id
private String username;
private String password;
}
[/sourcecode]
Associate it with the UserDetail domain:
[sourcecode language=”java”]
@Entity
public class UserDetail {
…………………….
@OneToOne(cascade= CascadeType.ALL)
@JoinColumn(name = ‘user_authentication_id’)
private Authentication authentication;
…………………….
}
[/sourcecode]
Add spring security dependency in build.gradle
[sourcecode language=”java”]
dependencies {
…………………….
compile(‘org.springframework.boot:spring-boot-starter-security’)
…………………….
}
[/sourcecode]
And configure your application to enable basic authentication using below code: org.springframework.security.core.userdetails.UserDetailsService
[sourcecode language=”java”]
@EnableWebSecurity
public class ApiSecurityConfig extends WebSecurityConfigurerAdapter{
…………………….
…………………….
@Autowired
public void configureGlobalSecurity(AuthenticationManagerBuilder auth) throws Exception {
auth.userDetailsService(userDetailsService);
}
@Override
protected void configure(HttpSecurity http) throws Exception {
http
.authorizeRequests()
.anyRequest().authenticated()
.and()
.httpBasic().authenticationEntryPoint(entryPoint)
.and()
.exceptionHandling().accessDeniedHandler(handler);
}
}
[/sourcecode]
Here we are configuring Spring security by overriding individual methods of org.springframework.security.config.annotation.web.configuration.WebSecurityConfigurerAdapter. @EnableWebSecurity that helps to auto-configure this.
To enable Spring Security integration with Spring MVC add the @EnableWebSecurity annotation to your configuration.
configureGlobalSecurity method is pretty straightforward, we are just providing the implementation for UserDetailService as the AuthenticationProvider
In configure method we are using HTTP Basic Authentication, also providing the Implementation of AuthenticationEntryPoint and AccessDeniedHandler for handling Authentication exception and Access denied exception.
The implementation for UserDetailService is pretty straightforward and self-descriptive, GitHub.
Let’s test the functionality using postman . Or you can pick any other REST client.
⇒ On accessing GET : <host>/user/ we’ll get an authentication error as below:
HTTP Status 401 : Full authentication is required to access this resource
To resolve this we are adding a new user with sample credential using the following script:
[sourcecode language=”sql”]
insert into authentication(username, password) values(‘username1’, ‘password1’);
insert into user_detail(age, name,user_authentication_id) values(23, ‘User 1′,’username1’);
[/sourcecode]
Now add the same credential in postman with basic authentication
In response, a token is automatically added into the header with key Authorization
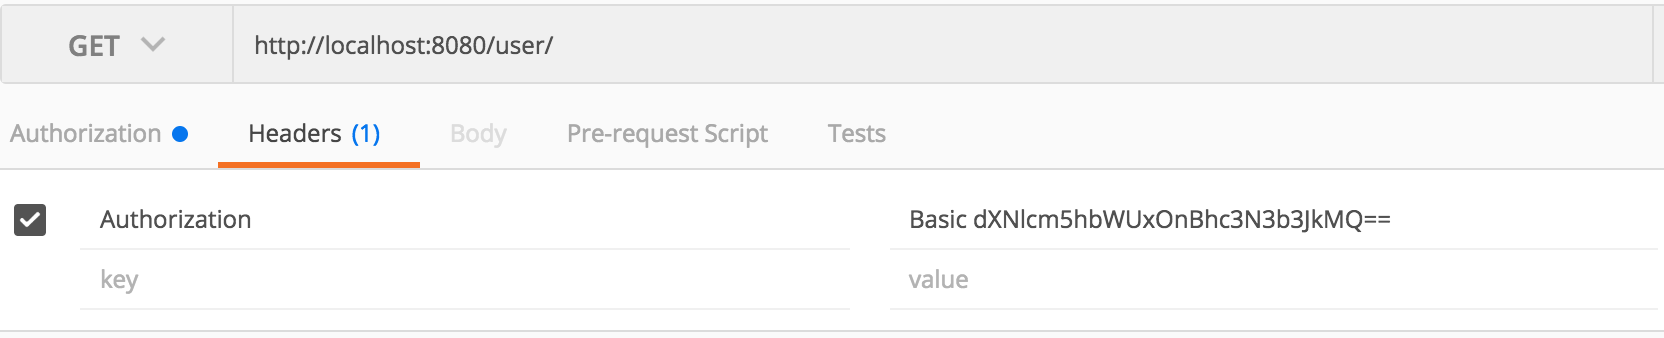 Basic dXNlcm5hbWUxOnBhc3N3b3JkMQ== is the encoded form of username1:password1 in base64 and prepended with ‘Basic ‘. Now you can access all the API’s using this entry into the header.
Again we’ll get forbidden error in POST PUT DELETE operation
 To resolve this we can simply disable the CSRF configuration in configure method.
[sourcecode language=”java”]
@Override
protected void configure(HttpSecurity http) throws Exception {
http.csrf().disable()
.authorizeRequests()
.anyRequest().authenticated()
.and()
.httpBasic().authenticationEntryPoint(entryPoint)
.and()
.exceptionHandling().accessDeniedHandler(handler);
}
[/sourcecode]
When should we use CSRF protection?
CSRF protection is a request that could be processed by a browser by normal users.
If you are only creating a service that is used by non-browser clients, you will likely want to disable CSRF protection.
To know more about CSRF, read https://www.owasp.org/index.php/Cross-Site_Request_Forgery_(CSRF)
As we discussed earlier ANONYMOUS user can only view the total no of users in the system i.e API with URL <host>/user/count. To do that change the chainRequestMatchers in the configure method:
[sourcecode language=”java”]
@Override
protected void configure(HttpSecurity http) throws Exception {
http.csrf().disable()
.authorizeRequests()
.antMatchers(‘/user/count’).permitAll() // request matcher for anonymous user
.antMatchers(‘/user/**’).authenticated() // request matcher for authenticate user
.and()
.httpBasic().authenticationEntryPoint(entryPoint)
.and()
.exceptionHandling().accessDeniedHandler(handler);
}
[/sourcecode]
Find the complete code at GitHub.
Step 4: User Authorization
Now as per the use case non-administrator user will have access to the profile only. i.e GET: <host>/user/profile .
To manage this we need to introduce Role/Authority based authentication system.
[sourcecode language=”java”]
@Entity
public class Role {
@Id
@GeneratedValue(strategy = GenerationType.AUTO)
private Long id;
@Column(unique = true)
private String authority;
@ManyToMany(mappedBy = ‘roles’, fetch = FetchType.LAZY)
private Set<Authentication> users;
}
[/sourcecode]
And associate it with Authentication entity:
[sourcecode language=”java”]
@Entity
public class Authentication {
@Id
private String username;
private String password;
@ManyToMany(fetch = FetchType.EAGER, cascade = CascadeType.ALL)
@JoinTable(
joinColumns = @JoinColumn(name = ‘user_id’), inverseJoinColumns = @JoinColumn(name = ‘role_id’)
)
private Set<Role> roles;
}
[/sourcecode]
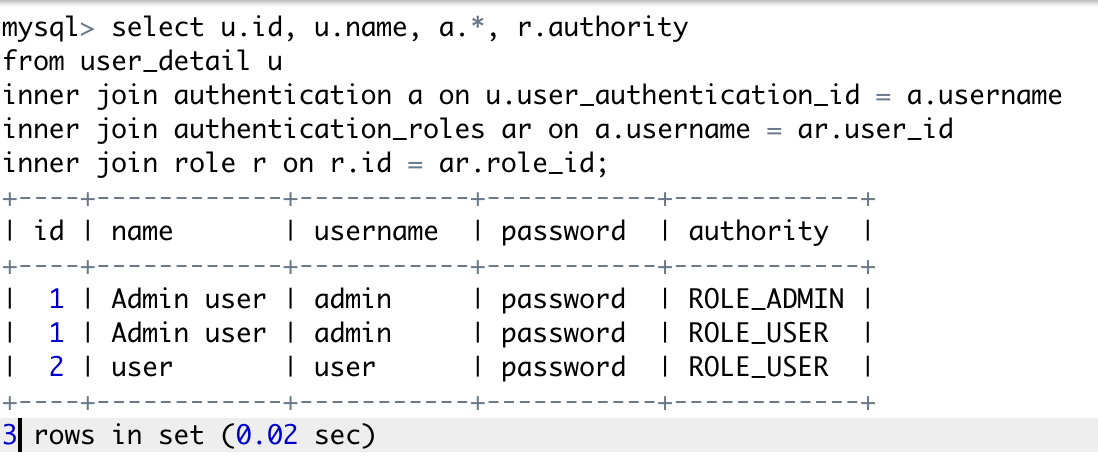
Add user credentials and their roles using the following script:
[sourcecode language=”sql”]
insert into role(authority) values(‘ROLE_ADMIN’), (‘ROLE_USER’);
insert into authentication(username, password) values(‘admin’, ‘password’),(‘user’, ‘password’);
insert into user_detail(age, name, user_authentication_id) values(25, ‘Admin user’,’admin’),(23, ‘user’,’user’);
insert into authentication_roles values(‘admin’,1),(‘admin’,2),(‘user’,2);
[/sourcecode]
Finally, modify the UserDetailService implementation by providing user authorities and configure method to get the desired result.
[sourcecode language=”java”]
@Override
protected void configure(HttpSecurity http) throws Exception {
http.csrf().disable()
.authorizeRequests()
.antMatchers(‘/user/count’).permitAll() // request matcher for anonymous user
.antMatchers(‘/user/profile’).hasRole(‘USER’) // check for authority with ROLE_USER in the database
.antMatchers(‘/user/**’).hasRole(‘ADMIN’) // check for authority with ROLE_ADMIN in the database
.and()
.httpBasic().authenticationEntryPoint(entryPoint)
.and()
.exceptionHandling().accessDeniedHandler(handler);
}
[/sourcecode]
Hope this will help you to understand the flow for basic authentication using spring security. Find the complete code at GitHub.
You can run the application by below steps,--

1. git clone git@github.com:bjpaul/restful-spring-security.git
2. cd restful-spring-security
3. gradle bootRun
Stay tuned for more on:-
- Stateless token based authentication using Spring Security
- Domain object security (ACLs)
- CAS authentication using spring security
- Web socket security in spring
- OAuth2 authentication using Spring Security
- Single sign on with OAuth2
- Spring security with JWT


Hi, that’s a good blog to understand security and authentication. Can you also provide a blog with detailed description to understand OAUTH2 with grant-type=”auth-token”.
Your detailing is very nice. so kindly provide it with detailed each step of Java/Spring code with Postman request and response.
Thanks,
Abhay
Your config code for ADMIN over-rides the USER, so all endpoints become only ADMIN accessible.
Well written blog on spring security.