Introduction
In my recent project, I encountered a scenario where I had to incorporate a custom DITA-OT plugin into the XML Add-On. In my following article, I’ll guide you through the steps to integrate the plugin.
Prerequisite
For this, you’ll need
- AEM 6.4 with the XML Documentation Add-On 3.8.
- Custom DITA-OT plugin zip file. (For our case, we will use DOCX or Word Plugin as an example)
What are we doing?
Before moving directly into the steps, we will discuss what we are actually going to do. As we all know, the XML Add-On is based on top of the DITA-OT. So, we will first integrate the custom plugin with the DITA-OT and then configure the XML Add-On to use it.
Steps to integrate the plugin
- As a first step, we will download the DITA-OT.zip file that XML Add-On uses. It can be found at two locations, one at /apps/fmdita/dita_resources/DITA-OT.zip and another at /etc/fmdita/dita_resources/DITA-OT.zip. We’ll be using the DITA-OT.zip, which is present under the apps folder, as AEM, by default, first uses the one under the apps folder.
- Now that the zip is downloaded, we will integrate the custom plugin. To do that,
- Unzip the DITA-OT.zip folder.
- Navigate to the ../DITA-OT/bin
- Open the terminal in that location and execute the below DITA-OT command,
dita –install <plugin-path>.zip
Once the plugin is installed, it will show “Added com.elovirta.ooxml“.
Eg. dita –install ~/Downloads/com.elovirta.ooxml.zip
- Now zip/compress the entire DITA-OT folder again.
- Unzip the DITA-OT.zip folder.
- Upload/Replace the new DITA-OT.zip folder to the exact same location in the AEM.
We have now uploaded the DITA-OT zip folder with our custom plugin, but these changes are not yet in effect. To do so, follow the below steps,
- In AEM, navigate to Tools > XML Documentation > Dita Profiles or use below link http://localhost:4502/libs/fmdita/profiles/profiles.html
- Select the Default Profile or the desired profile, and click on the Edit Profile option from the top rail.
- Click Done for changes to take effect.
How to use it?
The custom DITA-OT plugin is in place. Now to use it, we can add the preset for the custom plugin individually for each ditamap or for all the ditamaps at once globally. Below I’ll be showing you the steps for the latter one.
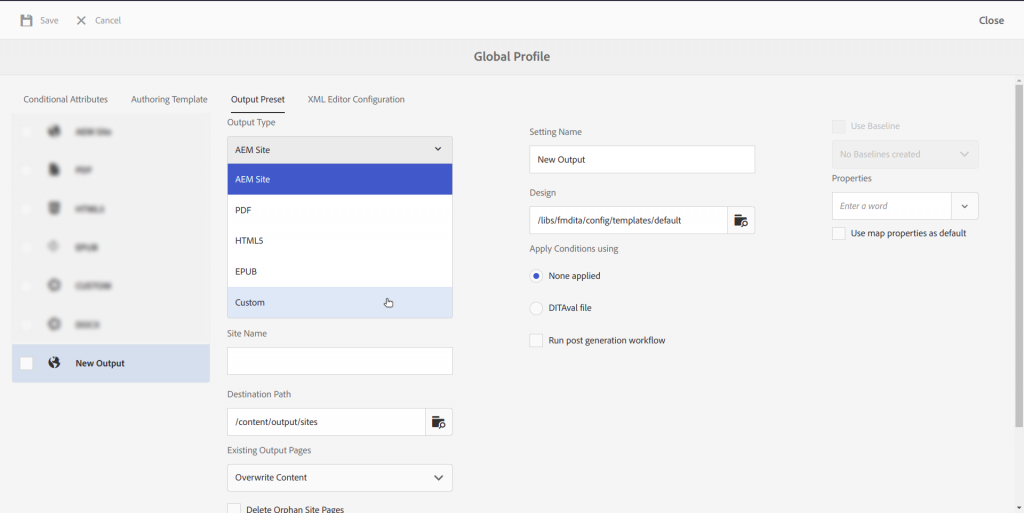
Adding Output Preset Globally (Configuring the Plugin for use)
- In AEM, navigate to Tools > XML Documentation > Folder Profiles or use the below link http://localhost:4502/libs/fmdita/folderprofiles/profiles.html
- Click open the Global Profile or the desired profile and navigate to the Output Preset section.
- From the top rail, select Create option which will add a new preset to configure.
- For the Output Type select the Custom option
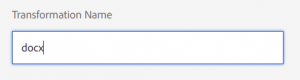
- Enter the transformation name for your plugin in the Transformation Name field. In our case, it is “docx”.
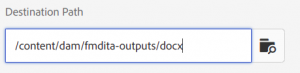
- Update the Destination Path field,
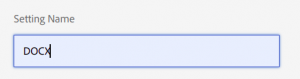
- Enter the label name for this output preset in the Setting Name field, In our case, it is “DOCX”. Click Save.
- For the Output Type select the Custom option
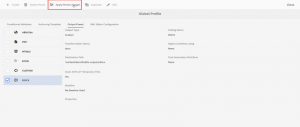
- To make that preset available on all of the ditamaps, select the checkbox next to the new preset (i.e DOCX) and click Apply Preset Changes from the top rail.
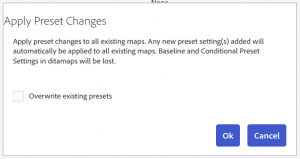
- When you click on Apply Preset Changes button, you will get an Apply Preset Changes pop-up, on which select the Ok option
- When you do that, you will be presented with the Confirm Action pop-up, again select the Ok option.
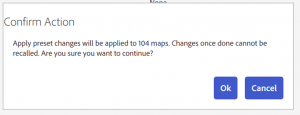
Note: It will take some time. It depends on the number of ditamaps you have in the folder.
Once the Apply Preset process is completed, you can open any ditamap and generate the output.
Conclusion
Following the above approach, you can integrate any custom DITA-OT plugin.