React is a JavaScript library that makes it painless to create interactive UIs. Unfortunately, embedding React into a Drupal site is not straightforward. In this article, I will show you relatively simple methods of how to do so.
React can be integrated with Drupal in 2 ways:
- Fully decoupled
- Partially Decoupled (Loosely Coupled)
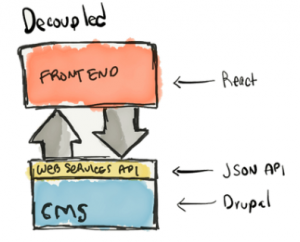
Fully Decoupled
In a fully decoupled CMS, the front-end and back-end are separated. We can also call this “Headless Drupal”.
The Drupal CMS handles the back-end. Initially, we need to set up our Drupal, build the content architecture and then expose this data as a web service API.
Once we are ready with the JSON API exposing the required data, we now need to set up our Front-end (React) to consume those APIs and display data in the application. This can be done by using create-react-app or by react webpack setup and axios for APIs.
Partially Decoupled (Loosely Coupled)
This approach will render your React app within a Drupal block. You could also put the React component into the theme. This method will allow you to include 3rd-party packages from npm, scale your application to many files and components, enable live editing in development mode, and help optimize things for speed and compatibility.
DON’T USE CREATE-REACT-APP
Create-react-app is a nice tool that generates scaffolding for a React application. It sets up a modern web app by running one command. But when we need to build react blocks to embed into drupal, create-react-app is not so great. For instance, We do not need a public folder that create-react-app provides in this case, as all of this is handled by drupal twig templating. Also, we do not need all the pre-installed dependencies.
WHAT TO DO
Goal
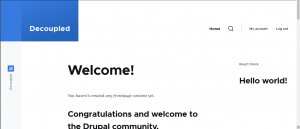
Connect a “Hello World!” React application to a Drupal theme or module.
Step 1: Create a custom module
In your custom module folder (/modules/custom) create a new folder for the custom module. Let’s call it react_module.
In the react_module folder, add an react_module.info.yml file to register your module.
name: React Module
description: Module for React code
package: Custom
core: 8.x
core_version_requirement: ^8 || ^9
type: module
Step 2: Enable the new module
Enable the module by navigating to Extend (/admin/modules) in the Manage administration menu.
Step 3: Setup React App
- Initialize a new react project inside /modules/custom/react_module/js/react-app.
npm init
This will generate a basic package.json. We will place all the react code inside this folder.
- Next, we want to install latest stable version of node:
nvm install node
node -v > .nvmrc
- Now we have to install all the required packages.
Dev dependencies:
npm install --save-dev @babel/core @babel/cli @babel/preset-env @babel/preset-react babel-loader webpack webpack-cli
Production dependencies:
npm install react react-dom
- Add a webpack config
This goes in a file called webpack.config.js.
const path = require('path');

const config = {
  entry: './src/index.js',
  devtool: (process.env.NODE_ENV === 'production') ? false : 'inline-source-map',
  mode: (process.env.NODE_ENV === 'production') ? 'production' : 'development',
  output: {
    path: path.resolve(__dirname, 'dist'),
    filename: 'app.bundle.js'
  },
  module: {
    rules: [
      {
        test: /\.js$/,
        exclude: /(node_modules)/,
        use: {
          loader: 'babel-loader'
        }
      }
    ]
  },
};

module.exports = config;
We are configuring a process here that’ll take our source index.js file, and pass them through different build steps that will ultimately output a single, optimized, .js file.
- Configure package.json
This tells webpack to either do a development (watch) or a production (build) build.
"scripts": {
  "build": "NODE_ENV=production webpack",
  "watch": "webpack --watch --progress"
}
Configure how Babel works in package.json.
"babel": {
  "presets": [
    [
      "@babel/preset-env",
      {
        "targets": {
          "browsers": [
            "IE >= 11",
            "last 3 versions"
          ]
        }
      }
    ],
    "@babel/preset-react"
  ]
}
After following these steps you’re all set to have Babel transpile your JavaScript so you can use JSX and ES6+ features in your code. Webpack will bundle your custom code along with the required React, and ReactDOM libraries, as well as any other libraries you include using npm, into a single JavaScript bundle.
Step 4: Create a basic React App
Put this in src/index.js. You can add other components within the render and scale your application to many files and components.
import React from 'react';
import ReactDOM from 'react-dom';

const root = ReactDOM.createRoot(document.getElementById('react-root'));
root.render(
  <h2>Hello world!</h2>
);
root.render() (i.e. virtual dom) will look for an HTML element with the ID react-root, and replace it with the HTML markup produced by your React code. This is also known as binding the React application to the DOM.
Step 5: Include your React app in Drupal
- Define a library for your React app.
In your module, add a react_module.libraries.yml file as follows:
react-lib:
  version: 1.x
  js:
    js/react-app/dist/app.bundle.js: { minified: true }
- Include the React app’s Drupal library and target markup on a page. The React app will put itself within the react-root div since we have used document.getElementById(‘react-root’) in Step 4.
There are quite a few ways to do this.
i) Using twig template (page, block, region etc):
{{ attach_library('react_module/react-lib') }}
<div id="react-root"></div>
ii) You can also use a render array to embed the app. For Instance, if you want to do things from a form alter:
$form['my_react_app'] = [
  '#markup' => '<div id="react-root"></div>',
  '#attached' => [
    'library' => [
      'react_module/react-lib'
    ],
  ],
];
iii) Define a block plugin
This will output the DOM element to bind to, and attach the React application asset library to that block. Then whenever the block appears on the page the React application will load.
Place this in modules/react_module/src/Plugin/Block/ReactBlock.php:
<?php
namespace Drupal\react_module\Plugin\Block;

use Drupal\Core\Block\BlockBase;

/**
 * Provides a 'ReactBlock' block.
 *
 * @Block(
 * id = "react_block",
 * admin_label = @Translation("React block"),
 * )
 */
class ReactBlock extends BlockBase {

  /**
   * {@inheritdoc}
   */
  public function build() {
    $build = [];
    $build['react_block'] = [
      '#markup' => '<div id="react-root"></div>',
      '#attached' => [
        'library' => 'react_module/react-lib'
      ],
    ];
    return $build;
  }
}
Clear drupal cache and the block will be available to place in any region. Go to /admin/structure/block and click on “place block” in the sidebar region and search for “React Block”. Place the block and it will be available on the page.
Step 6: Run
Let’s run a development build from within /modules/custom/react_module/js/react-app:
npm run watch
Running this command will run the watch build scripts in package.json (Step 3). It will listen for changes to any of the files in src and automatically rebuild the assets in dist/app.bundle.js.
Open / Reload the page containing the target div from twig or form (Step 5). You should see the “Hello world!” text in the target div.
To create the production build, run:
npm run build
Do this whenever you’re ready to deploy your changes, and then commit the updated files to Git.
Final Folder structure:
+-- react_module
| +-- react_app.info.yml
| +-- react_app.libraries.yml
| +-- react_app.module (Defines Drupal hooks like hook_page_attachments or hook_form_alter)
| +-- js
| | +-- custom.js (Defines Drupal Behaviors)
| | +-- react-app
| | | +-- dist/
| | | | +-- app.bundle.js
| | | +-- node_modules/
| | | +-- src
| | | | +-- index.js
| | | +-- package.json
| | | +-- package-lock.json
| | | +-- webpack.config.js
Note: If any of the changes are not reflected on page refresh, try clearing browser or Drupal cache.
Further for your understanding
- Try to add a React component to the page via a custom theme.