What is Robot Framework?
Robot framework is a comprehensive open-source automation framework for robotic process automation, acceptance testing, and acceptance test-driven development. It employs a keyword-driven testing method strategy. Test libraries that are implemented in either Python or Java can expand the possibilities.
- Robot Framework is a generic test automation framework for acceptance testing.
- It is Acceptance Test Driven Development (ATDD)
- It utilizes the keyword-driven testing approach internally.
- Provide test libraries implemented either with Python or Java, and users can create new higher-level keywords from existing ones using the same syntax that is used for creating test cases.
- Not much programming knowledge required
About Robot Framework
All the capabilities that (Cucumber + TestNG) offers are included in this Framework. This framework already includes a number of libraries that make it easier to create automated tests without having to write a lot of repetitive code. Additionally, Python programming gives you the opportunity to create your own libraries.
It’s not only about libraries; with the help of this robust automation platform, you can automatically generate Rich HTML reports, log data, failure screenshots, and much more without writing a single line of code.
Components of Robot Framework
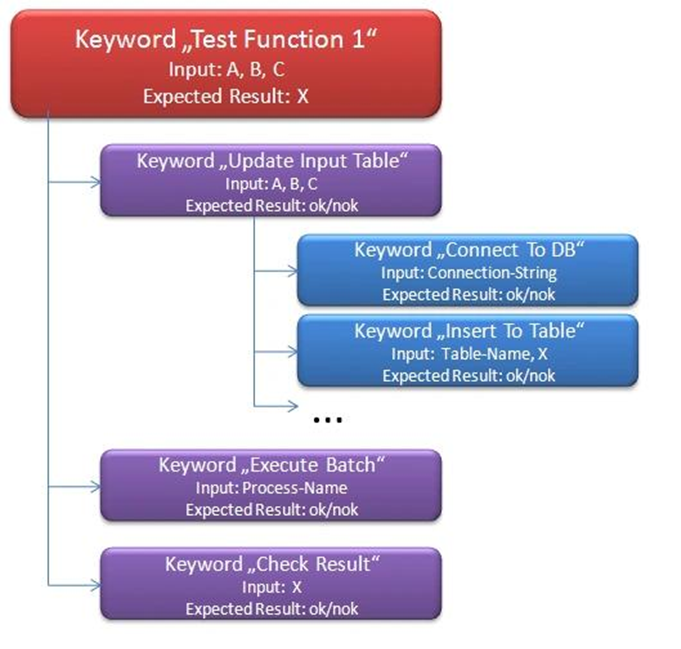
What means keyword-driven testing? When I use, the term “keyword is,” I mean a function or a method. The truly awesome and powerful part about this right now is that one keyword can be defined from other keywords and so on. Because of this, we frequently discuss:
Higher-level keywords:
Those are really testing a concrete aspect of the business logic of the system under test.
Lower-level keywords:
To keep the implementation of the higher-level keywords at a decent size one is often breaking down the required functionality to several lower-level keywords.
Technical keywords:
Those provide the technical implementation to access and thus test the system.
The following figure depicts this based on an example keyword.
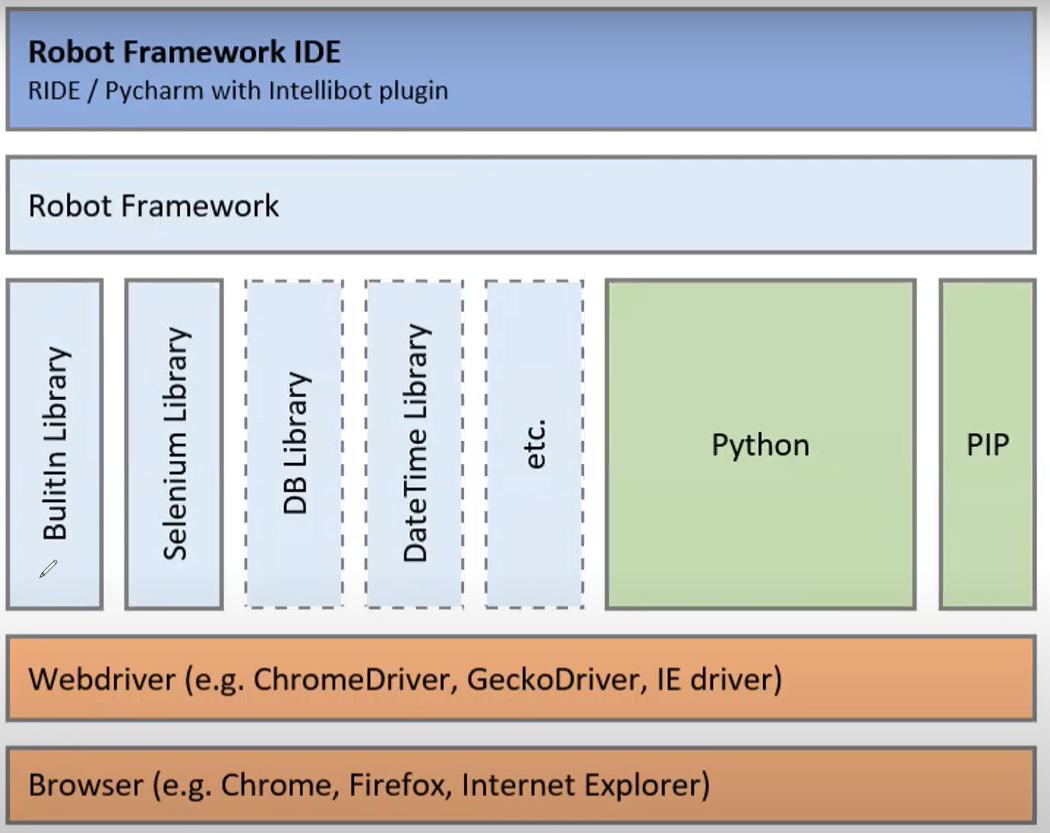
Robot Framework Architecture
The robot framework is platform-independent, Although the core framework is implemented using python it can also run on JPython(JVM) and IronPython(.NET).
Now, let’s talk about Installation, Setup, Execution, and Reporting
Setup and Installation
These instructions cover installing Robot Framework and its preconditions on different operating systems. If you already have Python installed (if not, please install python first and set the environment path), you can install Robot Framework using the standard package manager pip:
Before proceeding with the following instructions, please install Python and Pycharm IDE.
Now, open the command prompt/terminal and type the following commands one by one.
-
pip install selenium
-
pip install robotframework
-
pip install robotframework-seleniumlibrary
-
pip install webdriver-manager
Once you are done with the successful installation above,
- Create New Project in your machine (for ex. RobotFramework)
- Open created a project in Pycharm IDE &
- Add the following packages to the project interpreter
- selenium
- robot framework
- robotframework-seleniumlibrary
- webdriver-manager
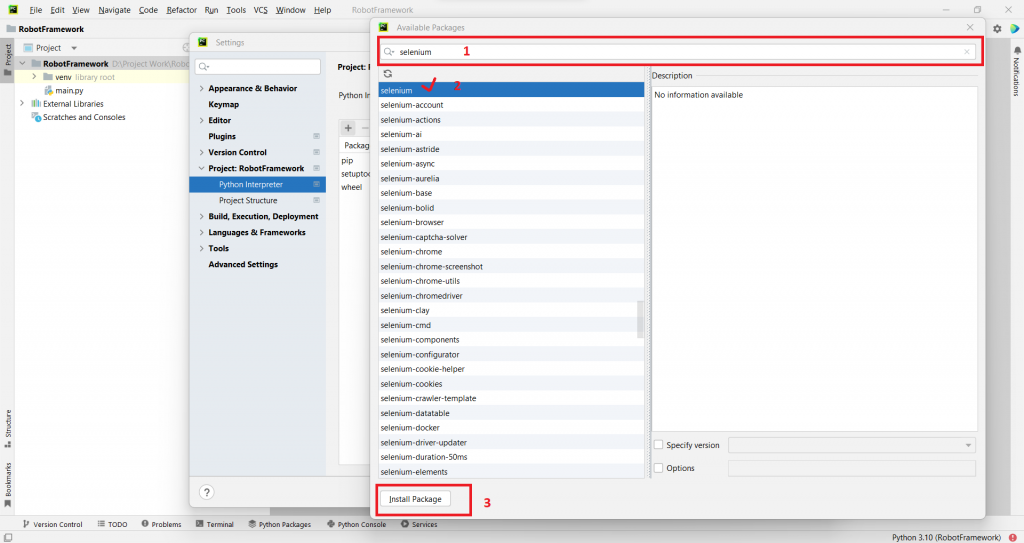
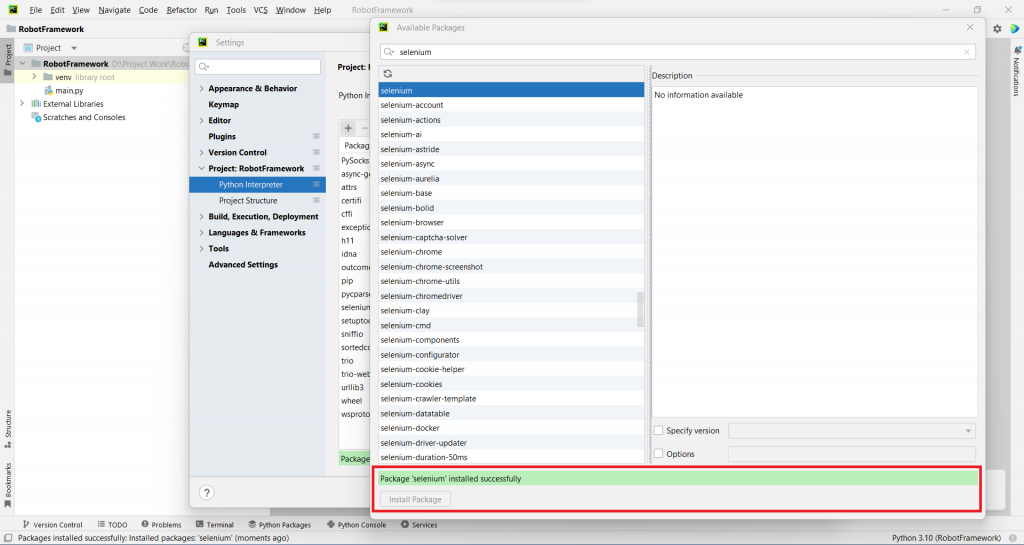
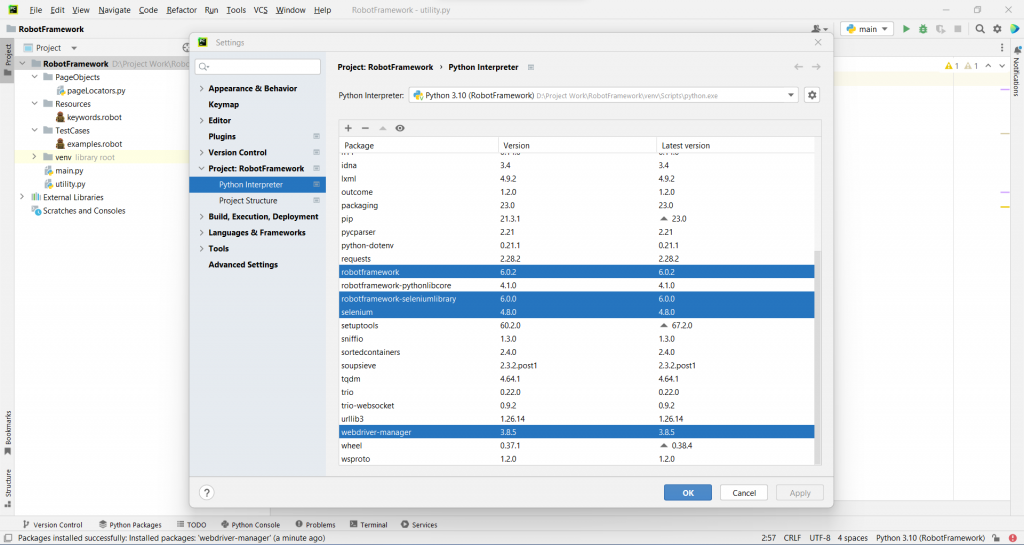
To add the above packages to the project interpreter, please follow
- Click on your project -> click on File Menu -> Open Settings -> (One Dialogue should open)
- Click on Project and click on Python Interpreter and click on the + icon
- Then type the package name and select the required from the list and click on Install Package
For more details, please follow the following slides:
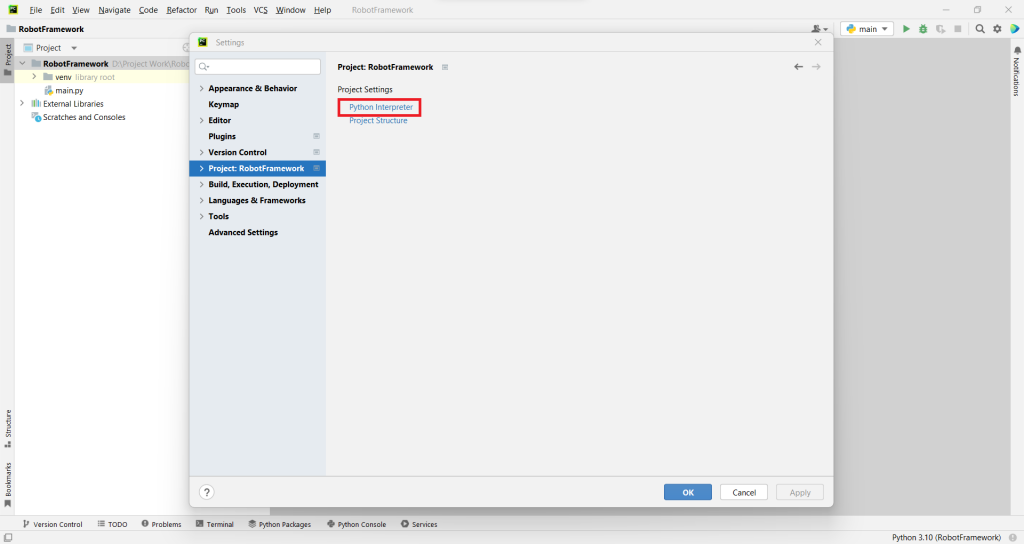
Package installation slide 1

Package installation slide 2
Package installation slide 3
Package installation slide 4
Package installation slide 5
The above slides demonstrate the package installation in the project interpreter. I have added slides for Selenium Package, with the same approach, you can add the remaining packages as mentioned above.
Once you are done with installing all the packages, we are ready to write test scripts for Automation.
Implementation
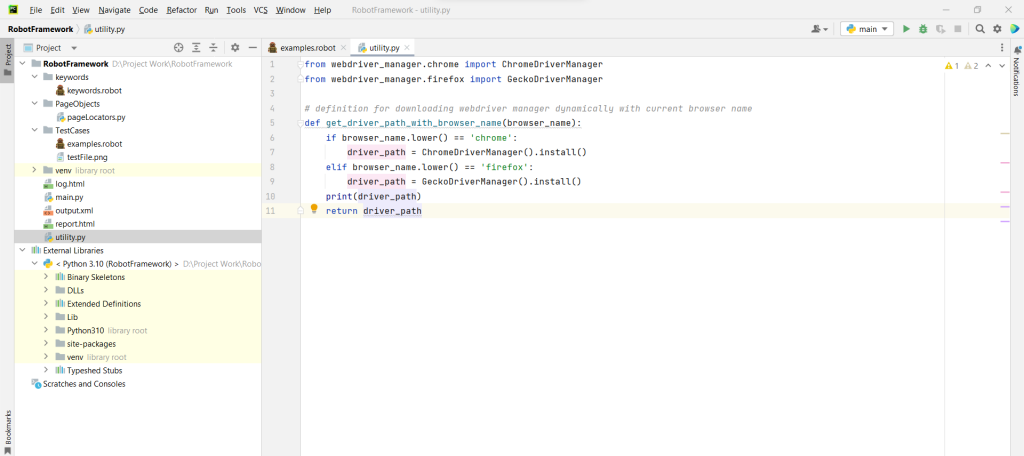
Create a file in your project at the root with the name utility.py (here we are going to define required functions, like getting webdriver binary instance)
Create a folder in your project at the root with the name PageObjects. Inside this folder, create a file, pageLocators.py (here we are going to define all the web elements/locators)

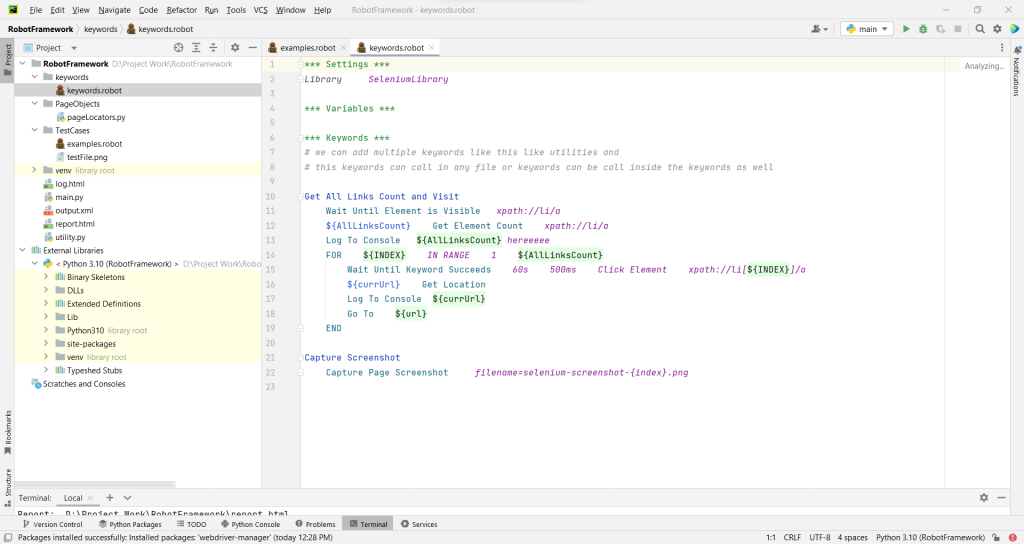
Create a folder in your project at the root with name keywords. Inside this folder create a file, keywords.robot (here we are going to add all the keywords/functions)
Create a folder in your project at the root with the name TestCases. Inside this folder create a file, example.robot (here we are going to add our Tests and Validate them)
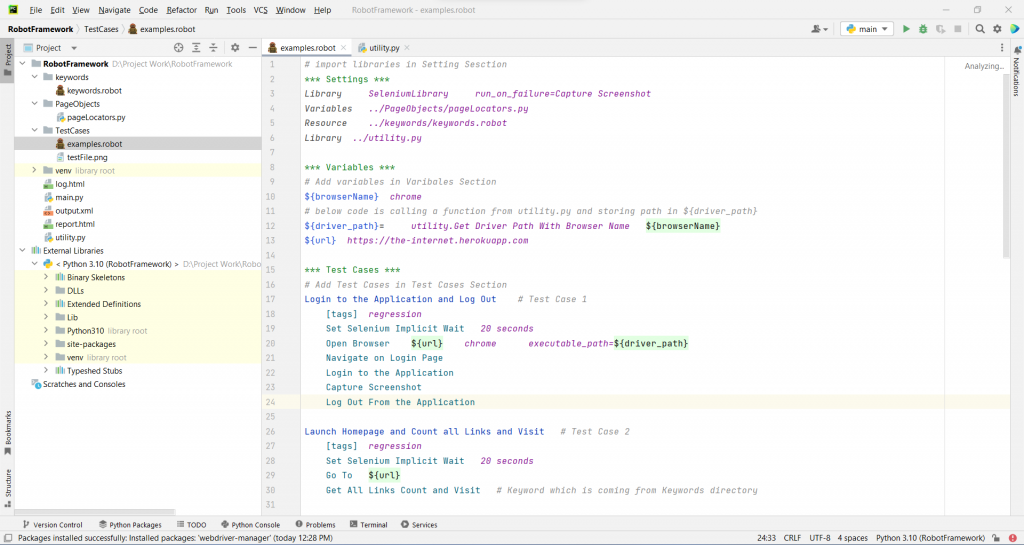
Example: test case slide 1
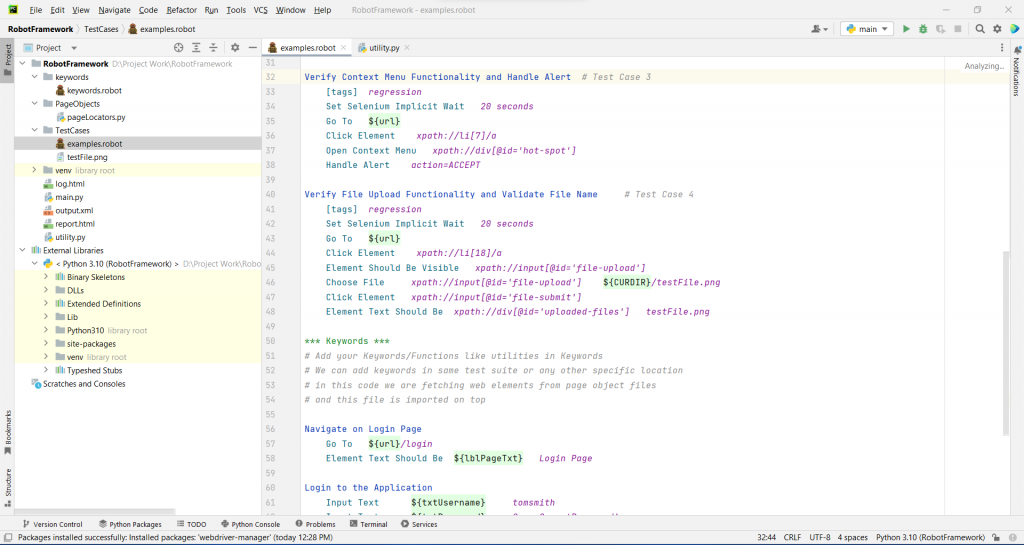
Example: test case slide 2
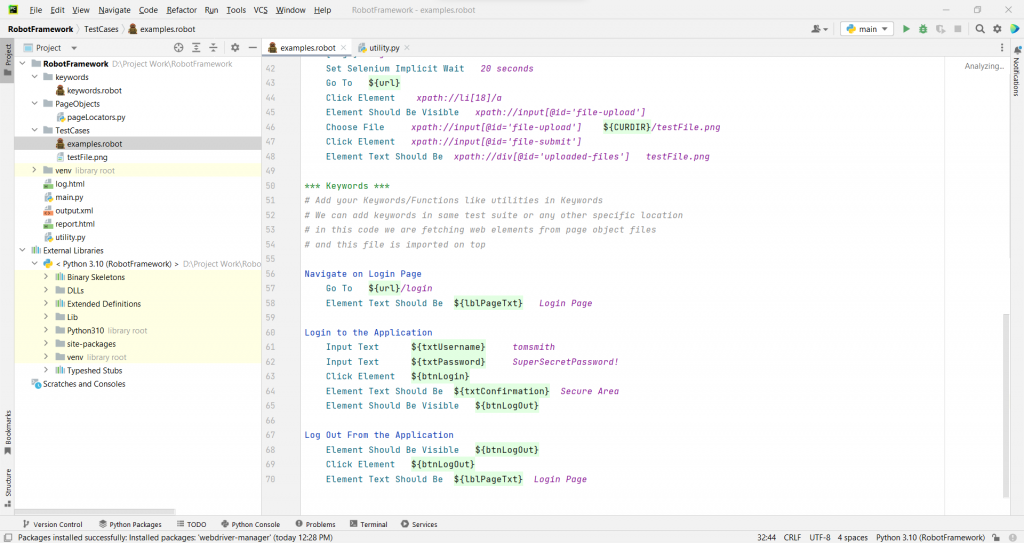
Example: test case slide 3
So now let’s understand a few things about the above code:
In the given Test Suite example.robot has four test cases automated with different sets of validations. Here I have tried to show both the ways to declare web elements i.e. we are fetching web elements for a few tests from the PageObjects folder, and a few web elements are added inline. that is just for your understanding however, professionally, we should add those inside the PageObject folder page by page.
I also created a few keywords in the same Test suite, and a few were called from the Keywords folder; here again, the same thing which we just discussed above related Page Objects. We can create many Keywords as required under the *** Keywords *** section in the same file or any other location like the Keywords folder. These keywords can use inside the keywords as well, so it doesn’t have any limitations to use, and it’s the best thing Robot Framework provided.
In the test cases, you see there are four sections,
First Section is *** Settings ***, here we have imported all the libraries and resources I have added.
The second Section is *** Variables ***, here we have added all the Variables simply as we declare any other frameworks, also we can import Variables from other files too.
The third Section is *** Test Cases ***; here, we have added all the Test Cases and Validated them. I have added four sample test cases for understanding you can go ahead and add as you need. In these Test Cases, I mostly called the Keywords (Predefine or Customized Keywords). Also, I have added tags to each test case that will help you to run a particular type of tag like (run only regression/sanity)
The fourth Section is *** Keywords ***, here I have created a few keywords which were used above in test cases.
Executions
To run the above test cases, open the terminal (Alt+F12) in your Pycharm IDE, type the following command, and press enter.
robot TestCases\examples.robot
To run the above test cases using the tag name then, type the following command (this will execute matching tags only)
robot --include regression .
Reporting
Robot framework supports good reporting where we can check many things as follows:
Once you run your test scripts, the report.html file will be created in your directory, you just need to open it in a browser.

Report: Part 1, Test Case wise statistics

Report: Part 2, Detail Test Case wise logs
Source Code Link
https://drive.google.com/drive/folders/18dwpEBGQ5LXDLehFsZf0tnzRTHJlBzrM?usp=share_link
Conclusion
The test cases in Robot Framework are based on keywords written in tabular format, which makes it clear and readable, and conveys the right information about the intention of the test case. For example, to open a browser, the keyword used is “Open Browser.”
If you have any queries or feedback, please let me know in the comment section,
Thank You!